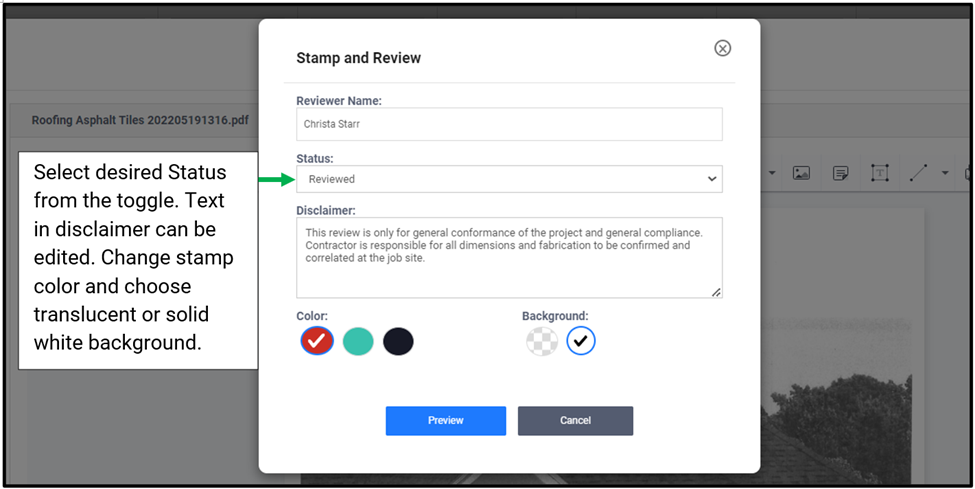
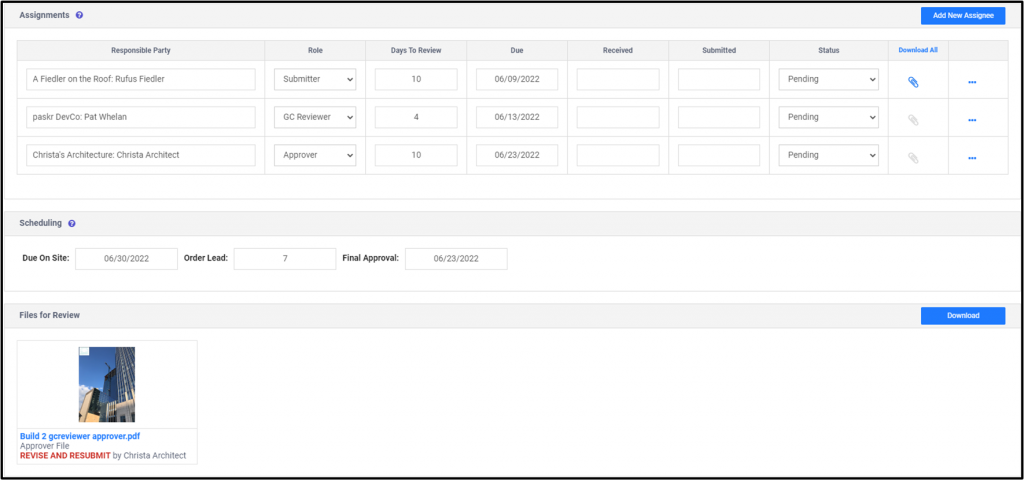
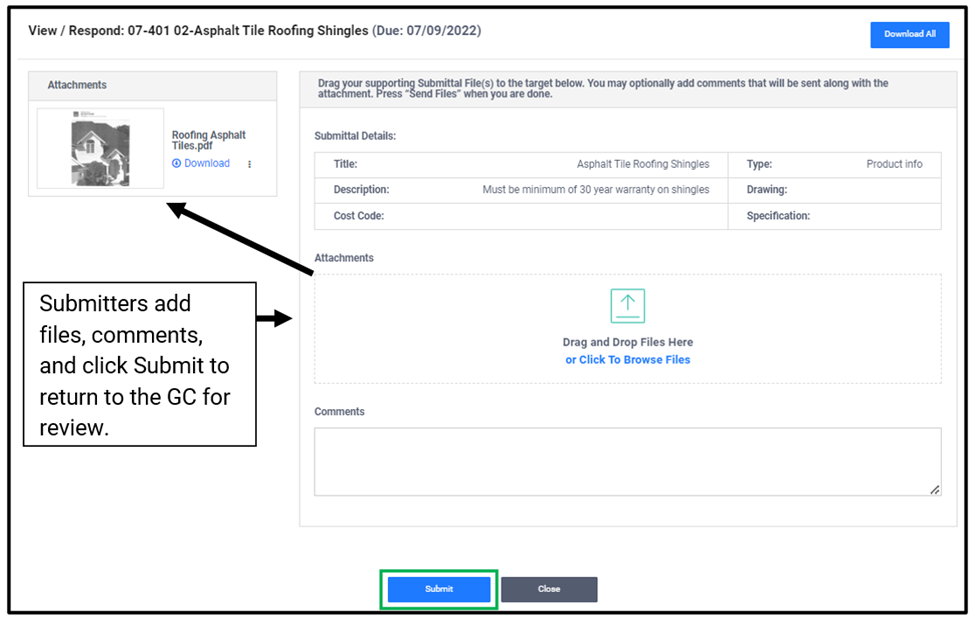
How do I Work with Submittal Scheduling?

Scheduling

Placing a Final Approval date or a Due on Site date into the Scheduling section of the Submittal will calculate all the due dates for each user in the Assignments section.

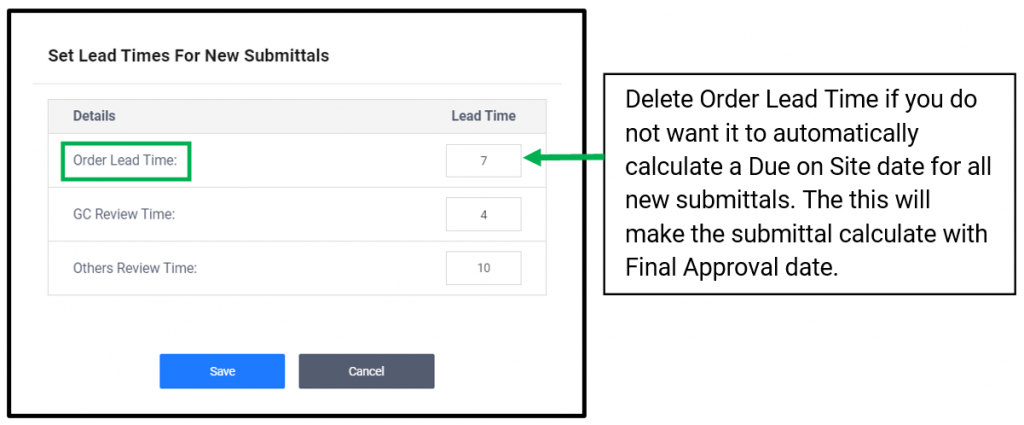
NOTE: Due on Site date is not required if the Submittal item does not need to be ordered or delivered to the project location. If you do not want to use Due on Site field place a zero in the Order Lead time field. The default Order Lead time comes from Settings and can be changed (see below).

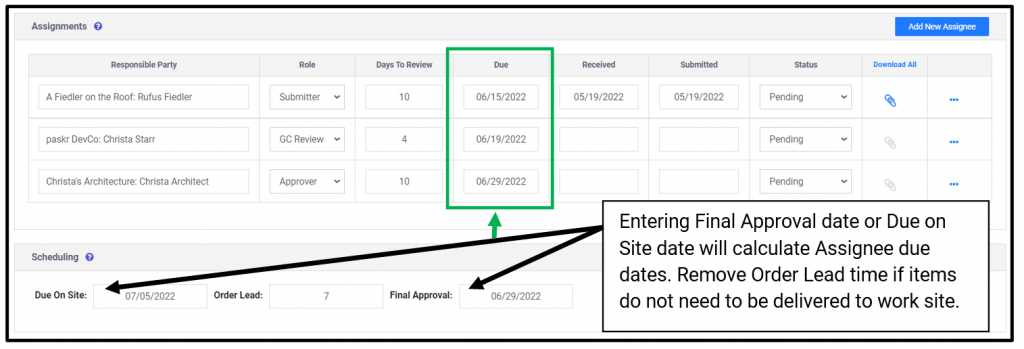
  • Due on Site: This is the date the material is due on the job site. It is not a required field, but will calculate if the Submittal as an Order Lead time entered.
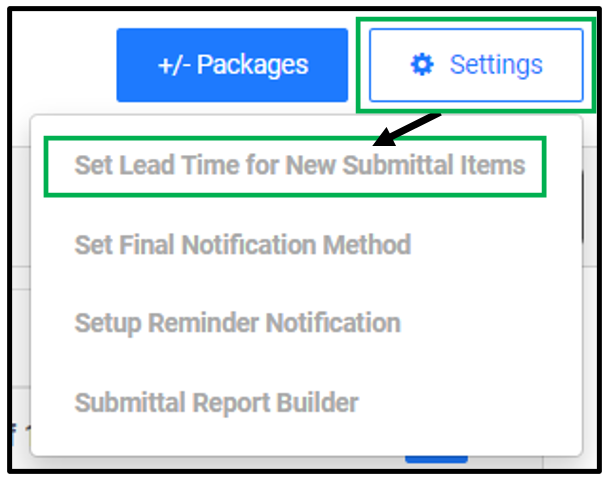
  • Order Lead: This is the order lead time for the materials. This is a default setting that can be changed under Settings>Set Lead Time for New Submittals. If can be set to zero if you prefer to enter a custom Order Lead time for each Submittal.
  • Final Approval: This is the date approval is needed from the final Approver in order for the project to remain on schedule. This date is used to back calculate the due dates for all other Assignees based on their Days to Review in the assignments section. Days to Review is also a default setting that can be changed under Settings>Set Lead Time for New Submittals>Days to Review for GC and Others.

How Do I Create Submittal Packages

Click on Submittals on the left hand Navigation and select the blue +/- PACKAGES button.

Add Packages

There are a few ways to add a package to a submittal

Click on a package on the left and it moves to the right to the submittals used in the job section

or use the search bar to search for a package. Then click on the package to move it from left to right

Once the Submittal used in job section is complete, click Done.

Add Custom Packages

Type in a package Number and package name then select Add Custom.

TIP: You can add all cost coded in your project by clicking on, Add All Packages in Job. Click Remove all Packages Without Items to delete those that have no Submittals created in them.

How do I add Submittal Items to my Submittal Packages?

To add a submittal item to a submittal package click on the blue plus sign to the right of the package.

Building submittal packages

Can I Delete Default Submittal Items?

Default Submittals items that have been saved from Project Submittals can be reviewed and deleted under Administraton> Default Settings>Default Submittal List

Select the Package you would like to edit, and the items within the default package will appear to the right.

Use the Trashcan icon to delete these default items you no longer need. This action is permanent, so any items deleted accidentally will need to be created again and saved as defaults from a project submittal area.

Can I turn Submittal Reminders On/Off?

Submittals Reminders can be controlled from Submittals> Settings> Setup Reminder Notifications.

Submittal reminders will default to the ON status and will be sent 48 hours prior to the Submittal due dates for each individual.

The Delivery Period (in Hours) can be changed.

Reminders can be turned OFF by clicking so that the blue highlight moves to the Off side, and the set Period option will disappear. Click Save to commit any changes.

How Does the Owner View/Respond to a Submittal?

There are two ways to repond to a Submittal, by clicking the link in the request email or by logging into the portal if you have multiple items to review.

Email

Follow the magic link in the email to open the Submittal.

This image has an empty alt attribute; its file name is image-60-1024x368.png

Login

  • Log into the GCs portal
  • Select the Submittal tile
  • Navigate to the project
  • Click on the ellipses next to the Submittal
  • Click on View/Respond
This image has an empty alt attribute; its file name is image-4-1024x481.png

Choose the project

This image has an empty alt attribute; its file name is image-5-1024x118.png

Stamp and Annotate

Both clicking on the email link or the View/Respond when logged in will open to the same Submittal area, where the Owner can use the Stamping and Markup tools to Approve/Reject each Submittal document.

If Owner would like to download to stamp using their own preferred method, the Download and Upload buttons are located directly above the files on left.

Stamping Features

  • Annotation tools allow for regular markups including highlights, shapes and text.
  • Use the Page Shuffle to add a blank page or import other documents to combine and sort.
  • Click Stamp to use the stamping feature to Approve or Reject each file.

Page Shuffle

  • Add new blank page
  • Import other documents and Save to sort those pages in the combined file.
  • Move or Delete Pages and Save

Stamp

  • Go to the pagewhere you would like to place the Stamp.
  • Click Stamp button to open Stamp information.
  • Name and default Disclaimer text will populate, but can be edited.
  • Select the Status you wish to apply to the file.
  • Approvals – Selecting any of these will moved the submittal along to the next party
    • Approved
    • Aproved as Noted
    • Reviewed
    • Reviewed as Noted
  • Rejections – Selecting of these statuses will immediately close the current item and create a new item with an added letter and begin the entire process again.
    • Rejected
    • Revise and Resubmit

Preview the Stamp for Accuracy

  • Click Apply for Stamp to appear and position on document.
  • Resize the stamp from corners. Click and drag to reposition on document.
  • If you need to make changes, click on the stamp and use Delete on keyboard to remove. Click Stamp again to open, adjust and Apply again.
  • Stamp all files with a Status to complete your review.
  • Click Submit at bottom to send submittal on to the next party with the automated process.

Helpful Hints:

If you choose to use the Stamp/Markup feature, you will be required to mark an approval status on ALL attachments, as these files will be saved and displayed for the next user in the workflow. This could be a second Approver or if you are the Final Approver, the GC will be notified or the Approvals will be automatically distributed depending upon the GCs selected preference.

If you change your mind and wish to switch to Download and Upoad method, all annotations will be deleted.

How do Approvers Respond to Submittals?

When Approval requests are sent out from Submittals module, the user can click the link and respond and use the Stamping and Markup features directly from the magic link in the email. Approvers can also log into their portal if they have a number of Submittals to process, or if they wish the system to save custom text for their markup stamps.

Clicking on the email link will open the Submittal where the Approver can use the Stamping and Markup and tools to Approve each submittal document.

If Approver would like to download to annotate stamp using another method, the Download and Upload buttons are located directly above the files on left.

Stamping Features

  • Annotation tools allow for regular markups including highlights, shapes and text.
  • Use the Page Shuffle to add a blank page or import other documents to combine and sort.
  • Click Stamp to use the stamping feature to Approve or Reject each file.

Page Shuffle

  • Add new blank page
  • Import other documents and Save to sort those pages in the combined file.
  • Move or Delete Pages and Save

Stamp

  • Go to the pagewhere you would like to place the Stamp.
  • Click Stamp button to open Stamp information.
  • Name and default Disclaimer text will populate, but can be edited.
  • Select the Status you wish to apply to the file.
  • Approvals – Selecting any of these will moved the submittal along to the next party
    • Approved
    • Aproved as Noted
    • Reviewed
    • Reviewed as Noted
  • Rejections – Selecting of these statuses will immediately close the current item and create a new item with an added letter and begin the entire process again.
    • Rejected
    • Revise and Resubmit

Preview the Stamp for Accuracy

  • Click Apply for Stamp to appear and position on document.
  • Resize the stamp from corners. Click and drag to reposition on document.
  • Click on stamp and use Delete on keyboard if you wish to make changes. Click Stamp again to open, adjust and Apply again.
  • Stamp all files with a Status to complete review.
  • Click Done at bottom and return to Submittal to Save and Submit to the next party with the automated process.

Helpful Hints:

If you choose to use the Stamp/Markup feature, you will be required to mark an approval status on ALL attachments, as these files will be saved and displayed for the next user in the workflow. This could be a second Approver or if you are the Final Approver the GC will be notified or the Approvals will be automatically distributed depending upon the GCs selected preference.

If you change your mind and wish to switch to Download and Upoad method, all annotations will be deleted.

How Does the Architect View/Respond to a Submittal?

There are two ways to repond to a Submittal, by clicking the link in the request email or by logging into the portal if you have multiple items to process.

Email

Follow the magic link in the email to open the Submittal.

This image has an empty alt attribute; its file name is image-60-1024x368.png

Login

  • Log into the GCs portal
  • Select the Submittal tile
  • Navigate to the project
  • Click on the ellipses next to the Submittal
  • Click on View/Respond

Stamp and Annotate

Both clicking on the email link or the View/Respond when logged in will open to the same Submittal area, where the Architect can use the Stamping and Markup tools to Approve/Reject each Submittal document.

If Architect would like to download tostamp using their own preferred method, the Download and Upload buttons are located directly above the files on left.

Stamping Features

  • Annotation tools allow for regular markups including highlights, shapes and text.
  • Use the Page Shuffle to add a blank page or import other documents to combine and sort.
  • Click Stamp to use the stamping feature to Approve or Reject each file.

Page Shuffle

  • Add new blank page
  • Import other documents and Save to sort those pages in the combined file.
  • Move or Delete Pages and Save

Stamp

  • Go to the pagewhere you would like to place the Stamp.
  • Click Stamp button to open Stamp information.
  • Name and default Disclaimer text will populate, but can be edited.
  • Select the Status you wish to apply to the file.
  • Approvals – Selecting any of these will moved the submittal along to the next party
    • Approved
    • Aproved as Noted
    • Reviewed
    • Reviewed as Noted
  • Rejections – Selecting of these statuses will immediately close the current item and create a new item with an added letter and begin the entire process again.
    • Rejected
    • Revise and Resubmit

Preview the Stamp for Accuracy

  • Click Apply for Stamp to appear and position on document.
  • Resize the stamp from corners. Click and drag to reposition on document.
  • If you need to make changes, click on the stamp and use Delete on keyboard to remove. Click Stamp again to open, adjust and Apply again.
  • Stamp all files with a Status to complete your review.
  • Click Submit at bottom to send submittal on to the next party with the automated process.

Helpful Hints:

If you choose to use the Stamp/Markup feature, you will be required to mark an approval status on ALL attachments, as these files will be saved and displayed for the next user in the workflow. This could be a second Approver or if you are the Final Approver the GC will be notified or the Approvals will be automatically distributed depending upon the GCs selected preference.

If you change your mind and wish to switch to Download and Upoad method, all annotations will be deleted.

What Happens when a Submittal is Rejected?

When I submittals is set to Rejected or Revise and Resubmit by a GC Reviewer or an Approver, that Submittal item is immediately closed and a new Submittal Item is created with a letter appended to it and the entire process begins again.

The rejected submittal will then be nested beneath the the new Submittal item, but the item will change to a blue hyperlink. This can be selected to expand and view the previously rejected files if needed.

This new Submittal will have a letter appended to the number and the same assignments, as well as the rejected file attached for review. The GC will Resend the submittal request to the Submitter to collect the corrected Submittal information.

This image has an empty alt attribute; its file name is image-2-1024x480.png

The Submitter will be prompted to Replace any rejected files on the new magic link they receive.

Any files that are marked with any of the approved statuses will remain and will not need to be replace or reviewed again.

This image has an empty alt attribute; its file name is image-24-1024x492.png

How Do Subs Return A Submittal that has Been Requested By The GC?

There are two ways for subcontractors to return a submittal. Through email or by logging into their portal.

Email

They can follow the magic link in the email to return a submittal.

They can drag and drop files or browse computer to add the files, add comments and click Send to return the required documents to the GC for review.

Log into Portal

Subcontrators with multiple submittals can easily submit by logging into their portal where they sign contracts and submit their billing documents.

  • Login
  • Navigate to the Submittal tile
  • Select the project name from the provided list

Click on the ellipses and then select View/Respond to open the same upload area as the emailed Magic link.

Add any files and comments needed

Resubmit after a Rejection

If a GC Reviewer or Approver chooses Rejected or Revise and Resubmit on any submitted file, that item will be closed and a new Submittal Item with a letter will be created automatically. The rejected submittal will be nested beneath the new submittal for reference.

This new Submittal will have a letter appended to the number and the same assignments, as well as the rejected file attached for review. The GC will Resend the submittal request to the Submitter to collect the corrected Submittal information.

The Submitter will be prompted to Replace any rejected files on the new magic link they receive.