

- Home
- Upcoming Live Training Sessions!!
- Webinar Recordings
- Implementation Courses
- Getting Started Guide For Admins
- RedTeam Go Navigation
- Gear Icon
- Administration
- Contacts
- Projects
- Planroom
- Estimate (Base Bid)
- Bid Invitations
- Proposal Package
- Construction Buy Out
- Contracts
- Daily Logs
- Photos
- Billing
- Schedules
- Submittals
- Transmittals
- Request For Information (RFI)
- Potential Change Orders (PCOs)
- Change Orders
- Owner Change Orders
- Subcontractor Change Orders
- Internal Change Orders
- Meetings
- How Do I Add Meetings?
- Close Out
- Job Costs (Purchase Orders & Expenses)
- Required Documents
- Accounting
- Reports
- Superintendent
- Subcontractor
- Architect
- Owner
- Mobile
- Release Notes
- Glossary of Terms
- Accounting
Hello. How can we help you?
How do Expenses Work for a PM?
The Expenses Module allows costs for projects to be added through the Web Module or RedTeam Go Mobile App. Superintendents and those in the field can submit items from the mobile platform, Project Managers Approve the Expenses and Field Purchase Orders to add to project costs. Accountants can Accept Expenses/ Field Purchase Orders. Acceptance will push those values to an existing Accounting Integration.
To work with Expenses as a PM go to Accounting>Expenses to Access the Expenses List Screen.
- Use the Caret Symbol to expand or roll up Expenses and PO by Project.
- Use Ellipses to Print, Edit or Approve each Expense and Purchase Order.


- Use Filter icon to view only your Projects or switch between Approved and Unapproved Expense records.

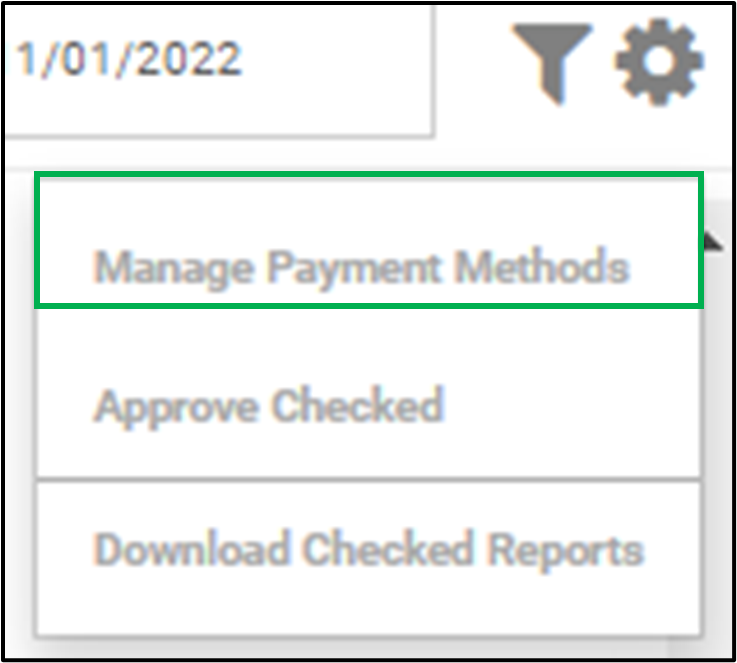
Use the Gear icon to work with the Payment methods that will be selected for each Expenses/ Field PO, approve in Bulk and download reports in bulk.


How to set up Payment Types for Field Expenses and Purchase Orders
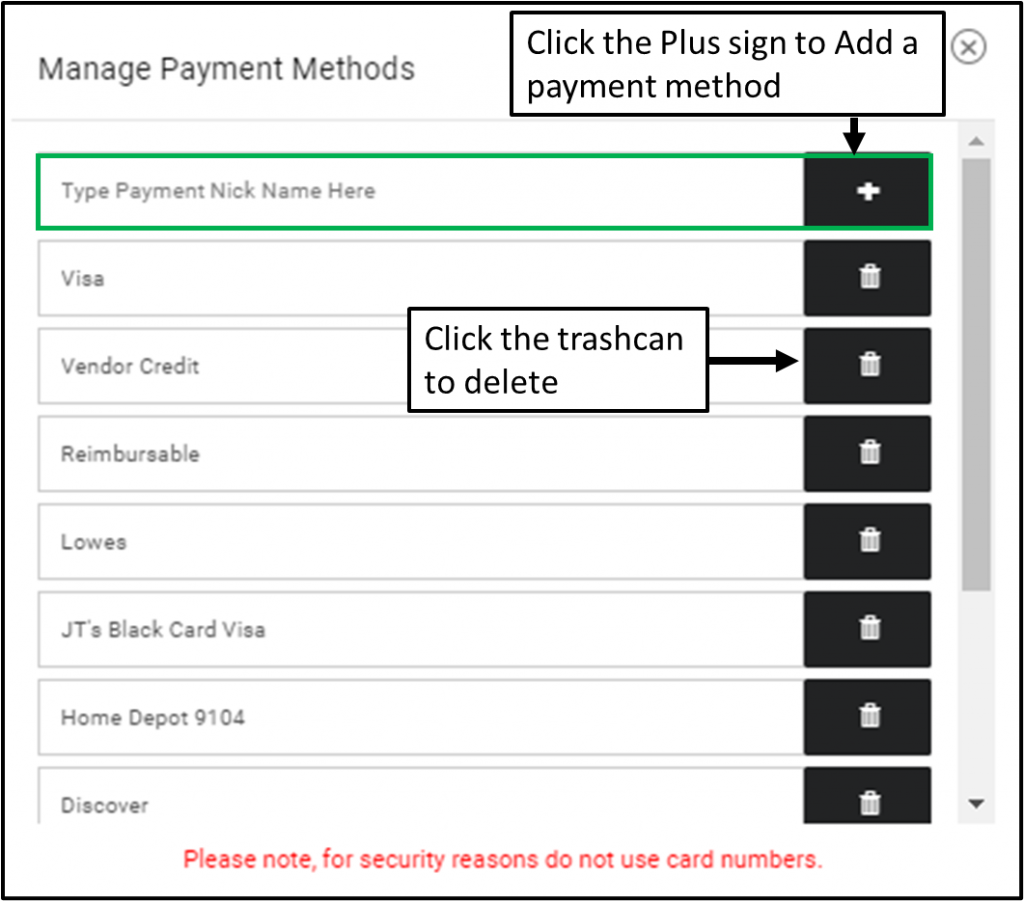
Payment Types can be entered for all company issued credit accounts, so that when Field Expenses and Purchase Orders are created the employee can select which method of payment they used for their purchase.
On the top navigation menu click on Accounting>Expenses.
Click on the Gear Symbol and select Manage Payment Methods.
Type in Payment Type Nick Name and click on + sign to add. Repeat as necessary.
Click the Trash Can to delete a payment type.
How can we turn off Sub Billing Notarization?
You can turn off this option by having the GC employee with Notary
- Go to Accounting > Approve Sub Billing
- Click on the Settings Gear Icon
- Check the box that says ‘Do Not Notarize Subcontractor Billing’
- This will remove the Liens to Notarize Quick Link from view and will not apply the Notary seal when they Accept Sub Bills under the Digital Lien setting.


This option to turn off Sub Billing Notarization is for GCs who may Notarize Owner Bills but either do not require Lien releases from subcontractor, do not need to Notarize signed Liens or who cannot digitally notarize liens in their jurisdiction.
How Can I enter a Sub Bill for a Subcontractor?
You can enter Sub Bills for Subcontractors with a locked/signed agreement who will not participate in Sub Billing through their portal. The bills prepared this way will use the existing cost code layout as the Schedule of Values (SOV), even if you have the custom SOV rule set under Accounting>Billing>Billing Requirements.
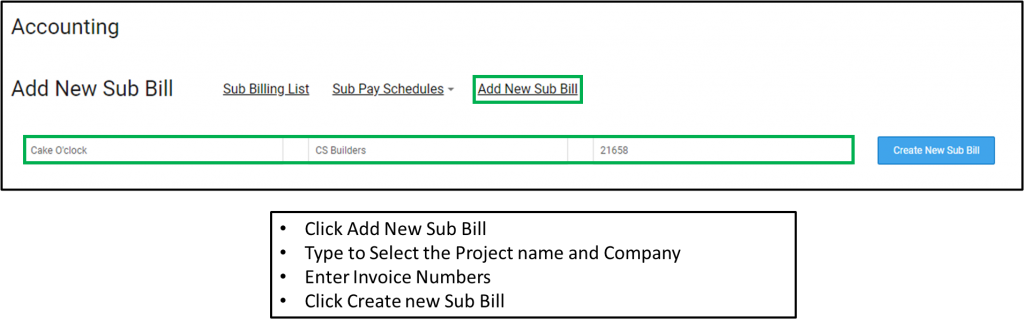
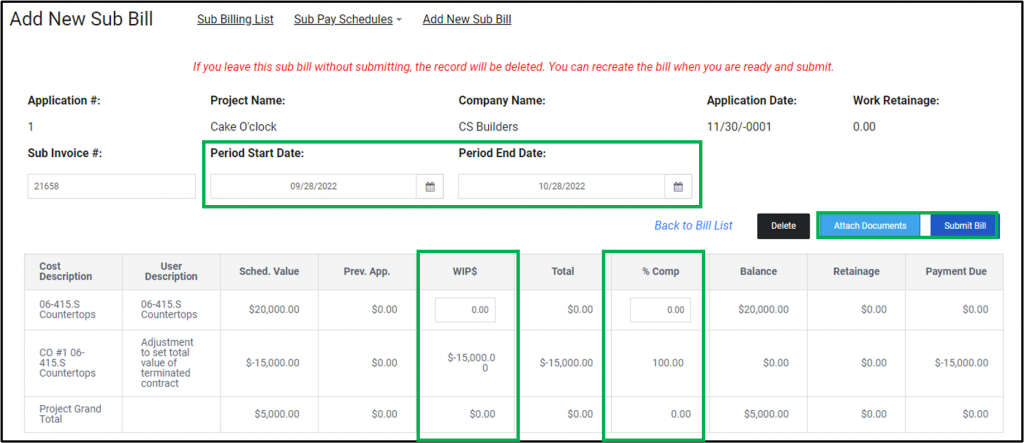
Click Accounting>Billing>Add New Sub Bill
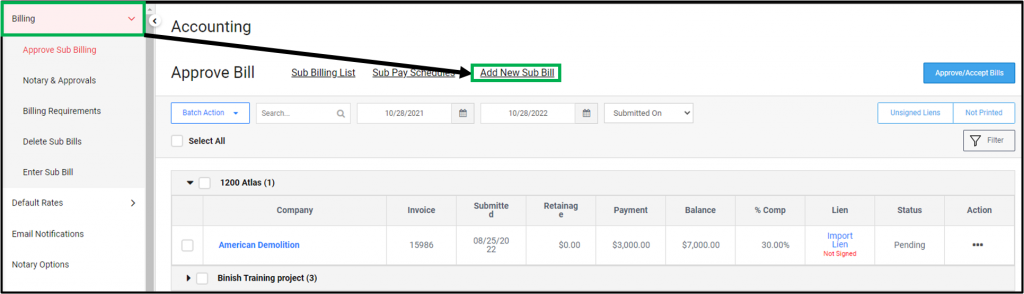


- Set the Billing Date Period
- Enter bill amounts, either in Work in Progress (WIP$) column or enter a Percent Complete in the % Comp Column. These two cells are linked, entering a value in one will automatically complete the other.
- Attach any supporting document, such as a copy of the bill you received from Subcontractor outside the RedTeam Go system. Even if you attach a bill, you will still need to enter the correct billing values.
- Submit Bill when complete
- Sub Bills entered this way will automatically go to the Approved status since they are entered by a GC employee.
How can I Delete a Sub bill?
While an incorrect Sub bill can always be returned to a subcontractor to Edit, sometimes it is easier to simply Delete a billing and start over. To delete a subcontractor billing you:
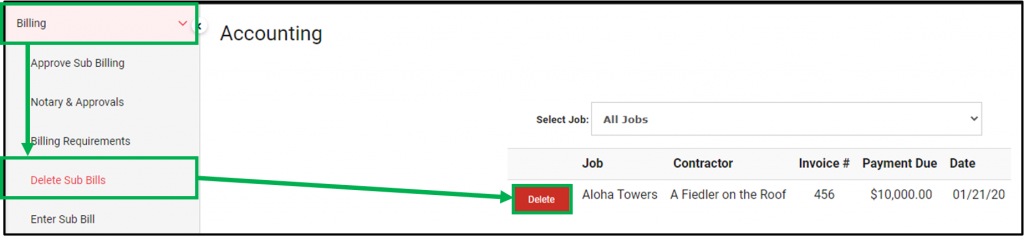
- Click on Accounting>Billing>Delete Sub billing to access the list of billings.
- Locate the correct bill and select Delete.
NOTE: If you choose to Delete a bill that has later bills already submitted, these bills must all be deleted. Since each bill is based on the previous pay application, the calculations would be incorrect.
What notification emails does the accountant receive?
See below for a list of emails the Accountant will receive as the project moved forward in Status, and as money is moved during the course of the project.

If the accountant does not wish to receive email notifications on the topics above, they can go to Accounting>Email Notifications>uncheck the box next to the notification email, and it will no longer be sent when that task is performed.
NOTE: This is a Global Setting so the option to send or not send will apply to all Accountants at your company. Certain actions will still permit the PM to select an Accountant and send the notification e-mail anyway. If you are receiving these notifications and do not want them, let your Project Managers know they do not need to check the Accountant’s name and/or send the notification e-mail if they can dismiss it without sending.
How do I Accept Sub Bill as an Accountant if my Company uses Hand Signed Lien Releases?
ACCOUNTANT GENERAL INFORMATION
Accountant-level approval for Sub Billing is called Accept.
If you are using HAND-SIGNED Notary option for Sub Billing, Approving the Lien in the Lien column (or Uploading and Approving the Lien from the GC Accounting area) will trigger the bill to be marked as Accepted.
In Hand-Signed lien release setting, both PMs and Accountant roles can Approve Lien Releases (which will move bills to Accepted status).
If you have a RedTeam Go QuickBooks Accounting Integration Accept is the trigger that sends Sub Bills over to the Accounting integration.
If Accountants need to get an Invoice over to their Accounting integration Prior to obtaining the lien release, they can us Batch Print option on the Actions drop down. This will move the Bill to Accepted while waiting for the Subcontractor to submit the lien release.
APPROVING LIENS
When using Hand-Signed Lien option, Accountants will Accept by Approving the Liens as they are returned by the Subcontractors or by importing and Approving the Liens themselves. These actions will be handled through the Lien Column.
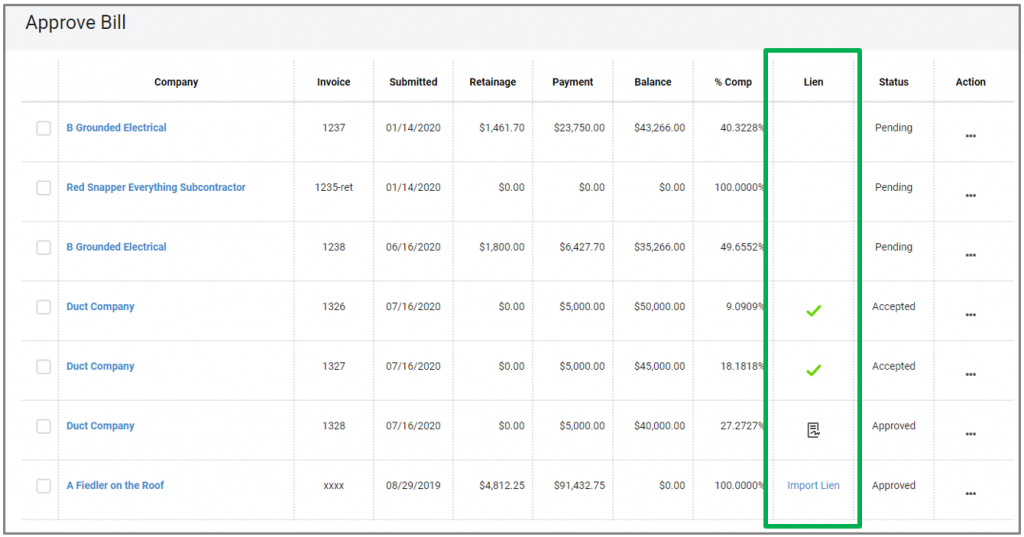
Blank Lien column – Pending Status: when a Subill is first submitted or entered, it will need to be approved by a PM to trigger the Lien Document to be sent.
Import Lien – Approved Status: when the Lien has been sent but not yet returned the Import Lien link appears. The Accountant or PM will be able to Import and Approve a Lien here.

Lien to Approve – Approved Status: When a Lien has been submitted requires Approval (Paper with Signature Icon)

Approved Lien – Accepted Status: when a Lien is approved this will mark as Accepted

PLEASE NOTE: When using Hand Signed Lien option, both PMs and Accountants can both Import and Approve a Lien document. This action will automatically mark the bill as Accepted. If you have an Accounting Integration and wish to control when the bills are pushed to an Accounting Integration in NEW Subilling module, you will want to make it a company policy to only permit Accountants to import and Approve Lien documents.
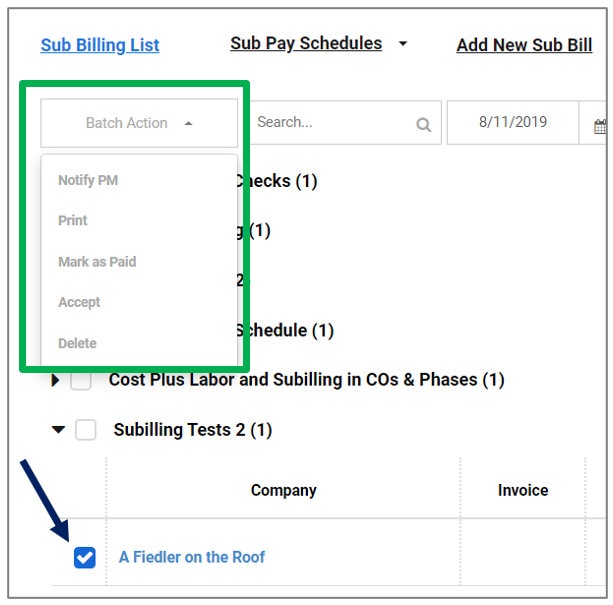
ACOUNTANT BATCH ACTIONS
Batch Actions, including Print and Mark as Paid allow you to select multiple items at once. Check box next to the Sub Bills you wish select then Click on Batch actions and select from Menu.
NOTE: The items must be visible onscreen for the action to take place.
How do I approve Sub Bills as a PM if my company uses Hand-Signed Lien Releases?
Subills can be approved by a PM from Accounting>Billing>Approve Sub Billing or from within the Project at Billing>Sub Billing which connects to the bill list in Accounting.
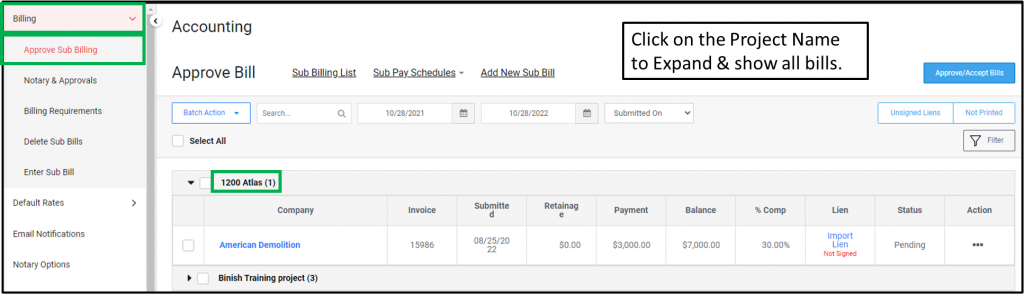
APPROVE BILLS AS PROJECT MANAGER
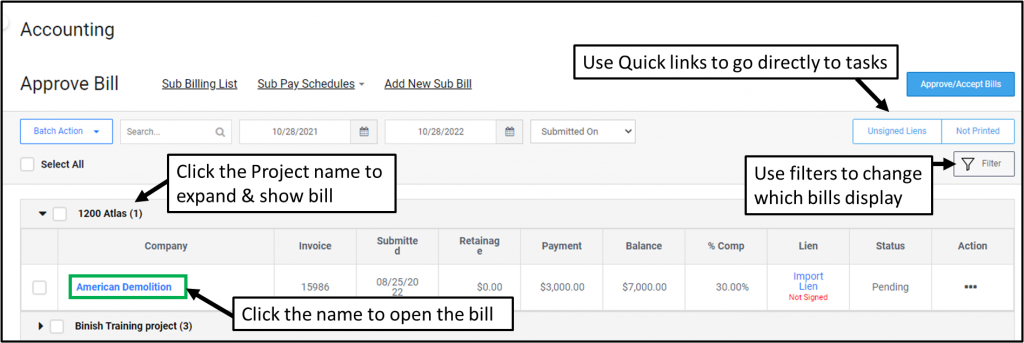
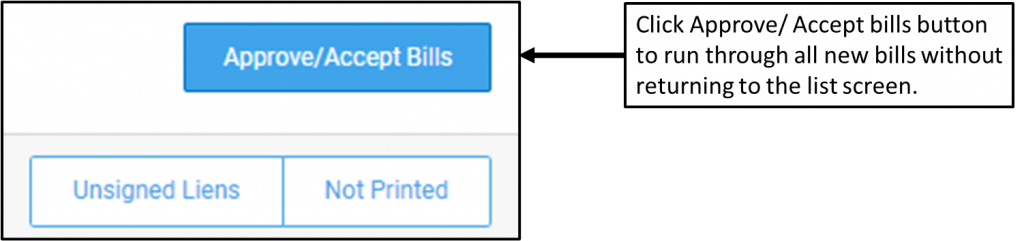
Sub Bills can be Approved either by clicking on the Subcontractor name or by launching the Approve Bills Quick Link button to start with the oldest Sub Bill and work through all Bills on all projects, without returning to List Screen.
Review of Sub Bill

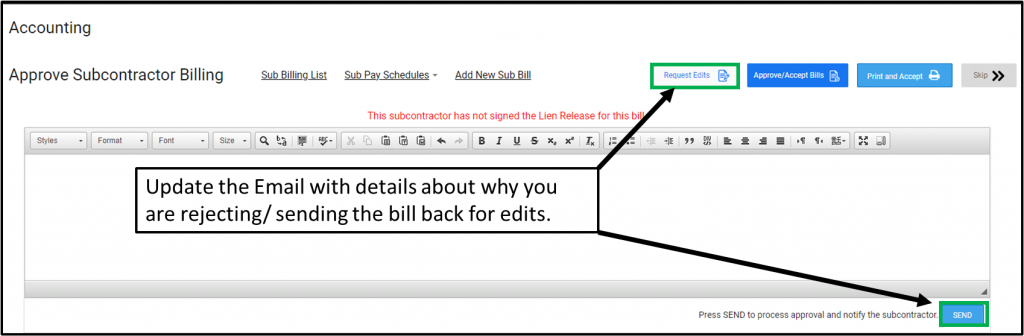
Use the Action buttons in upper right:
- Click Approve if bill is correct.
- Use Request Edit to send an email to the Subcontractor with your reason for the rejection. The subcontract will be able to edit and resubmit the bill.
- Use the Skip to move to the next bill without making a decision. It will remain in the current status and you can always return the bill at a later time.
Once you Approve or Request Edit from the subcontractor, you will be moved to the next Pending Bill to review. If there are no additional bills that require your action, it will return you to the list screen.
Click Sub Billing List in the upper left to return to the main screen at any time
HINT: PM Approval of the Bill will Send the Lien Release to the subcontractor to complete.
FILTER
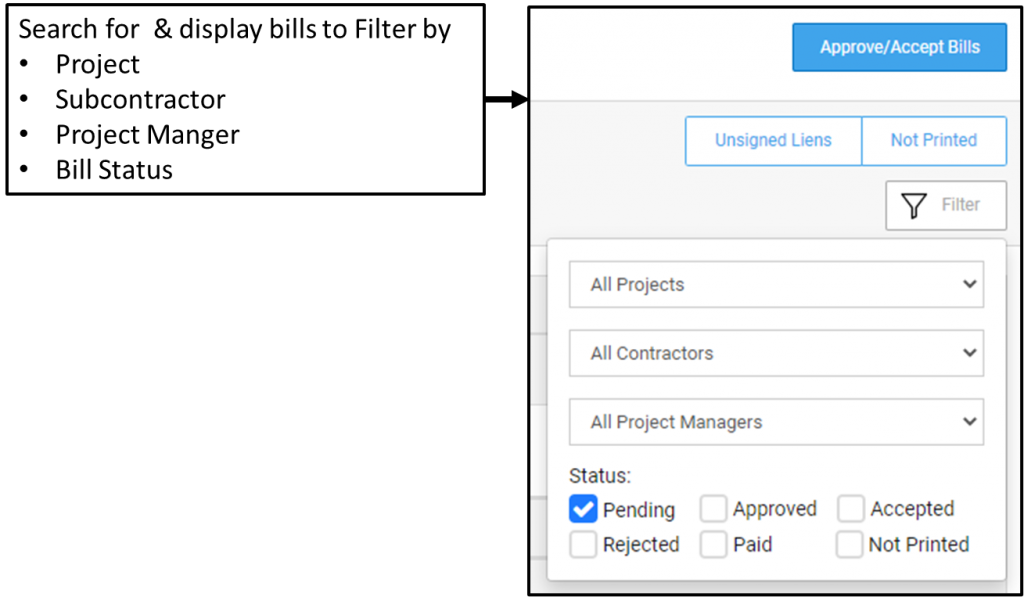
- Use the filter icon to change the Items displayed on the Subilling list screen
- After you have selected your filters, Click anywhere outside the filter for options to take effect
Status Checkbox Definitions
Pending – New Bills that have been submitted and require PM Approval to Send out the Lien Release to the subcontractor. When a Project Manager logs in, their view will default to show all Pending Sub Bills ready for PM approval on their Projects. Users with the Dual PM/Accountant settings will also default to show Sub Bills in Pending.
Approved – Sub Bills that have been Approved by a PM. This action will trigger the Lien Release to be sent to subcontractor for Companies using Hand-Signed Lien Release setting.
Accepted – In Hand-Signed Lien releases Approval of the Subcontractors Lien Release moves the Bill to Accepted status. For those with a RedTeam Go QuickBooks Accounting Integration, Accept is the trigger that pushes the subcontractor Billings to the Accounting Integration. [Note: For Projects still using old Sub Billing module, the PM Approval will continue to be the trigger that push to Accounting Integrations until those projects close out]
Rejected – Bills that have been sent back to the subcontractor to edit and resubmit.
Paid – Bills that have been marked as Paid from the Bulk Actions menu.
Not Printed – Bills that have not yet been Printed by an Accountant using the Batch Actions Tab. THIS BOX SHOULD ONLY BE CHECKED IF YOU ARE LOOKING TO SEE WHICH BILLS HAVE NOT YET BEEN PRINTED. It should be used in combination with at least one other Status box (Approved, Accepted) and the system will alert you to any that have not yet been Printed. Companies that still Print bills and send the PDF or Hardcopy Bill to your Accounting Department can use the Not Printed box to check their work.
SAFETY CHECK! If you used the Print Feature in your company work flow, Not Printed provides a way to check and confirm that you have not missed sending any bills to your Accounting Department.
ENTER SUB BILLING
You can enter Sub Bills for Subcontractors that will not participate in Sub Billing through their portal. The bills prepared this way will use the existing cost code layout as the Schedule of Values (SOV), even if you have the custom SOV rule set under Accounting>Billing>Billing Requirements.
- Set the Billing Date Period
- Enter bill amounts, either in Work in Progress (WIP$) column or enter a Percent Complete in the % Comp Column. These two cells are linked, entering a value in one will automatically complete the other.
- Attach any supporting document, such as a copy of the bill you received from Subcontractor outside the RedTeam Go system. Even if you attach a bill, you will still need to enter the correct billing values.
- Submit Bill when complete
HINT: A Sub Bill entered by a PM will automatically be set to the Approved status.
What is the QB Integration Reconciliation Report?
The Integration Reconciliation Report is an excel report that can be used to match the transactions that are sent from RedTeam Go to QuickBooks through our Accounting Integrations. The report is only available for users who have a RedTeam Go Integration with QuickBooks Desktop (QBD) and QuickBooks Online (QBO) active.
TO ACCESS THE REPORT
- Go to Accounting and click on your QB Accounting integration tab on the left Navigation Widow
- Click Settings> Integration Reconciliation

- Enter the the Date Range you would like use for the Report
- Click Generate

You can wait for the report to Generate and open into Excel or you can continue working elsewhere and Pending Report will be available to download from Completed Reports list when compiled.
WHAT INFORMATION IS INCLUDED/ EXCLUDED?
The Reconciliation Report will include transactions that have been sent to QB on the following Cost and Revenue items during the selected date period:
- Purchase Orders
- Expenses and Field Expenses
- Sub Bills
- Timecards
- Owner Billing (Lump Sum Total)
The Reconciliation Report will NOT include the following transactions because these Budget and Award transaction values are tied to one of the above transactions.
- Original Budget Values (Revenue tracked by Owner Bills)
- Owner Change Orders (Revenue tracked by Owner Bills)
- Subcontractor Award Amounts (Costs tracked by Sub Bills)
- Subcontractor Change Orders (Expenses will be tracked by Sub Bills)
REPORT LAYOUT
The Report will show the Projects Names ordered by Project number across the top of the report
The Transactions that have been sent to QB are on the left, including the Cost Codes, Vendors/Subcontractors and Transaction dates.

TRANSACTION DETAILS
- The Cost Codes are organized to appear by EXPENSE TYPE on the report
- EXPENSE TYPES are the letters used in RedTeam Go to designate the type of cost item and what types of transactions they can be used with
- The order of EXPENSE TYPES appear on the report:
- Material (.M)
- Subcontractor (.S)
- Equipment (.EQ)
- Other (.O)
- Overhead (.OH)
- Labor (.L )
- General Costs (if used for a Purchase)
- Permit Cost (if used for a Purchase)
- Owner Billing (Lump Sum at the Bottom of the Report)
HOW EXPENSE TYPES ARE PAIRED WITH TRANSACTIONS IN RedTeam Go
Purchase Orders, Field Purchase Orders and Expenses can be made with the following EXPENSE TYPES
- Material (.M)
- Equipment (.EQ)
- Other (.O)
- Overhead (.OH)
Subcontracts and their associated Subcontractor Bills can only use
- Subcontractor (.S)
Timecards used to track Labor Cost can only use with
- Labor (.L)
NOTE ON LABOR: Labor items will send the total number of hours that have been applied to each Labor code during the selected period for both QBD and QBO. QuickBooks Online will also include the monetary value calculated for each Labor cost (Number of Hours x Employee Rate in Administration).
QuickBooks Desktop will ONLY receive Labor Hours from RedTeam Go because Intuit does not provide a method to send the monetary value via the integration.
TOTALS
The bottom of each EXPENSE TYPE section will include a total for that section (by Project).
The bottom of the report will also display a Grand Total of all cost items that are included on the report.

How does the Job Cost Statement work with QuickBooks integration?
Use this post in conjunction with What is Shown on the Job Cost Statement?
Job Cost Statement (JCS) is the only report that is capable of using QuickBooks (QB) Push/Pull back of data via the RedTeam Go Accounting Integration. This means that as transactions are updated in QB, those values will pull back into the JCS. The benefit is real time Revenue and Cost data from Accounting Department will be directly communicated for the Project Manager to see.
NOTE: Project Managers may need to update RedTeam Go data to match these values communicated back from QuickBooks to keep the rest of their RedTeam Go values in step with the Accounting Department and the Job Cost Statement.
WHAT ARE SOME OF THE EXAMPLES WHERE PMs WILL NEED TO UPDATE RedTeam Go TRANSACTIONS ?
- Purchase Orders – If a discount for early payment to vendor is made on a PO in QB, the PM would need to create a credit PO transaction to keep the rest of the project Budget values in lockstep with Accounting data.
- Owner Billing – If an Owner refuses to pay a portion of a submitted Owner Pay Application, this would require the RedTeam Go Owner Bill to be unsigned and edited to match the expected Revenue from the Owner Payment.
- With the QB Accounting integration, it is possible that payments that are created in QB will duplicate an existing RedTeam Go Entry. (See the Section Below on how to Delete Duplicate entries.)
HINT: Payments made on the RedTeam Go entry that is Pushed/Pulled from QB will NOT create Duplicates!
HOW DOES THE REPORT WORK WITH THE INTEGRATIONS TURNED ON?
The Primary difference with a QB integration is that much of the information needs to go to QB first and then pull back into RedTeam Go Job Cost Statement. This will cause a delay in the appearance of some items.
The following items will populate in directly from RedTeam Go:
- Budget (Estimate)
- Award Amounts to Subs (.S codes in Projected Cost column only)
- Owner Change Orders (OCO)
- Subcontractor Change Orders (SCO)
The following items must get a QB ID before they will appear on the JCS:
- Owner Billing (Revenue Section on top of Report)
- Subilling (in the Cost to Date column)
- Timecards (OB Online only, QB Desktop does not offer Pull back capability)
- Expenses
These will not show up as a Cost on JCS until Invoice is converted to a Bill QB:
- Purchaser Orders (Traditional POs, under Commitments)
- Field Purchase Orders (from Expenses Module)
HOW SOON WILL I SEE MY COMPLETED TRANSACTIONS SHOW UP ON THE JCS?
Routine Delay – There is a delay of up to an hour for some transaction to appear on the JCS. This is due to a combination of the Push and Pull between QB and RedTeam Go and the information copying between databases for accuracy.
QB Connection Active? – Make sure your QB integration for QBD or Web Connector for QBO is turned on.
Check QB Integration Log – Go to Accounting >QuickBooks integration tab in RedTeam Go to see if there are errors or issues with the Transactions you are expecting.
Transactions Approved? Confirm that the Transactions are Approved/Accepted in RedTeam Go to initiate the send to QB.
Occasionally there will be corrections or modifications made to a project costs that are picked up by the hourly or 24 hour checks that are run to ensure all transactions and changes are captured.
HINTS on Specific Transactions:
Purchase Orders and Field Purchase Orders will not show up on the JCS Cost columns until a Bill is created in QB. (Use the option to upload Field POs as a Bill in QB Settings, and check the associated Box in Field PO before Acceptance to see these to populate on JCS when send to QB)
Subcontractor cost amounts will not show up on the JCS Cost To Date columns until Subills have been Approved/Accepted.
Labor Costs entered in RedTeam Go will not show up on the JCS if you do not have the Timecards Module turned on for your QBO Integration. While Timecards is the module most frequently turned off (due to other company Payroll methods) this is true of any Module not turned on, such as Purchase Orders or Expenses. While RedTeam Go transactions for Items will not be sent to QB if they are turned off, any transactions made in QB WILL pull back into the JCS. For more information on which QB Modules are currently active for your company, contact concierge@redteam.com
NOTE: Labor Costs for QB Desktop users will be the RedTeam Go labor cost value from Timecards x Employee Rates locate in Accounting>Time Cards menu. Intuit does not provide a mechanism for the Pull Back of Labor cost information from QBD.
HOW DO I DELETE DUPLICATE OR INCORRECT TRANSACTIONS?
WARNING: Notes on Duplicate Transactions:
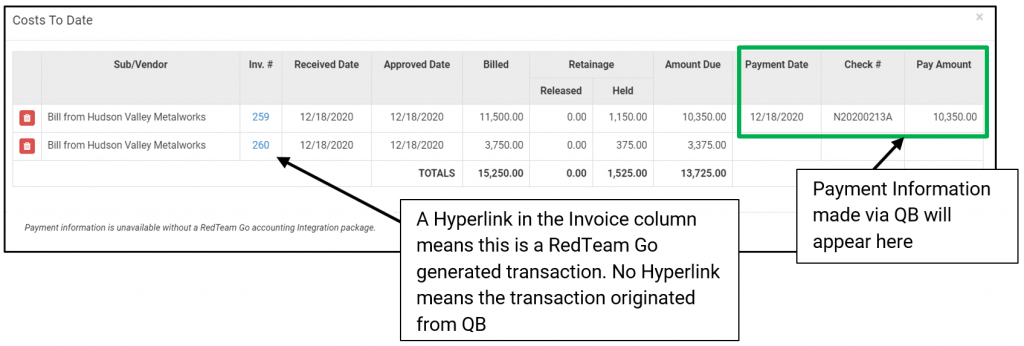
With the normal workflow, RedTeam Go transactions will pass to QB and any updates made to Payment Totals will display in the entry details on the far right. However, if a Payment Transaction is generated FROM QB and pulls into RedTeam Go, you will see both Transactions appear on the Job Cost Statement. In order to keep values in line, the PM will need to delete one of the duplicate entries.

- Click on the Value in the Total Cost to Date column
- Click the Red Trashcan next to the transaction you wish to Delete
- Click on the Restore button to review deleted transactions
- Select to Restore an item to the JCS report
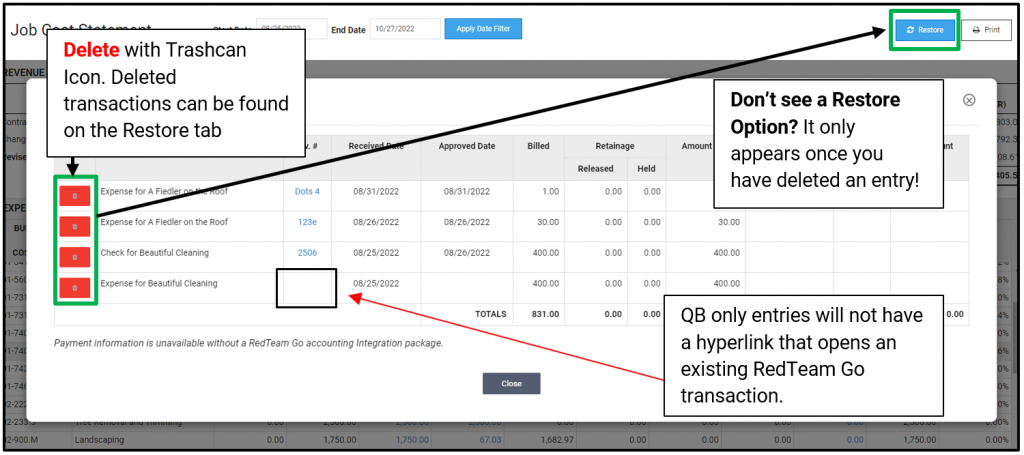
- Click Restore button next to the item you would like to return to JCS report.
