

- Home
- Upcoming Live Training Sessions!!
- Webinar Recordings
- Implementation Courses
- Getting Started Guide For Admins
- RedTeam Go Navigation
- Gear Icon
- Administration
- Contacts
- Projects
- Planroom
- Estimate (Base Bid)
- Bid Invitations
- Proposal Package
- Construction Buy Out
- Contracts
- Daily Logs
- Photos
- Billing
- Schedules
- Submittals
- Transmittals
- Request For Information (RFI)
- Potential Change Orders (PCOs)
- Change Orders
- Owner Change Orders
- Subcontractor Change Orders
- Internal Change Orders
- Meetings
- How Do I Add Meetings?
- Close Out
- Job Costs (Purchase Orders & Expenses)
- Required Documents
- Accounting
- Reports
- Superintendent
- Subcontractor
- Architect
- Owner
- Mobile
- Release Notes
- Glossary of Terms
- Accounting
Hello. How can we help you?
What types of Transactions will populate into the Owner Bill?
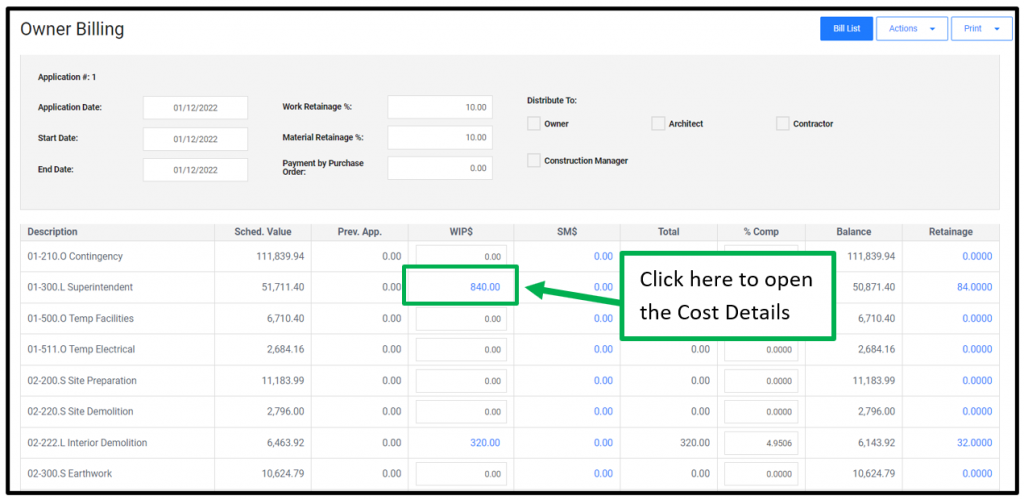
Most Owner Billing templates will be able to populate Approved transactions from Subilling (.S), GC Labor Time (.L) and Purchases (.M,.O,.OH, .EQ) into the affiliated line items or divisions. You can then choose to include or remove the costs from the bill WIP columns themselves.
Any Transactions that have been approved prior to the first bill being created will automatically populate into the Bill’s WIP column. Click on the hyperlink to display the cost details. All items will appear on bills when they are Approved. Accountant level Acceptance is not required for any of these transactions to appear in Owner Billing.
WORKING WITH PROJECT COSTS
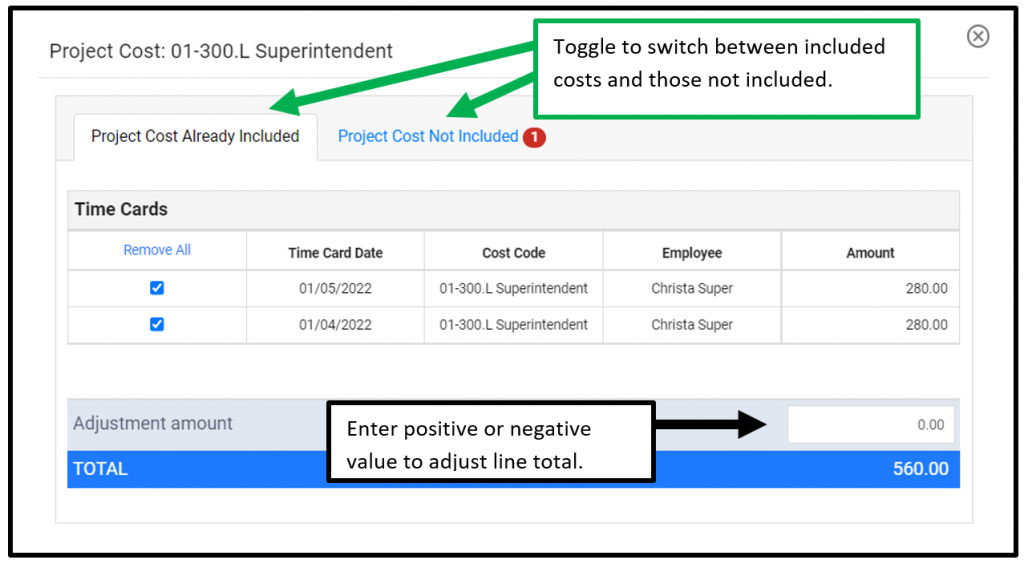
- Click the hyperlinked cost to display the Cost items that are included.
- Switch between tabs to show the Cost Not Included.
- The Red Badge counter will appear if there are any items on the Project Cost Not Included.
- Click to remove items that you do not wish to include on the current pay application and they will be moved to the Project Cost Not Included tab.
- If you wish to add or remove funds from the billing line item you can use the Adjustment cell. The total that appears on the Blue line will be the amount that will display on the Bill after Adjustment is applied.
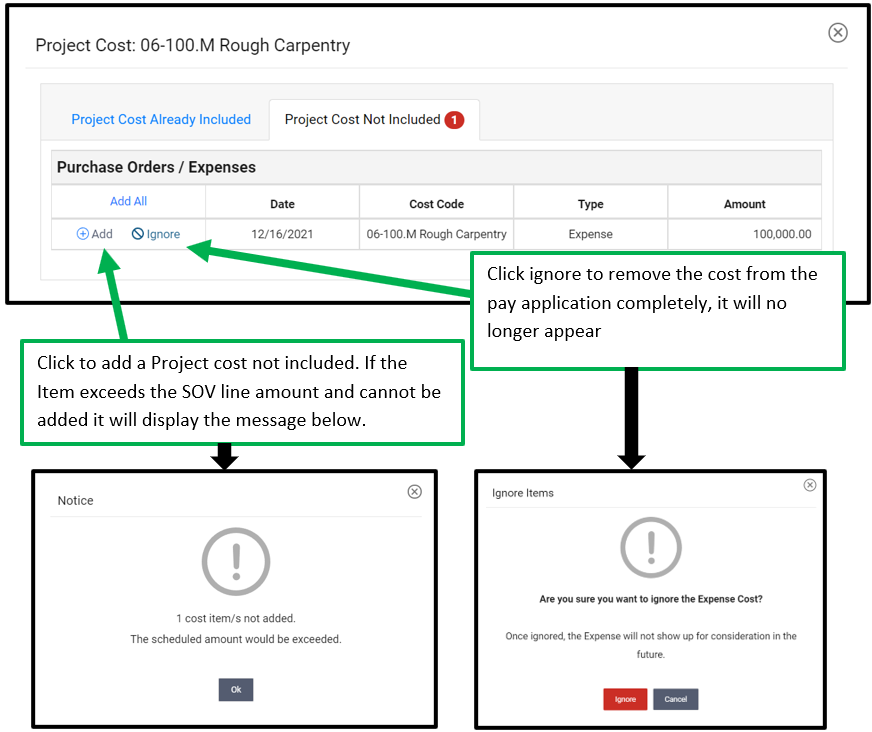
Project Costs Not included:
- From the Project Cost Not included, you can choose to Add items to the current bill.
- If the amount exceeds the line item total, you will see the warning that it cannot be added. If costs have been moved around for the construction budget, the amount spent on a line item may exceed what was originally included in the Owner SOV. In this case, you may need to bill costs on a different line item.
- If additional funds were added via an Owner Change Order (OCO) or Phase, you may need to add the OCO to the pay application in order to add the cost item.
- If you have already billed for an item and no longer wish to see the transaction on the cost details, you can choose to Ignore the cost item. This will permanently remove it from the owner billing.
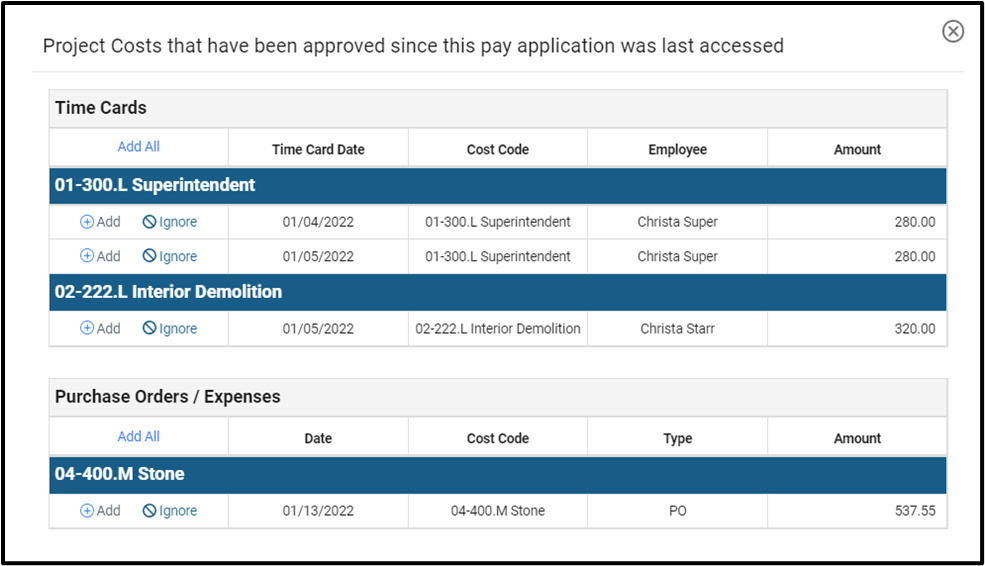
APPROVED COSTS SINCE BILL WAS LAST ACCESSED
Anytime the user opens the bill after that, they will be presented with the Approved Costs since the Bill was Last Accessed. We do not automatically add additional costs, so the user would not need to hunt through the bill and remove unwanted items.
These project costs will show on this window until they are either added to a bill or ignored.
On a Split Contract Project, the Owner B costs will all need to be added manually from the Approved costs window. This is to avoid confusion about which costs are applied to the Owner A/Owner B contract SOV.
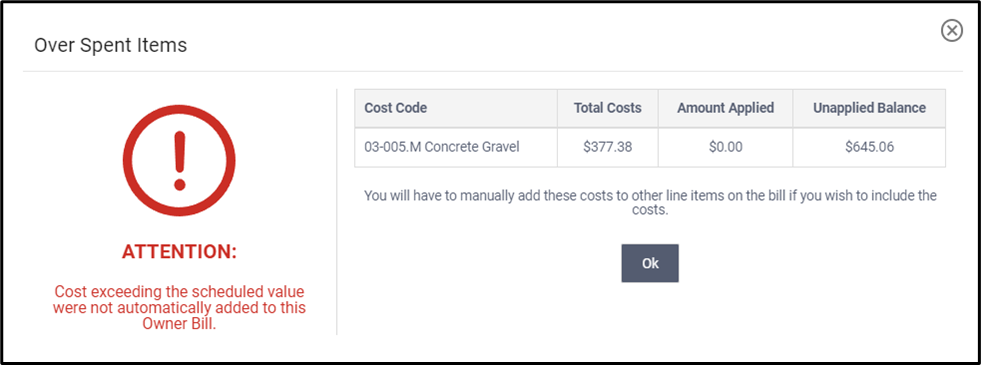
OVER SPENT ITEMS
If approved costs exceed the total value of the line item or Divisions, users will see the Over Spent items notice appear. This can occur for a number of reasons.
- The amount spent on the line item exceeds the original SOV line item total on the Owner Bill. In this case, you may just need to use either the WIP column or the Adjustment cell to partially bill on that line item and bill the remainder on another line item.
- Additional costs may have been added via Owner Change Order (OCO) or Phase. You may need to add the OCO to the pay application (under Actions) to add the cost items to the billing worksheet.
PLEASE NOTE: There must be a positive cost already added to the line item to activate the Project Costs pop-up window. Without a positive cost (to add the blue hyperlink), you will not be able to see these Over Spent Items on the Project Cost Not Included tab. They will only appear once on the Over Spent Items warning below. In other words, the value in the WIP cell will remain at zero with no hyperlink.
How do I Accept Sub Bill as an Accountant if my Company uses Hand Signed Lien Releases?
ACCOUNTANT GENERAL INFORMATION
Accountant-level approval for Sub Billing is called Accept.
If you are using HAND-SIGNED Notary option for Sub Billing, Approving the Lien in the Lien column (or Uploading and Approving the Lien from the GC Accounting area) will trigger the bill to be marked as Accepted.
In Hand-Signed lien release setting, both PMs and Accountant roles can Approve Lien Releases (which will move bills to Accepted status).
If you have a RedTeam Go QuickBooks Accounting Integration Accept is the trigger that sends Sub Bills over to the Accounting integration.
If Accountants need to get an Invoice over to their Accounting integration Prior to obtaining the lien release, they can us Batch Print option on the Actions drop down. This will move the Bill to Accepted while waiting for the Subcontractor to submit the lien release.
APPROVING LIENS
When using Hand-Signed Lien option, Accountants will Accept by Approving the Liens as they are returned by the Subcontractors or by importing and Approving the Liens themselves. These actions will be handled through the Lien Column.
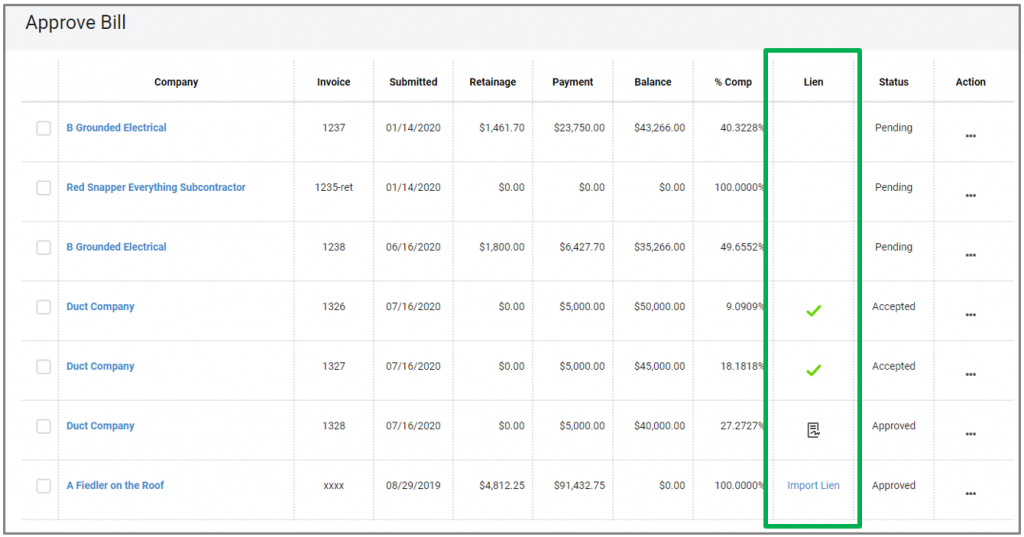
Blank Lien column – Pending Status: when a Subill is first submitted or entered, it will need to be approved by a PM to trigger the Lien Document to be sent.
Import Lien – Approved Status: when the Lien has been sent but not yet returned the Import Lien link appears. The Accountant or PM will be able to Import and Approve a Lien here.

Lien to Approve – Approved Status: When a Lien has been submitted requires Approval (Paper with Signature Icon)

Approved Lien – Accepted Status: when a Lien is approved this will mark as Accepted

PLEASE NOTE: When using Hand Signed Lien option, both PMs and Accountants can both Import and Approve a Lien document. This action will automatically mark the bill as Accepted. If you have an Accounting Integration and wish to control when the bills are pushed to an Accounting Integration in NEW Subilling module, you will want to make it a company policy to only permit Accountants to import and Approve Lien documents.
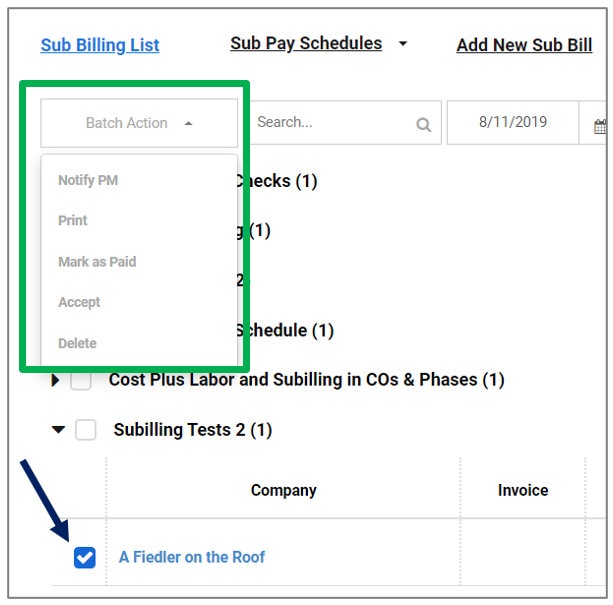
ACOUNTANT BATCH ACTIONS
Batch Actions, including Print and Mark as Paid allow you to select multiple items at once. Check box next to the Sub Bills you wish select then Click on Batch actions and select from Menu.
NOTE: The items must be visible onscreen for the action to take place.
How do I approve Sub Bills as a PM if my company uses Hand-Signed Lien Releases?
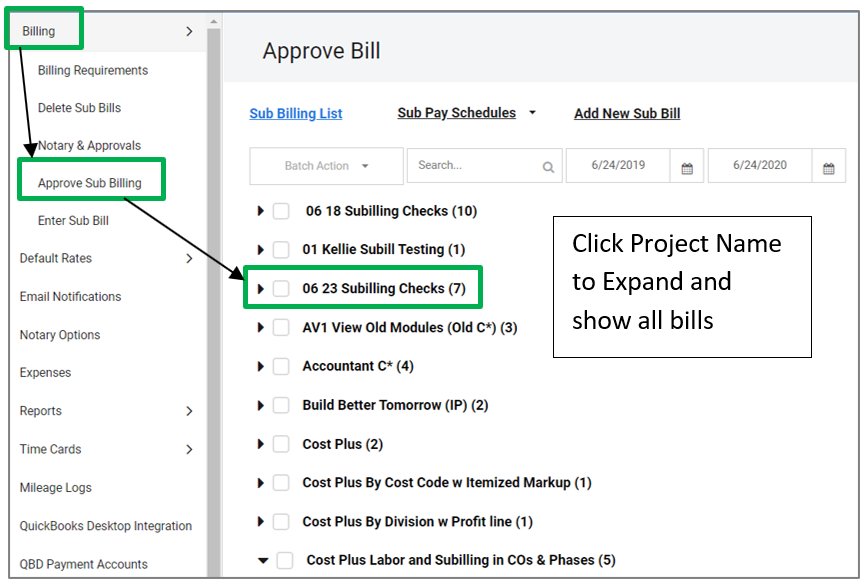
Subills can be approved by a PM from Accounting>Billing>Approve Sub Billing or from within the Project at Billing>Sub Billing which connects to the bill list in Accounting.
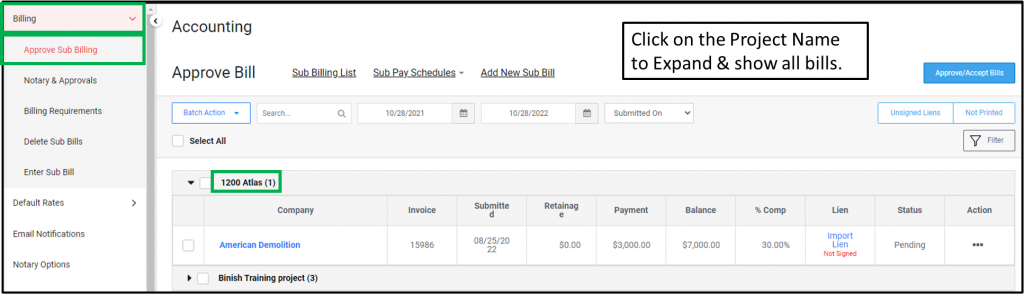
APPROVE BILLS AS PROJECT MANAGER
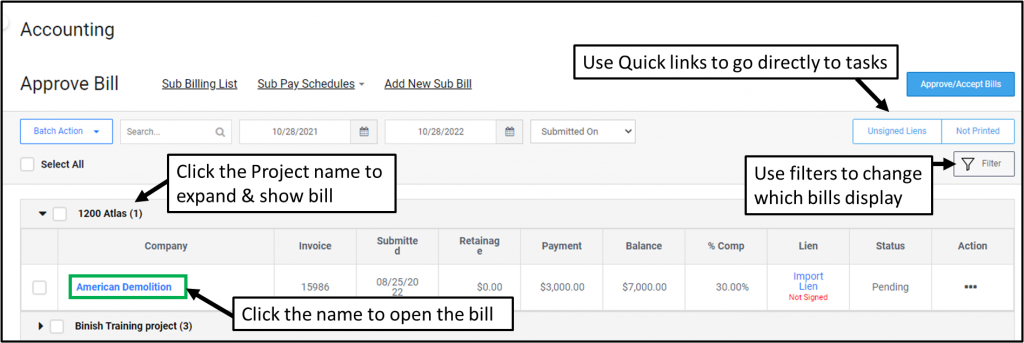
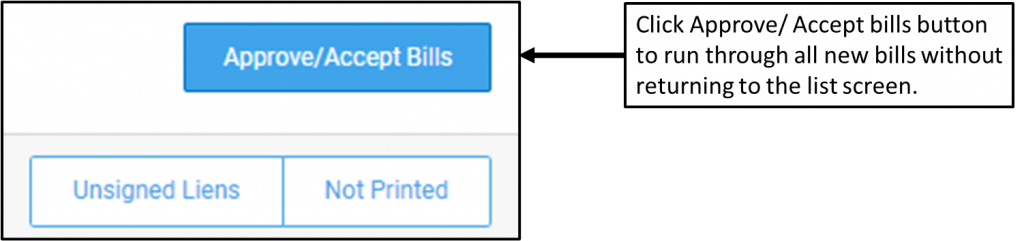
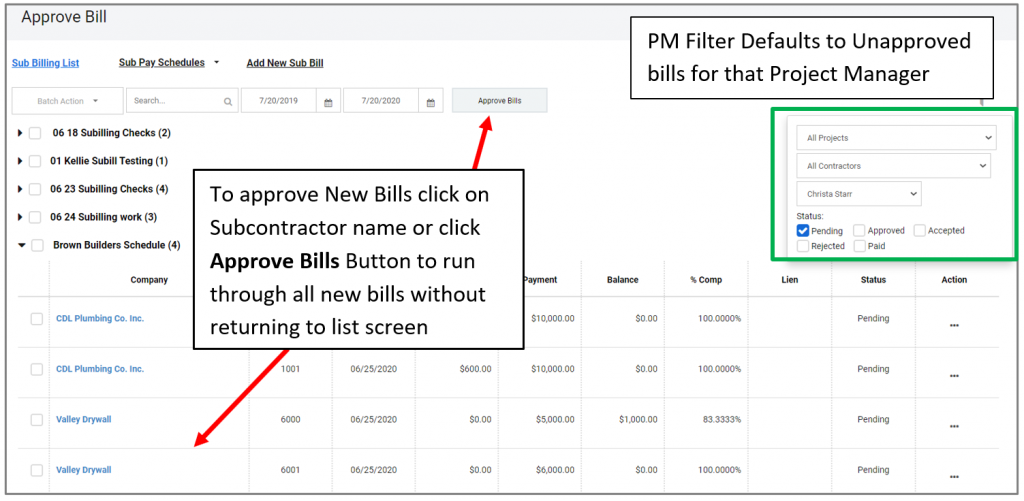
Sub Bills can be Approved either by clicking on the Subcontractor name or by launching the Approve Bills Quick Link button to start with the oldest Sub Bill and work through all Bills on all projects, without returning to List Screen.
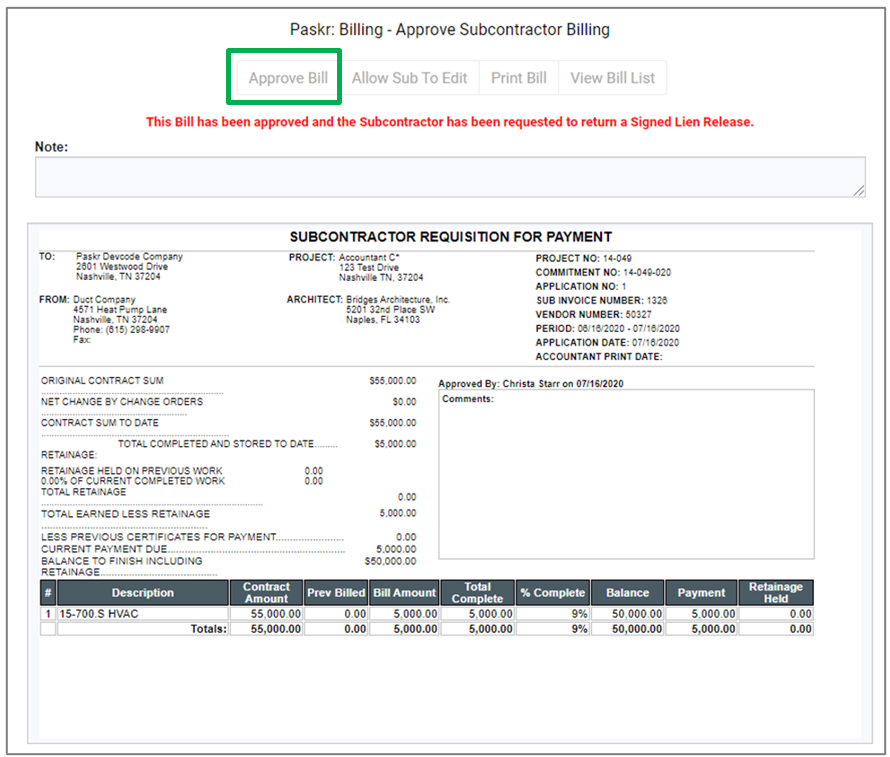
Review of Sub Bill

Use the Action buttons in upper right:
- Click Approve if bill is correct.
- Use Request Edit to send an email to the Subcontractor with your reason for the rejection. The subcontract will be able to edit and resubmit the bill.
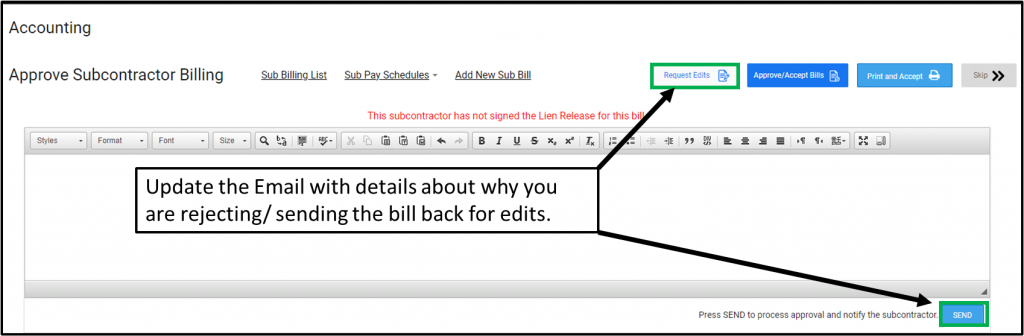
- Use the Skip to move to the next bill without making a decision. It will remain in the current status and you can always return the bill at a later time.
Once you Approve or Request Edit from the subcontractor, you will be moved to the next Pending Bill to review. If there are no additional bills that require your action, it will return you to the list screen.
Click Sub Billing List in the upper left to return to the main screen at any time
HINT: PM Approval of the Bill will Send the Lien Release to the subcontractor to complete.
FILTER
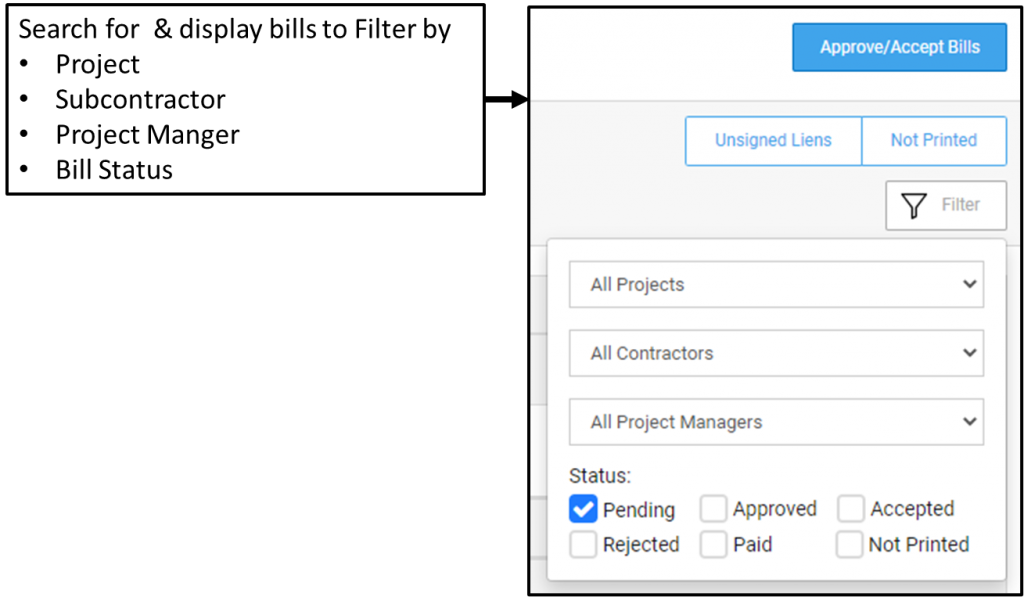
- Use the filter icon to change the Items displayed on the Subilling list screen
- After you have selected your filters, Click anywhere outside the filter for options to take effect
Status Checkbox Definitions
Pending – New Bills that have been submitted and require PM Approval to Send out the Lien Release to the subcontractor. When a Project Manager logs in, their view will default to show all Pending Sub Bills ready for PM approval on their Projects. Users with the Dual PM/Accountant settings will also default to show Sub Bills in Pending.
Approved – Sub Bills that have been Approved by a PM. This action will trigger the Lien Release to be sent to subcontractor for Companies using Hand-Signed Lien Release setting.
Accepted – In Hand-Signed Lien releases Approval of the Subcontractors Lien Release moves the Bill to Accepted status. For those with a RedTeam Go QuickBooks Accounting Integration, Accept is the trigger that pushes the subcontractor Billings to the Accounting Integration. [Note: For Projects still using old Sub Billing module, the PM Approval will continue to be the trigger that push to Accounting Integrations until those projects close out]
Rejected – Bills that have been sent back to the subcontractor to edit and resubmit.
Paid – Bills that have been marked as Paid from the Bulk Actions menu.
Not Printed – Bills that have not yet been Printed by an Accountant using the Batch Actions Tab. THIS BOX SHOULD ONLY BE CHECKED IF YOU ARE LOOKING TO SEE WHICH BILLS HAVE NOT YET BEEN PRINTED. It should be used in combination with at least one other Status box (Approved, Accepted) and the system will alert you to any that have not yet been Printed. Companies that still Print bills and send the PDF or Hardcopy Bill to your Accounting Department can use the Not Printed box to check their work.
SAFETY CHECK! If you used the Print Feature in your company work flow, Not Printed provides a way to check and confirm that you have not missed sending any bills to your Accounting Department.
ENTER SUB BILLING
You can enter Sub Bills for Subcontractors that will not participate in Sub Billing through their portal. The bills prepared this way will use the existing cost code layout as the Schedule of Values (SOV), even if you have the custom SOV rule set under Accounting>Billing>Billing Requirements.
- Set the Billing Date Period
- Enter bill amounts, either in Work in Progress (WIP$) column or enter a Percent Complete in the % Comp Column. These two cells are linked, entering a value in one will automatically complete the other.
- Attach any supporting document, such as a copy of the bill you received from Subcontractor outside the RedTeam Go system. Even if you attach a bill, you will still need to enter the correct billing values.
- Submit Bill when complete
HINT: A Sub Bill entered by a PM will automatically be set to the Approved status.
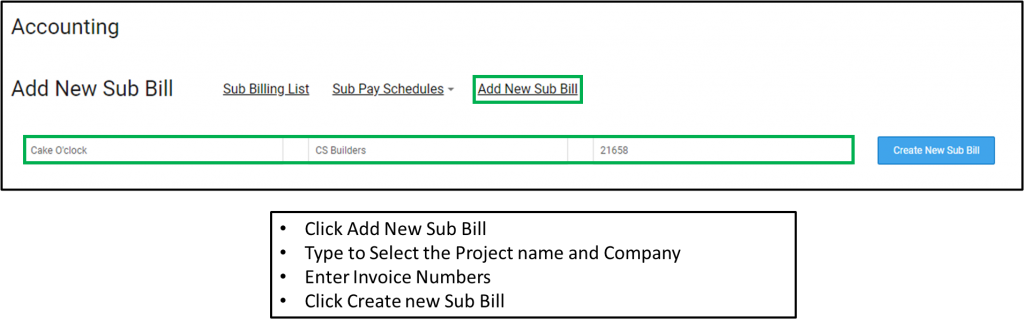
Can the GC Add Sub Billing?
You can now enter Sub Bills for Subcontractors with a locked/signed agreement, who will not participate in Sub Billing through their portal. The bills prepared this way will use the existing cost code layout as the Schedule of Values (SOV), even if you have the custom SOV rule set under Accounting>Billing>Billing Requirements.
Click Accounting>Billing>View Sub Billing>Add New Sub Bill


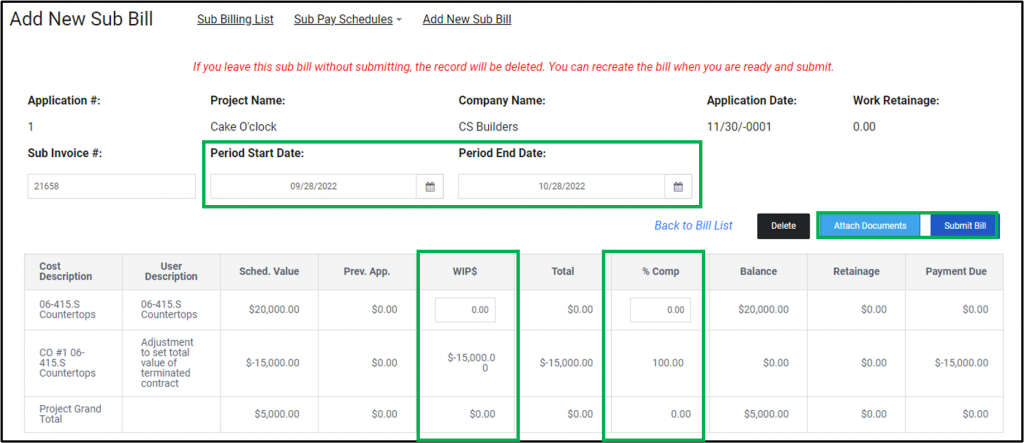
- Set the Billing Date Period
- Enter bill amounts, either in Work in Progress (WIP$) column or enter a Percent Complete in the % Comp Column. These two cells are linked, entering a value in one will automatically complete the other.
- Attach any supporting document, such as a copy of the bill you received from Subcontractor outside the RedTeam Go system. Even if you attach a bill, you will still need to enter the correct billing values.
- Submit Bill when complete
- Sub Bills entered this way will automatically go to the Approved status since they are entered by a GC employee.
What are the Quick Links for Accountants in Sub Billing?
Additional Quick links have been added to the Subilling page to Assist Accountants with their work. The Quick Links will appear differently depending upon:
- User Roles (PM, Accountant, Notary)
- GC Lien release setting (Digital or Hand-signed)
DIGITAL LIENS
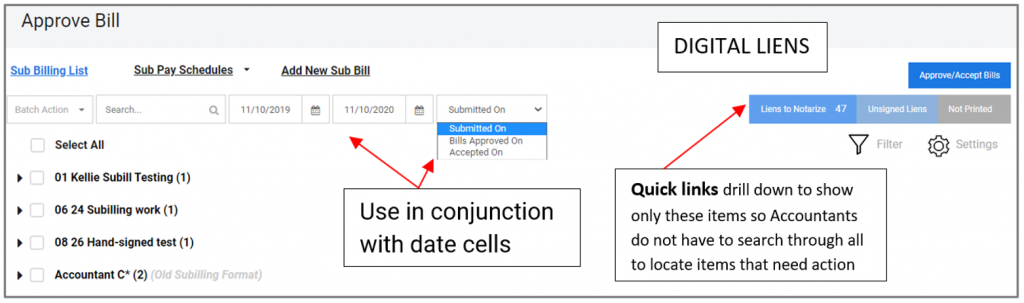
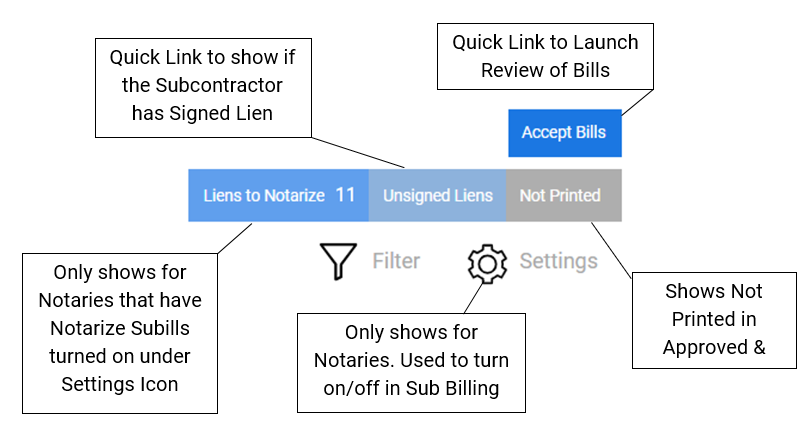
- Approve/Accept – Quick link that launches the User into Approvals or Acceptance of Sub Bills from Oldest to most recent. The text in this button depends upon user role settings in company contact.
- Liens to Notarize – Only Accountants with Notary will have a this Quick Link
- Unsigned Liens – Allows PM/Accountants to checked for unsigned digital liens before Approve/Accept/Notarize
- Not Printed – a Quick link to view which Bills in Approved, Accepted, Paid categories.
Other Updates
- The Settings Icon will only appear for Notaries using Digital Lien option. It provide a way to turn Notarize Sub Billing on and off.
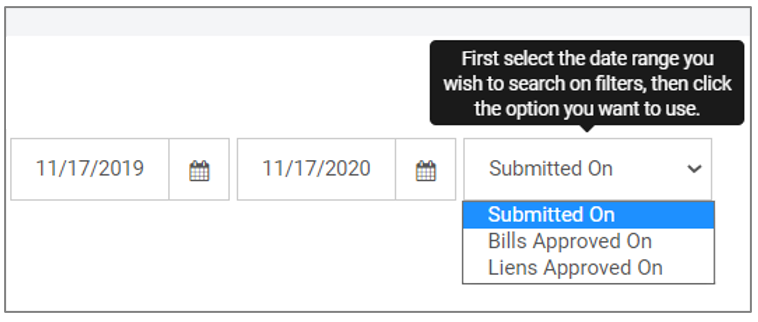
- The Submitted on Toggle was added to help locate bills by the date they were Submitted On (default), Bills Approved On or Accepted On

HAND-SIGNED LIENS
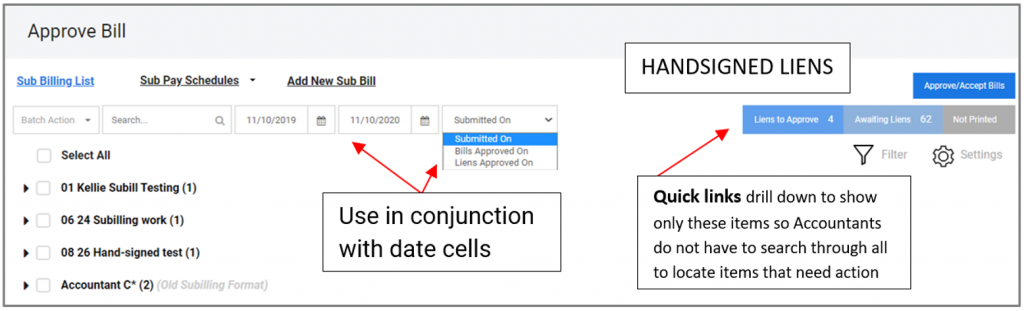
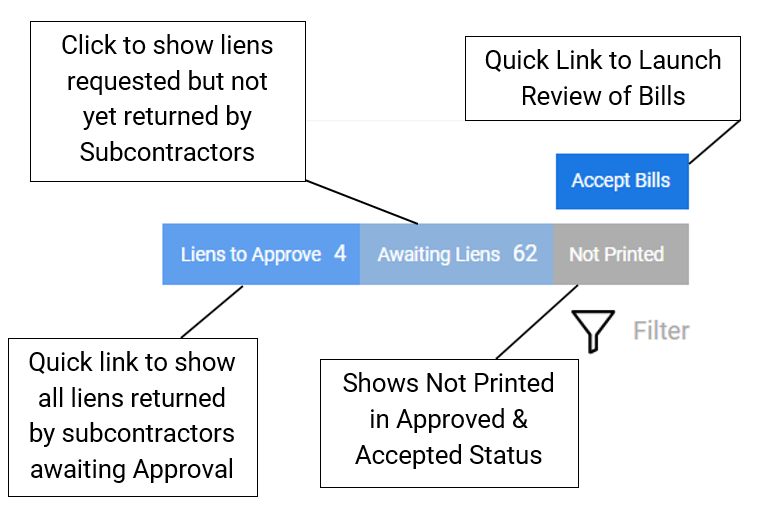
- Approve or Accept – Quick link that launches the User into Approvals or Acceptance of Sub Bills from oldest to most recent. The text in this button depends upon user role settings in company contact.
- Liens to Approve – Displays all Liens that have been submitted by the Subcontractor and are ready for Approval (show piece of Paper Icon)
- Awaiting Liens – Allows PM/Accountants to check to see which Bills Hand-signed Liens have been requested for, but have not yet been returned by the Subcontractors.
- Not Printed – a Quick link to view which Bills in Approved, Accepted, Paid categories have not yet been Printed. (NOTE: Check Pending & Not Printed on Filter to check for Printed items in Pending status)
Other Updates
- Printing in Pending status is now possible for an Accountant, but it will ONLY post the Print Date and will not move the status out of Pending. It will still need to be Approved by a Project Manager to change Status. NOTE: This update is simply so Accountants who Print bills first can see which items have already been Printed so they will not duplicate or miss any bills.
- The Submitted on Toggle was added to help locate bills by the date they were Submitted On (default), Bills Approved On or Liens Approved On
What are the triggers that move Sub Billing Statuses on the Accounting Page?
The Statuses for Sub Bills are: Pending, Approved, Accepted, Rejected, Paid
The Filter allow you to select which of these Status items display on screen
The Triggers that can change the statuses on the Accounting Subilling page or inside the Project at Billing>Subilling are different depending upon whether your company uses Hand-signed Liens or Digitally Signed Liens.
There are also slight differences in how they are moved in Old Subilling Module
HAND SIGNED LIENS
For Hand-Signed Liens, Project Manager Approval moves bill from Pending to Approved in Status column and sends the Lien Release to the Subcontractor.
To move Bills from Approved to Accepted Status do one of the following:
- Approve the subs Hand-Signed Lien (PM or Accountant can do this)
- Use Accept or Print and Accept in Accountant Accept Screen
- Accountant checks bills and uses Print on Batch Actions (Pending Bills excluded*)
*WHY ARE PENDING BILLS EXCLUDED? If an Accountant Prints a Bill in Pending status, it will post the Print Date but will NOT move the bill to Accepted. This is because it would be difficult to see that those bills have not yet been Approved by a Project Manager which emails the lien release to the sub!
In Old Billing Module the triggers to move Approved to Accepted are:
- Approving the Hand-Signed Lien (PM or Accountant can do this)
- Clicking Accept on the Ellipses next to the Bill
- Accountant checks boxes and select Accept on Batch Actions
- Accountant checks boxes and selects Print on Batch Actions. (Important for old Billing Module because there was no Accept option in old billing. Printing was the old action that typically designated work on the bill to be complete in RedTeam Go.
DIGITALLY SIGNED LIENS
For Digital Liens, Project Manager Approval moves bill from Pending to Approved in Status.
To move Bills from Approved to Accepted Status Accountants will do one of the following:
- Accept/Notarize or Print and Accept from Accountant Accept Screen
- Accountant checks boxes and select Accept on Batch Actions
- Accountant checks boxes and selects Print on Batch Actions (not permitted on Bills in Pending)
- Users with the PM/Accountant Dual Role set their contact can Approve/Accept in one click. If will also Notarize at same time if they have this enabled.
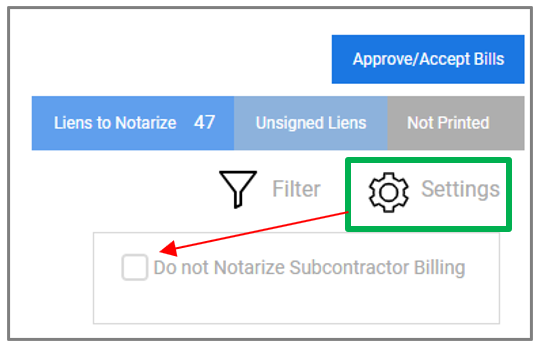
How can we turn off Sub Billing Notarization?
You can turn off this option by having the GC employee with Notary
- Go to Accounting > Approve Sub Billing
- Click on the Settings Gear
- Check the box that says ‘Do Not Notarize Subcontractor Billing’
- This will remove the Liens to Notarize Quick Link from view and will not apply the Notary seal when they Accepting Sub Bills under the Digital Lien setting.
This option to turn off Sub Billing Notarization is for GCs who may Notarize Owner Bills but either do not require Lien releases from subcontractor, do not need to Notarize signed Liens or who cannot digitally notarize liens in their jurisdiction.
How do I approve Sub Bills if our Company used Hand Signed Lien Releases?
All Sub Bills for projects using the old Sub Billing format and new Sub Billing format will be Approved from the List Screen at Accounting>Billing>Approve Sub Billing or from within the Project at Billing>Sub Billing which connects to the bill list in Accounting.
APPROVE EXISTING SUBILLS
Project Managers
- PM view will default to show new bills that require PM Approval on their projects.
- The Filter Icon can be used to change the default settings.
- Click on Subcontractor names to View, Approve bills or send back for Edit as needed.

Projects already using the old module will open to the same Approval page as before. Click to Approve or Request Edit and use View Bill list to return to the List screen to Approve additional Bills.
When using Hand Signed Lien Releases on Existing Bills
PM Approval still sends the Hand-Signed Lien release email to Subcontractors with the upload link. When these are returned, they will be reviewed and Approved/Rejected using the Lien Column on the Subilling List Screen
Filter Icon
- Use the filter icon to change the Items displayed on the Subilling list screen
- After you have selected your filters, Click anywhere outside the filter for options to take affect

Status Checkbox Definitions
Pending – New Bills that have been Submitted or Entered Project Manager view will default to show all Pending Sub Bills ready for PM approval. Users with the Dual PM/Accountant settings will also default to show Sub Bills in Pending.
Approved – Sub Bills that have been Approved by a PM. This action will trigger the Lien Release to be sent to subcontractor for Companies using Hand-Signed Lien Release setting.
Accepted – This is a new Status that represents Approval by an Accountant. Accepted replaces the old action that used to be called ‘Printed’. Printing would remove the Sub Bill from the list of active bills to be processed. If an Accountant is also a Notary, Accepting will Notarize. Accepting in new Sub Billing we will now be the trigger that pushed the Sub Bills through RedTeam Go Accounting Integrations. For Projects still using old Sub Billing the PM Approval will continue to be the trigger that push to Accounting Integrations until those projects close out.
Rejected – Bills that have been sent back to the subcontractor to edit and resubmit.
Paid – Bills that have been marked as Paid from the Bulk Actions menu.
Not Printed – Bills that have not yet been Printed using the Batch Actions Tab. If you still Print these bills and send to your Accounting Department, you can use the Not Printed box to make sure that you have not missed any bills. If Bills do not show up when you check the appropriate Statuses (Approved, Accepted etc.) on the Filter in addition to the Not Printed box then you will know that they have already been Printed.
Accountants
When using Hand-Signed Lien option, Accountants will Accept by Approving the Liens as they are returned by the Subcontractors or by importing and Approving the Liens themselves. These actions will be handled through the Lien Column.
Blank Lien column – Pending Status: when a Subill is first submitted or entered, it will need to be approved by a PM to trigger the Lien Document to be sent.
Import Lien – Approved Status: when the Lien has been sent but not yet returned the Import Lien link appears. The Accountant or PM will be able to Import and Approve a Lien here.
Lien to Approve – Approved Status: When a Lien has been submitted requires Approval (Paper with Signature Icon)
Approved Lien – Accepted Status: when a Lien is approved this will mark as Accepted
*Please Note: When using Hand Signed Lien option, in both old and new Subilling modules,an Accountant and a PM can both Import and Approve a Lien document. This action will automatically mark the bill as Accepted. If you have an Accounting Integration and wish to control when the bills are pushed to an Accounting Integration in NEW Subilling module, you will want to make it a company policy to only permit Accountants to import and Approve Lien documents.
Batch Actions
Batch actions, including Print and Mark as Paid allow you to select multiple items at once. Check box next to the Sub Bills you wish select then Click on Batch actions and select from Menu.
NOTE: The items must be visible onscreen for the action to take place.
APPROVING NEW SUB BILLS
New Bills can be Approved either by clicking on the Subcontractor name and reviewing the bill or you can click on the Quick Launch Button, which will appear when you have a project that start Sub Billing in new using new sub Billing
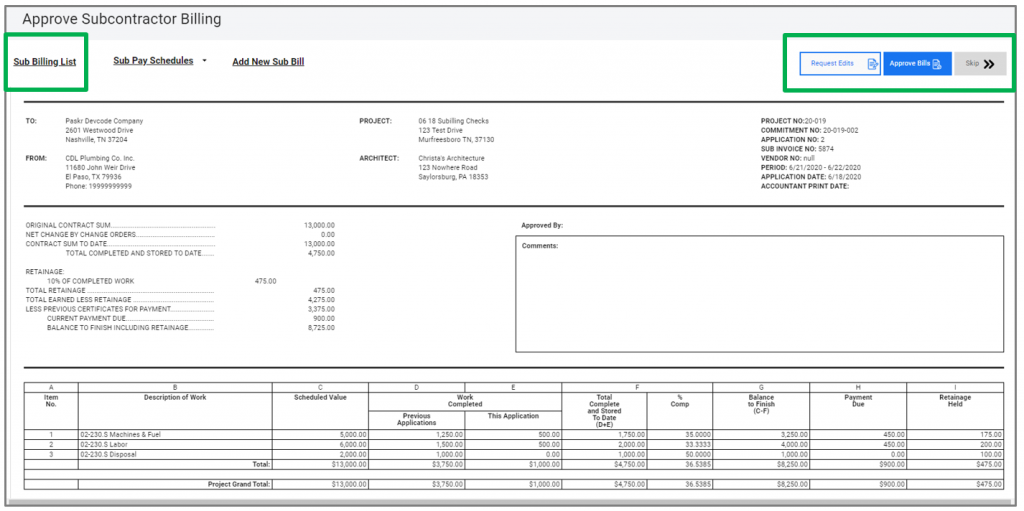
New Subill Approval Screen
- After reviewing the bill use Approve to or Request Edit to send an email to the Sub with your reason for rejection.
- Use the Skip option to go to the next bill without making a decision. It will remain in the current status and you can always return the bill at a later time.
- Once you Approve or Request an Edit from the subcontractor you will be moved to the next bill to review in that project. If there are no additional bills that require your action, it will return you to the list screen.
- Click Sub Billing List in the upper left to return to the main screen at any time
NOTE: PM Approval of the Bill will Send the Lien Release to the subcontractor. New Sub Billing uses the same Hand-signed Lien Workflow as the old version.
Quick Launch Button
The Quick Launch Button allows users to move through all bills created in a the new Billing format quickly and efficiently.
The Button Name itself, will reflect your personal user role settings.
- Button will say Approve for a PM
- Button will say Accept for an Accountant
- Button will say Approve/Accept if you have the Dual Role PM/Accountant setting in your company contact.
Quick Launch button :
- Can Only be used on Projects using NEW Sub Billing Format
- Will automatically open the oldest bill requiring your level of Approval or Acceptance
- As soon as you Approve, Reject or Skip a bill it will move to the next bill in the list

ACCOUNTANTS
An Accountant level of approval has been introduced to Sub Bills is called Accept.
- For companies using Hand-Signed Lien Releases approving the Lien release from the List Screen will mark the Bill as Accepted. This is the same when you are working with new or old Bills (Please see detailed instructions in the APPROVE EXISTING BILLS Accountants section above).
- When using Hand-Signed Liens both a PM and an Accountant can approve the Liens. This needs to be possible for companies where an Accountant may not work in RedTeam Go. *PLEASE NOTE: If your company only permits an Accountant to approve the liens, you will need to make it a company policy that only Accountants can take this action.
- Approving the submitted lien is what will send the bill to the Accounting Software through the RedTeam Go Accounting Integration. Same caution applies here as above. If Accountant wants to control when bills are sent to Accounting software you must make it a company policy that only Accountant can approve the Lien in RedTeam Go.
Why has this changed?
ACCOUNTING SOFTWARE INTEGRATIONS (QB Desktop, QB Online, SAGE, Foundation)
Accept will now also serve as the trigger that sends New format Sub Bills to an Active RedTeam Go Accounting Integration. Previously, PM Approval was the trigger, but Accountants have requested better control over when Sub Bills are sent to Accounting software.
NOTE: Projects using old Sub Billing will continue to send to Accounting Integrations upon PM Approval until those projects close out.
ENTER SUB BILLING
You can now enter Sub Bills for Subcontractors that will not participate in Sub Billing through their portal. This is only available for projects using new sub Billing. The bills prepared this way will use the existing cost code layout as the Schedule of Values (SOV), even if you have the custom SOV rule set under Accounting>Billing>Billing Requirements.


- Set the Billing Date Period
- Enter bill amounts, either in Work in Progress (WIP$) column or enter a Percent Complete in the % Comp Column. These two cells are linked, entering a value in one will automatically complete the other.
- Attach any supporting document, such as a copy of the bill you received from Subcontractor outside the RedTeam Go system. Even if you attach a bill, you will still need to enter the correct billing values.
- Submit Bill when complete
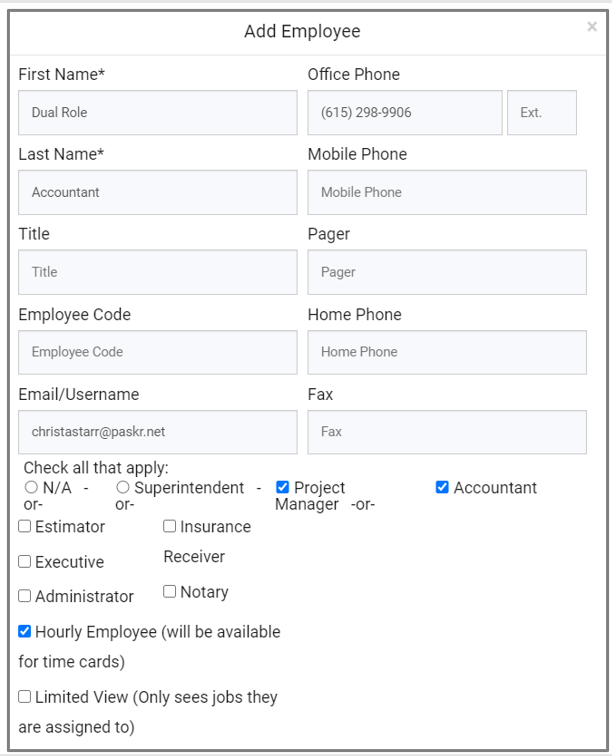
NEW Accountant/PM Dual Role
It is now Possible to have an Accountant/PM Dual Role that will permit you to perform both PM and Accountant Actions.
To set user account with Dual Role
- Go to Settings>Company Settings
- Click employee name to open Contact
- Check boxes for both Project Manager and Accountant,
- Scroll to bottom and click Save
- You may need to log out and back in to see new setting take effect
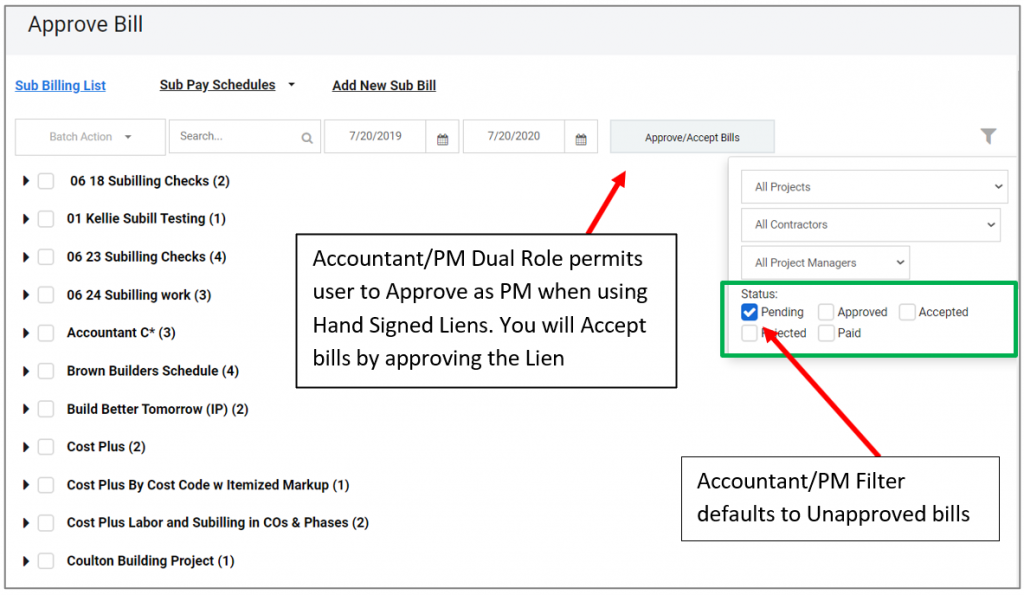
If you are using both Hand-Signed Liens and the Dual PM Accountant role, Approving the Bill here on the Bill screen will ONLY apply the first Approval and send the email to the Subcontractor with the Lien Document and an Upload link.
You will then Approve the Lien when returned, as usual, from the list screen Lien column to mark those Sub Bills as Accepted.
How Do I Approve Sub Bills if our Company uses Digital Lien releases?
All Sub Bills will be Approved From the List Screen at Accounting>Billing>Approve Sub Billing or from within the Project at Billing>Sub Billing which connects to the bill list in under the Accounting Tab.
APPROVE EXISTING SUB BILLS

Project Managers
- PM view will default to show new bills that require PM Approval on their projects
- The Filter Icon can be used to change the default settings
- Click on Subcontractor names to View, Approve bills or send back for Edit as needed.

Projects already using the old module will open to the same Approval page as before. Click to Approve or Request Edit and use View Bill list to return to the List screen to Approve additional Bills.

Filter Icon
- Use the filter icon to change the Items displayed on the Sub Billing list screen
- After you have selected your filters, Click anywhere outside the filter for options to take affect

Status Checkbox Definitions
Pending – New Bills that have been submitted or Entered. “Project Manager view” will default to show all Pending Sub Bills ready for PM approval. Users with the Dual PM/Accountant settings will also default to show Sub Bills in Pending.
Approved – Sub Bills that have been Approved by a PM.
Accepted – This “Accepted” Status represents Approval by an Accountant. Accepted bills will remove the sub bull from the list of active bills to be processed, and push the billing information through to the Job Cost Statement into the “Current Period Costs”, “Retainage,”, and “Total Cost to Date” columns. If an Accountant is also a Notary, Accepting the bill will Notarize the attached digital Lien Release.
NOTE: “Accepting” by the Accountant is the trigger that pushes the Sub Bills through RedTeam Go Accounting Integrations.
Rejected – Bills that have been sent back to the subcontractor to edit and resubmit.
Paid – Bills that have been marked as Paid from the Bulk Actions menu.
Not Printed – Bills that have not yet been Printed using the Batch Actions Tab.
NOTE: If you still Print these bills and send to your Accounting Department, you can use the Not Printed box to make sure that you have not missed any bills. If Bills do not show up when you check the appropriate Statuses (Approved, Accepted etc.) on the Filter in addition to the Not Printed box then you will know that they have already been Printed.
ACCOUNTANTS
- Accountants will now Notarize Liens from the Sub Billing list screen.
- Accountants can Notarize or Accept (depending on their user role settings in Company Settings) existing Sub Bills by clicking on the ellipses (…) and selecting Accept or Notarize.


Batch Actions
Batch actions, including Print and Mark as Paid, Accept or Notarize allow you to select multiple items at once. Check the box next to the Sub Bills you wish select, then Click Batch Action and select from Menu.
NOTE: The items must be visible onscreen for the action to take place.

APPROVING SUB BILLS ENTERED BY GENERAL CONTRACTOR
APPROVING NEW SUB BILLS
New Bills can be Approved either by clicking on the Subcontractor name to open/review the bill, or you can click on the “Quick Launch” Approve Bills Button. This Approve Bills Button will appear when you have a project that has started using Sub Billing.
SUB BILL APPROVAL SCREEN
- After reviewing the bill use Approve Bill or Request Edit to send an email to the Sub with your reason for rejection.
- Use the Skip option to go to the next bill without making a decision. The skipped bill will remain in the current status for approval at a later time.
- Once you Approve or Request an Edit from the subcontractor you will be moved to the next bill to review in that project. If there are no additional bills that require your action, RedTeam Go will return you to the list screen.
- Click Sub Billing List in the upper left to return to the main screen at any time.
” QUICK LAUNCH BUTTON” – APPROVE BILLS/ACCEPT BILLS
The Quick Launch Button allows users to move through all bills quickly and efficiently.
The Button Name itself, reflects your personal user role settings which are set under Profile>Company Settings.
- Button will say Approve for a PM
- Button will say Accept for an Accountant
- Button will say Approve/Accept if you have the Dual Role PM/Accountant setting in your company contact.
The Quick Launch button :
- Will automatically open the oldest bill requiring your level of Approval or Acceptance.
- As soon as you Approve, Reject or Skip a bill, it will move to the next bill in the list.
Accountants
An Accountant level of approval has been introduced to Sub Bills is called Accept.
- If an Accountant with a valid Notary Accepts a new bill, it will both apply the Notary seal and mark the bill as Accepted in the status column on the list screen. This makes it easy to see the status a bill is in and also sort by, or filter out the accepted Bills from the filter.
- If an Accountant does not have an active Notary in the system, Accepting the Bills will mark them as Accepted.
- For Accountants not required to review each bill on the Bill List, Printing these Bills on the Batch Actions menu will also mark them as Accepted so they are moved out of the normal flow of Approving bills.
ACCOUNTING SOFTWARE INTEGRATIONS (QB Desktop, QB Online, SAGE, Foundation)
Accept will serve as the trigger that sends Sub Bills to an Active RedTeam Go Accounting Integration. Depending upon your company’s specific work flow, any of the above Accounting actions will send the bills to the accounting software.
NOTE: Projects using old Sub Billing will continue to send to Accounting Integrations upon PM Approval until those projects close out.

New Sub Bill Accept Screen
- Review Bill, Accept, Request Edits or use Skip to move on to the next bill
- Click Sub Billing List to return to the main screen

ENTER SUB BILLING
You can now enter Sub Bills for Subcontractors that will not participate in Sub Billing through their RedTeam Go portal. This is only available for projects using new sub Billing (As of August 17, 2020). The bills prepared this way will use the existing cost code layout as the Schedule of Values (SOV), even if you have the custom SOV rule set under Accounting>Billing>Billing Requirements.
- Set the Billing Date Period
- Enter bill amounts, either in Work in Progress (WIP$) column or enter a Percent Complete in the % Comp Column. These two cells are linked, entering a value in one will automatically complete the other.
- Attach any supporting document, such as a copy of the bill you received from Subcontractor outside the RedTeam Go system. Even if you attach a bill, you will still need to enter the correct billing values.
- Submit Bill when complete
NEW Accountant/PM Dual Role
It is now Possible to have an Accountant/PM Dual Role that will permit you to perform both PM Approval and Accountant Acceptance/Notarize at the same time.
To set user account with Dual Role
- Go to Profile>Company Settings
- Click employee name to open Contact
- Check boxes for both Project Manager and Accountant,
- Scroll to bottom and click Save
- You may need to log out and back in to see new setting take effect

What are the changes for Sub Billing portal?
We have upgraded the RedTeam Go Subcontractor Billing module for a number of reasons. By far, the most important reason was to improve the accuracy of your billing documents but we also included other improvements based on years of feedback from our users some of which are listed below.
As with anything new, it may take a little time to get used to the new view, and initially you will still only be connecting to the old bills through the new portal. Projects created in the old language will need to be completed there, so you will not experience some of the most important and beneficial changes right away. But as you move into new projects that utilize the full features we think you will see a vast improvement in workflow and accuracy.
- We used the code base of Owner Billing to reprogram Sub Billing to eliminate pesky rounding issues and updated to better handle various billing scenarios that occasionally required you to contact Client Experience for programming to adjust.
- We completely replaced the Subcontractor Portal side of billing to make it much easier to use, including permitting attachments before and after bills are submitted. This helps to better accommodate states that require more than one lien per bill and lay the ground work to further improve upon this in the future.
- To reduce confusion all PMs, Accountants/Notaries can now work from just one Sub Billing page regardless of whether you use Hand-Signed or Digitally-signed Lien Releases.
- For projects using New Billing, the Approval of SOVs and Bills can now be done from inside a project using the Billing tab. PMs no longer need to leave the project to go to Accounting to complete their Approvals.
- Over the years, one of the biggest requests was to make it possible for GC to enter Sub Bills for subcontractors that won’t participate. This is now possible on new projects!
- Also based on feedback from users, we made it possible for a user to hold a Dual PM/Accounting role so users who need to perform both functions will no longer require two logins!
Here are some other quick summaries Quick Summary of Changes for new Subilling
- While we have a new Accounting user interface, clicking on existing Subills will open the old PM Approval screens.
- New subilling will only be activated on NEW projects or projects where no previous Subills exist.
- Subcontractors will not see any change until they go to the Billing area on a Project that will be using the new New Subilling module.
- For Project using the new Sub Billing we added a Quick Launch Approve/Accept button for new Sub Bills. This will launch the approval window and go through all the PM’s or Accountant’s new Subilling projects for approval without having to return to the List Screen and open each bill.
- The Pay App Drawer will be removed from new projects and replaced by Billing>Subilling tab inside the Project. This gives access to all the Project’s SOV and Billing documents like the old pay app drawer with the added benefit of being able to Approve these items right from there.