

- Home
- Upcoming Live Training Sessions!!
- Webinar Recordings
- Implementation Courses
- Getting Started Guide For Admins
- RedTeam Go Navigation
- Gear Icon
- Administration
- Contacts
- Projects
- Planroom
- Estimate (Base Bid)
- Bid Invitations
- Proposal Package
- Construction Buy Out
- Contracts
- Daily Logs
- Photos
- Billing
- Schedules
- Submittals
- Transmittals
- Request For Information (RFI)
- Potential Change Orders (PCOs)
- Change Orders
- Owner Change Orders
- Subcontractor Change Orders
- Internal Change Orders
- Meetings
- How Do I Add Meetings?
- Close Out
- Job Costs (Purchase Orders & Expenses)
- Required Documents
- Accounting
- Reports
- Superintendent
- Subcontractor
- Architect
- Owner
- Mobile
- Release Notes
- Glossary of Terms
- Accounting
Hello. How can we help you?
How Do I create Bid Invitation Templates?
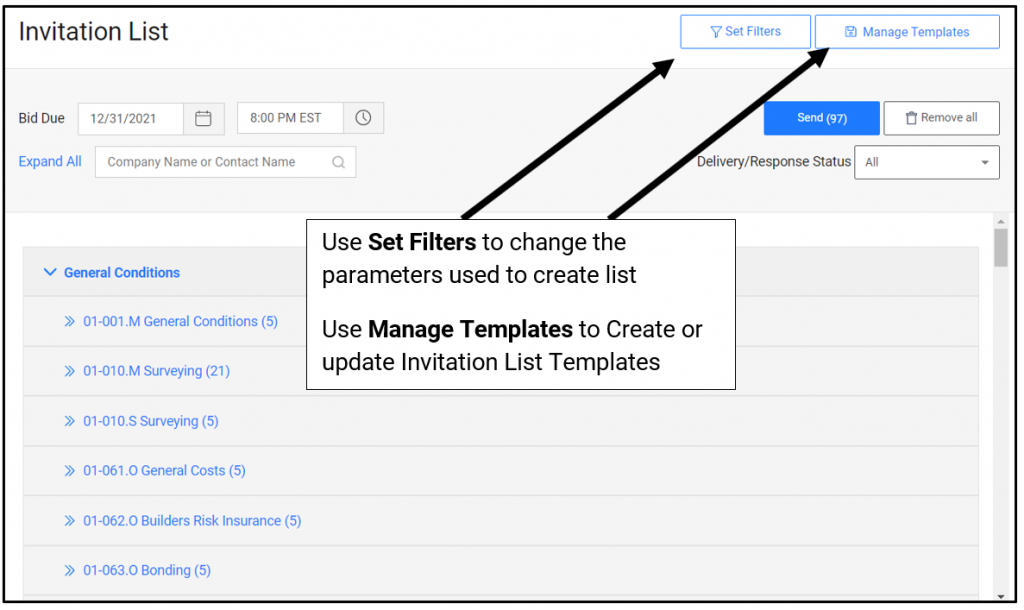
Once you have created an Invitation List that you would like to use on future Projects, select Manage Templates from the Bid Invitation List Screen
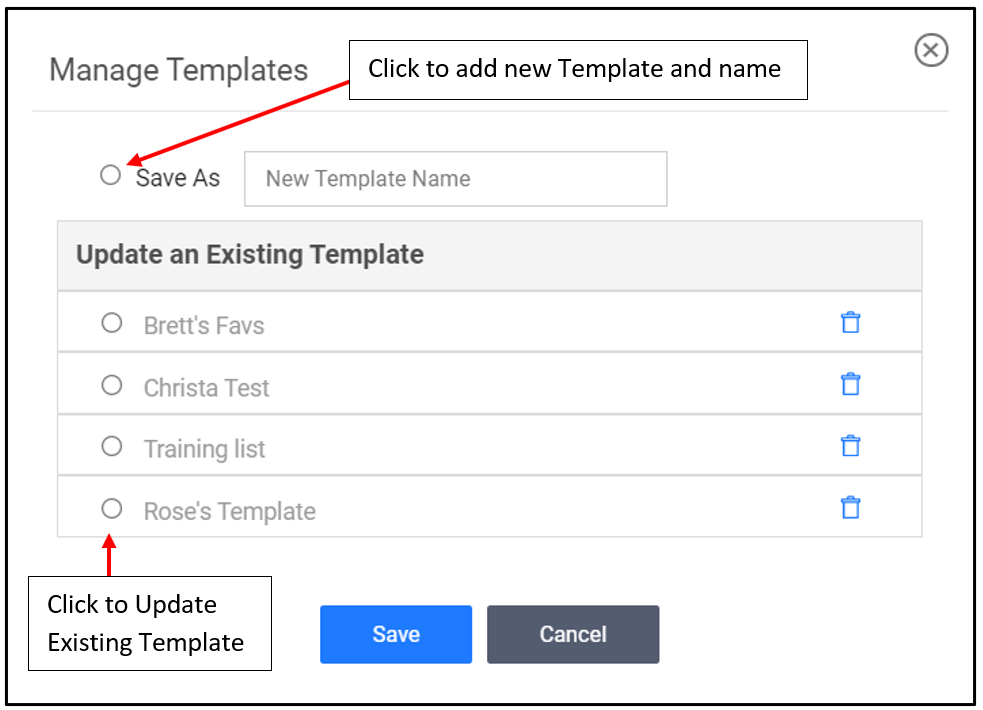
Manage Templates
- Click the radio button next to Save As, name your Template and click Save.
- Once a Template it saved, it can also be updated here.
Additional Information on Templates
- Templates will be visible and can be used by all company Estimators in the Bidding module.
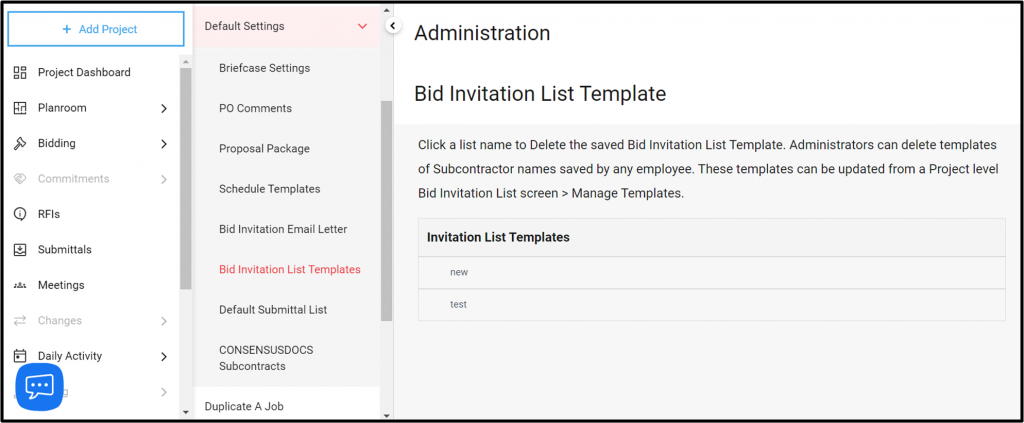
- The Template can only be deleted by the creator or by an Administrator. They can also be deleted from Administration>Default Templates>Bid Invitation List Templates
- If a default list is used on a project, any Subcontractors that do not have cost codes in the project will just be excluded from the Bid Invitation List
- Lists can be updated by clicking Manage Templates, selecting the radio button next to the list and clicking Save. This will update the list to include and add or removed contacts in the current project.
- Deleting a Template is permanent and cannot be undone.
Templates can be deleted by Site Administrators at Administration>Default Templates>Bid Invitation List Templates
How Do I send Bid Invitations?
After you have completed your Bidding Worksheet, go to Bidding>Invitation List to prepare Bid Invitations.
- Take the Tour to learn about the Bid Invitation process.
- Set or Update your Bid Invitation Due Date and Time.
- Customize your list with the information below or click Send to Email the Bid Invitations to all Invitees on the list.
- Subs and Vendors will be able to click on the link in the Email and submit bids that will pull back into your Bidding Worksheet.
- These values can also be reviewed from the Invitation Responses Tab below

To change the Filters that are used to compile the suggested Bid list, go to Set Filters button to adjust the parameters.

Add and Remove Bidders
Expand Divisions and Cost Items to see the suggested Invitee list for each:
- Click Add Invitees to locate and add additional bidders from your database
- Use Remove All to Clear our all invitees from a Cost Item
- Click Send All to send to just the Contractors in that cost item

Click on Company Name to drill down to view all cost items a Company will be invited to bid on. These can include cost items from the Base Bid, Alternates, Units or Phases if you have these items included in your Estimate.
- Click Company Bid to view Bid Pricing
- Remove to take that Bidder off the Invitation list

Send A Single Invitation
To send an invitation to just one Company or one Contact, begin typing the name in the search window until all other options disappear. Then click the blue Send button to send invitations to only those selected.
How Do I Customize my Bid Invitation Email Letter for my Project?
The Bid Invitation Email Letter can be edited at the Project level by going to Bidding>Invitation Email in your project.
The Company default version of this letter is available in Administration, but text content can be edited at the Project Level.
- Take the Tour to learn how to work with the letter content.
- Header will automatically populate with your Company Logo, Bid Invitation link and Subcontractor Information for each invitation.
- Email subject will default to include estimator, Company and Project name but can be edited.
- The blue links will populate Project specific information into the the Invitation letters.
- If you accidentally delete a link, click the Restore Default button to pull the letter from Administration default again.
- Click SAVE any time you have made changes or if the SAVE button illuminates.
- Return to the Bidding>Invitation List tab when you are ready to Send Invitations.

How do I set my Company Bid Invitation Email Letter Default?
A Default template is now available to be set in Administration. This template can be set so that a company standard can be used on all projects without the user having to edit the in-project letter each time. You must be an Administrator to access the Administration
To Edit go to Profile>Administration>Default Settings>Bid Invitation E-mail Letter
- Take the Tour to learn how to work with the letter!
- The items that appear in the header portion will populate automatically.
- Drag and drop the Icons into the letter body where the project specific information should appear. Text can be edited and deleted within the body.
- Beware of issues that could be created when cutting and pasting language in from another location as hidden or invisible formatting code will often come into the body as a result. Pasting plain text and using the text editor capabilities can avoid this issue.

How do I use the Bid Responses page?
The improved Invitation Responses screen allows you more control and better features to view, manage and enter bid information quickly and efficiently.
After you have sent Bid Invitations, you can manage responses by going to Bidding>Invitations>Invitation Responses.

Settings
To customize your view, click the Settings gear icon and select Edit Bid Invitation Columns. Drag and drop items into your preferred order or toggle columns On or Off.


Filter
Use Filters to display response results based on Response Statuses, entire Divisions or by specific Cost Codes. You can select any combination of these items to show exactly what you need to see.


Contact Card
Click on a subcontractors name to open the contact card. Here you can view, add or edit their bid numbers, comments and company contact details. One click options to e-mail, update Trades & Cost Codes assigned to the company, or to resend Bid Invitation.

Manage Responses

In addition to opening the contact card by clicking on company name, information can be edited or added to the Bid Management sheet cells. Using these cells you can update Bid Intentions, change Dates, upload attachments, Import the Bid Quote into Filing Cabinet enter important notes about the subcontractor or their bid in GC memo area.
You can also check on Bid Invitation Send and Delivery success using these two columns:
Server Status – This column will say ‘Sent’ to confirm that the Invitation has successfully left the RedTeam Go Server
Delivery Status – This column will report if the Bid Invitation e-mail has been accepted by the recipients e-mail server.
Important Note on e-mail Delivery* Once the email has been accepted by the recipient’s email server it does not always mean that it has been delivered to the recipient’s inbox. If a recipient reports that they have not received the e-mail, there are a number of things that can interfere with Delivery. Besides going into their Spam or Junk mail filter, it can also be rejected from their mail due things like company security settings, firewalls or a high setting on a third-party security protection software. While RedTeam Go has no control over the factors that could cause e-mail to be turned away from the recipient’s mail service, our Customer Experience team will do our best to help you troubleshoot an issue whenever possible.
Print Reports
Use the Print icon to quickly access the Bid Invitation reports

- Bid Invitation Detail Report – Filterable report that holds the records of all who have been sent invitations on the project, even if they have been removed from the Bid Invitation List screen. This report displays shows bid quote pricing by Cost Item so companies who bid on more than one cost item will appear multiple times on this report.
- Bid Invitation List – This report shows each invitee once with the total of their combined bid on all Cost Items.
- Deleted Invitees Log – New report to improve record keeping during Bid Management. It will record time and date when a company is removed from the Bid Invitation List. This will record by cost code if a company is removed only from certain cost items and will record the name of the employee who removed.
Where do I find reports for Bid Invitations and Invitation Responses?
There are two Bid Invitation Reports under the Reports tab. The first is the Bid Invitation Detail Report.
Bid Invitation Detail Report
From the Left-Side Menu, click Reports > Bidding > Bid Invitation Detail Report
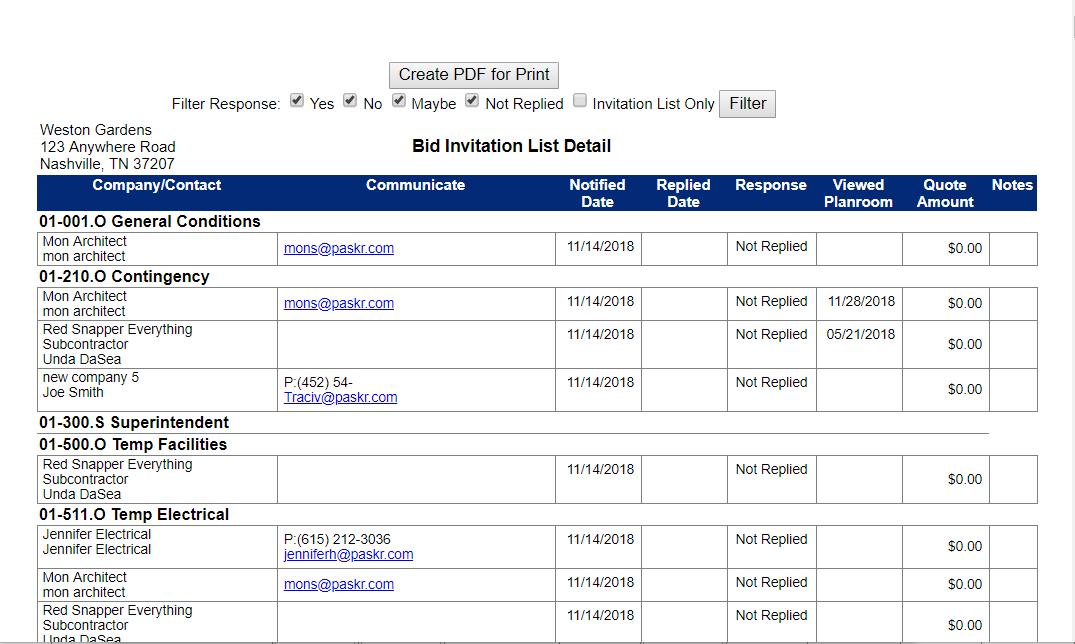
The Bid Invitation Detail Report is an interactive report that can be filtered to show those that responded yes, no, maybe, not replied or by the current Invitation List Only. It lists the invitees that were sent out by cost code in order by division, outlines how they have intended to bid, and their quote amount for each cost code they have been invited to bid on. It includes the Company Name/Contact Name, Phone, Email. Notified Date, Replied Date, Response, Viewed Plan Room, Viewed Drawing, Quote Amount and any Notes. This report is a record of everyone invited to bid on the project.
Bid Invitation List Report
The second report is the Bid Invitation List Report. Click Reports > Bidding > Bid Invitation List.
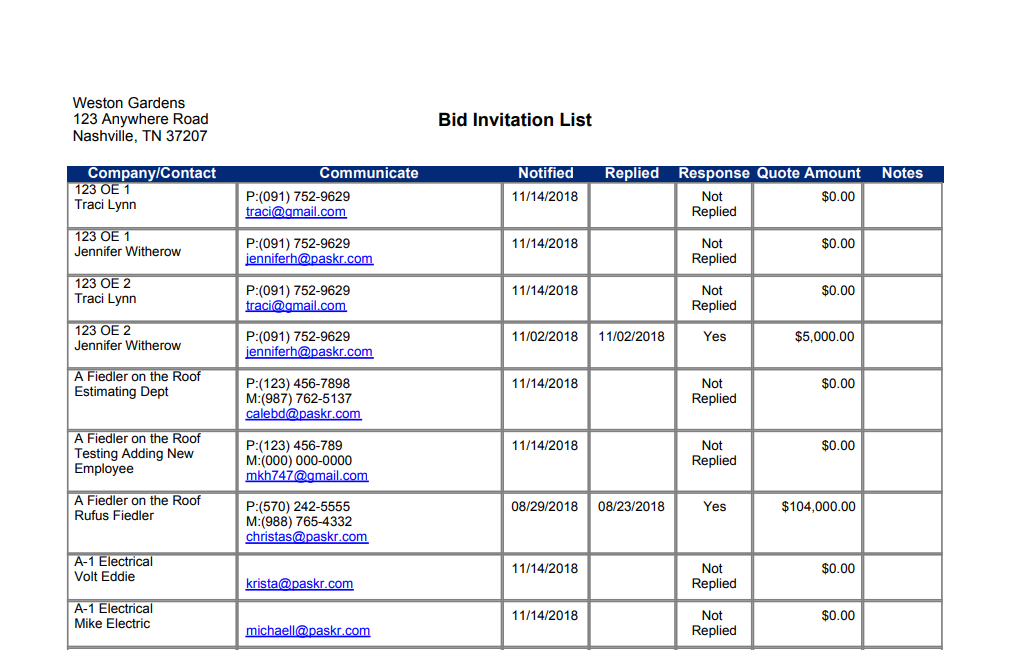
This is a report of the current Invitation List with only those on the Ready to Send list. It lists Company Name, Contact Name, Phone, Email, Notified Date, Replied Date, and Lump Sum Quote amount.
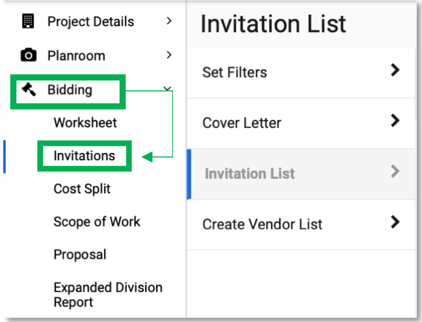
How do I send invitations?
To send Bid Invitations you will go to Bidding>Invitations>(Choose a project if you are not already in a project).
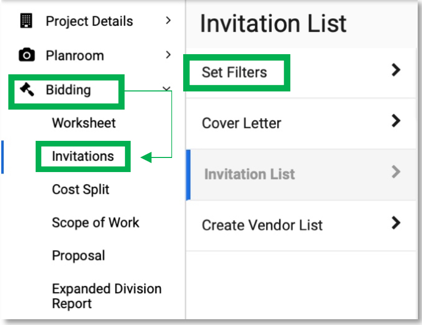
Filters
Before you send invitations you will want to first Set Filters and prepare your Cover Letter to send out with your Bid Invitations.
To set your Filters, click on Set Filters.
The first thing you will do on the Set Filters page is set the time and due date for your Subcontractor Bids to be turned in to you. Click in the Date Box, and Time Box to set.
Then Filter by Sub Ranking, Tags, Others, Project Zipcode, and Mile Radius. Once you have set these fields, click Next to move to the Cover Letter.

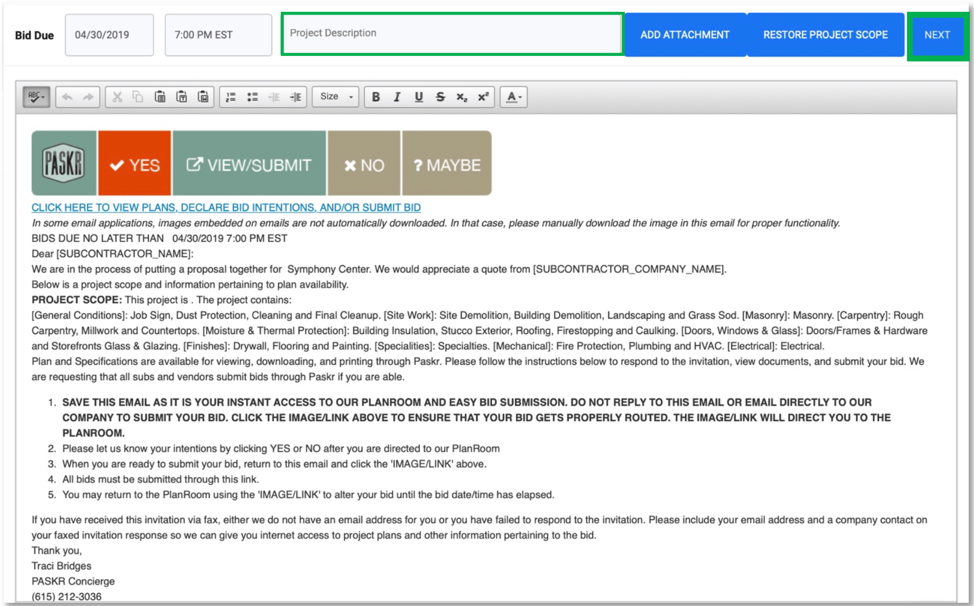
Cover Letter
The Cover Letter comes auto-populated with all the information from your Bidding Worksheet to complete the Scope of Work section. The Bid Due Date/Time will autofill as well. You will need to enter the Project Description to complete the sentence: This project is…
Then if there might be any additional information you would like to add to the Cover Letter, it is a text box. You can use your formatting tool bar at the top of the screen to bold, highlight, underline, change font size, etc. Just find the place where you would like to add your information and type away.
Once you have updated the Cover Letter click Next to proceed to compiling your Bid Invitation List.
Bid Invitation List
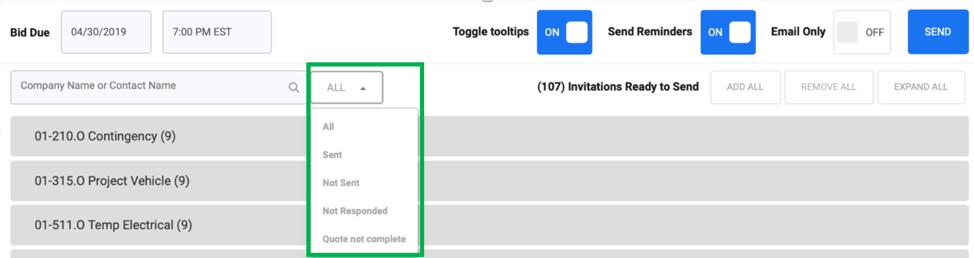
PASKR will search your contact database for all the subcontractor/vendor contacts that meet the criterial you set on the Filters page. Once the search is complete you will see the number of invitees in parenthesis ” Invitations Ready to Send”.

Check the box next to Send Reminders to have a Bid Invitation Reminder email automatically sent 48 hours prior to the Bid Due Date to anyone who has responded Yes or those that have not responded, who have not yet sent in a Bid Quote.

Check the Email only box to have no faxes sent to anyone that may not have an email address listed.

You can also Filter your Bid Invitation list by All, invitations Sent, invitations Not Sent, those Not Responded, or Quotes not Complete.
Ways to send Bid Invitations:
To Send ALL the Bid Invitations in the that are on the Bid Invitations list, you will see the number of invitations at the top of the list with a blue Send button. Click Send to send the # in parenthesis out via Email/Fax.

Send an individual bid invitation by typing a name in the search bar at the top and when the individual’s name appears as the only name in the list click on the blue Send button.

Send Invitations to All for an individual bid item by hovering over the bid item and clicking Send.

How do I set Filters for Bid Invitations?
To set your Bid Invitation Filters, click Bidding>Invitation List>Set Filters.

FILTERS
The Bid Invitation list screen will default to using the Radius Filter around the Project Zip code, but the user can change the parameters of the list Filter by
- Changing Radius Distance
- Selecting a Template
- Updating other Contact-specific Filters for Sub Rankings, Tags or other company affiliations.

Details about the Contact Specific Rankings
Sub Ranking – Each subcontractor and vendor can have a ranking that is applied in the company profile under Qualifications. The filter defaults to Average, No History, Good and Excellent. Uncheck rankings to narrow your invitation list.
NOTE: When your contacts are first entered into RedTeam Go, they are automatically checked with a Sub Ranking of “No History”. Contacts marked as ‘Do Not Use’ will not appear on the Invitation list.
Tags – Each subcontractor and vendor can have search tags applied to them in the company profile under Search Tags. Begin typing tag names. Select to narrow your invitation list to only those with the selected tags applied.
Others – Each subcontractor and vendor can have other qualifications selected in the company profile under Qualifications. The filter defaults to all but you can narrow your invitation list by selecting the qualifications listed.