

- Home
- Upcoming Live Training Sessions!!
- Webinar Recordings
- Implementation Courses
- Getting Started Guide For Admins
- RedTeam Go Navigation
- Gear Icon
- Administration
- Contacts
- Projects
- Planroom
- Estimate (Base Bid)
- Bid Invitations
- Proposal Package
- Construction Buy Out
- Contracts
- Daily Logs
- Photos
- Billing
- Schedules
- Submittals
- Transmittals
- Request For Information (RFI)
- Potential Change Orders (PCOs)
- Change Orders
- Owner Change Orders
- Subcontractor Change Orders
- Internal Change Orders
- Meetings
- How Do I Add Meetings?
- Close Out
- Job Costs (Purchase Orders & Expenses)
- Required Documents
- Accounting
- Reports
- Superintendent
- Subcontractor
- Architect
- Owner
- Mobile
- Release Notes
- Glossary of Terms
- Accounting
Hello. How can we help you?
How Do I Add Meetings?
You can Add Meetings two ways
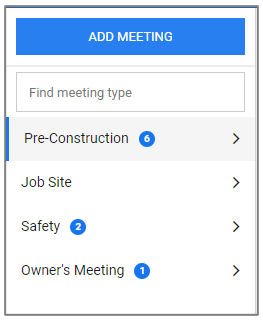
1.) For the first meeting you will need to click on Meetings in left hand Navigation and click Add Meeting above the category filters

Enter Meeting Information:
- Select from the Meeting Types. There are four default meeting types in RedTeam Go. (To add additional types to your Project go to Settings Gear>Add/Edit Meeting Types)
- Select Date, Start Time, End Time and Location then Save

2.) If you already have existing meetings, it is much faster to create the next meeting from the Previous meeting’s details.
- Click on the Meeting Category name to display the Category meeting list
- Click on the Ellipses of the last meeting
- Select Reuse for Next Meeting
- This will create the next meeting with any open Discussion topics pulled forward into the next Agenda

Once a New meeting is created, click Ellipses and choose Edit to begin work.
Next Post: How do I Prepare and Send A Meeting Agenda?
How Can Meeting Minutes Be Used?
Meetings can be used to create Meeting Agendas, record and to produce Meeting Minutes for various types of meetings. Records are easily updated and distributed with the ability to roll open issues to the next meeting as needed.
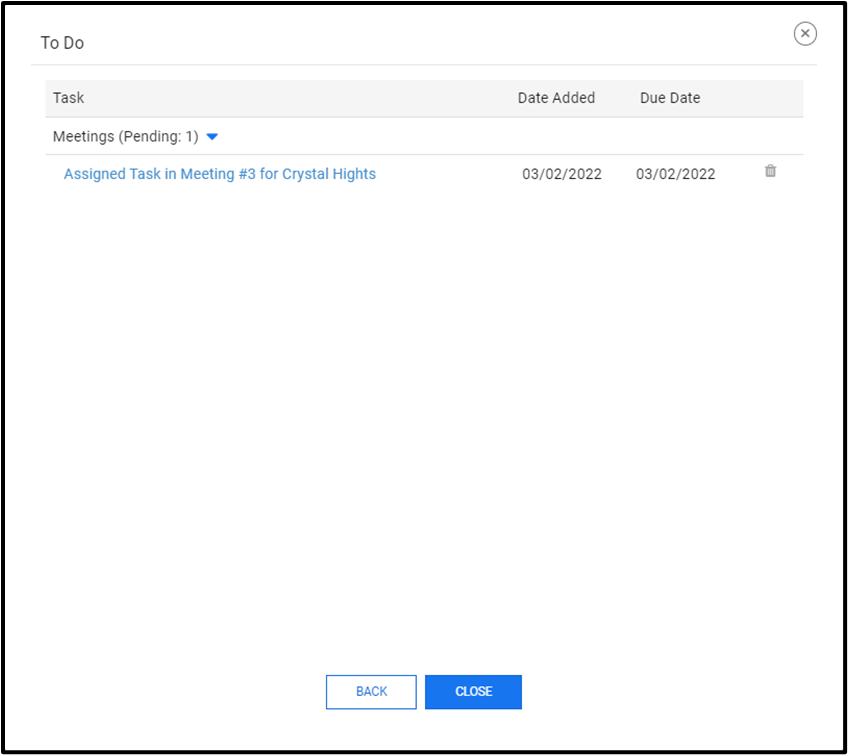
Assigning Topics/Tasks for Individuals in Meetings will be added to the Employee’s Dashboard To Do list, with Due Dates (if included).
How Can I Add/Edit Meeting Types?
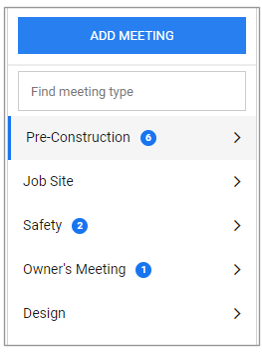
Each project will have the default meeting categories of Pre-Construction, Job Site, Safety and Owner’s Meeting. Blue number badges will display the number of each type of meeting created.
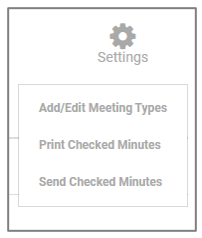
Add or Edit these categories by clicking the Gear Symbol and selecting Add/Edit Meeting Types.
From the Meeting Types screen, you can add new Meeting Types or delete types you will not need on the project.
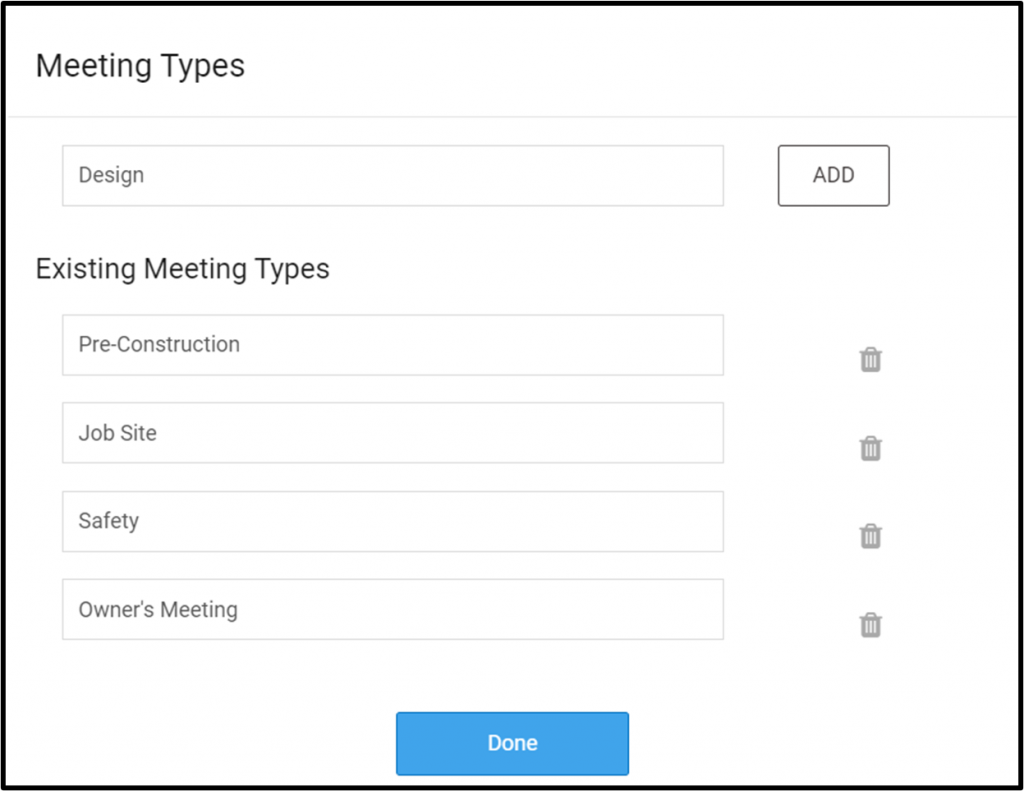
Once added, they will appear on the Meetings Filter
How do I prepare and send a Meeting Agenda?
After you create a new meeting the worksheet is divided into section for
- Meeting Details (including next meeting)
- Discussion Topics
- Attendees
- Attachments
- Gear Icon (to Print, Send, Delete or Pull Open items into the Meeting)
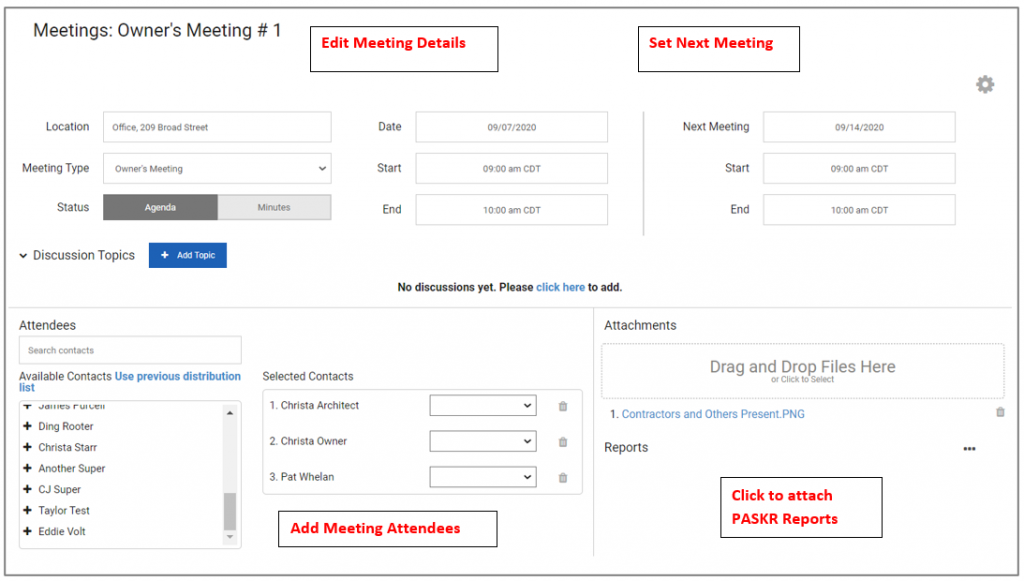
Meeting Details
Edit Current Meeting and Next Meeting details.
HINT! If you select Reuse for Next Meeting on the Meeting list screen, this information will populate into the next meeting
Discussion Topics
Discussion Topics can be either created new or pulled in from previous meetings via the Gear Symbol.
Click on Add Topic to enter the first Discussion item for the Agenda.
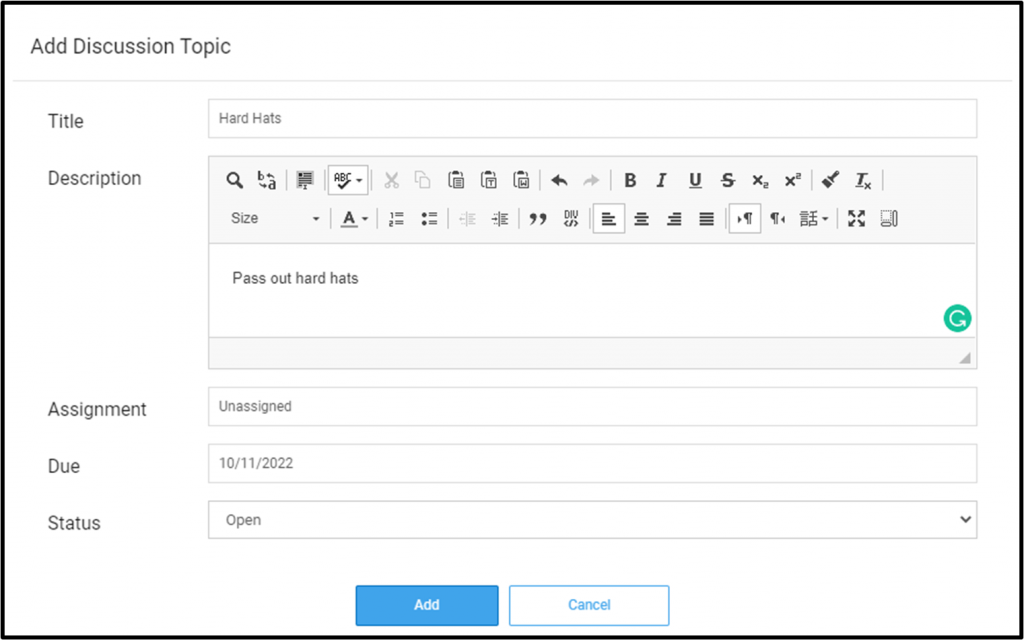
Once added:
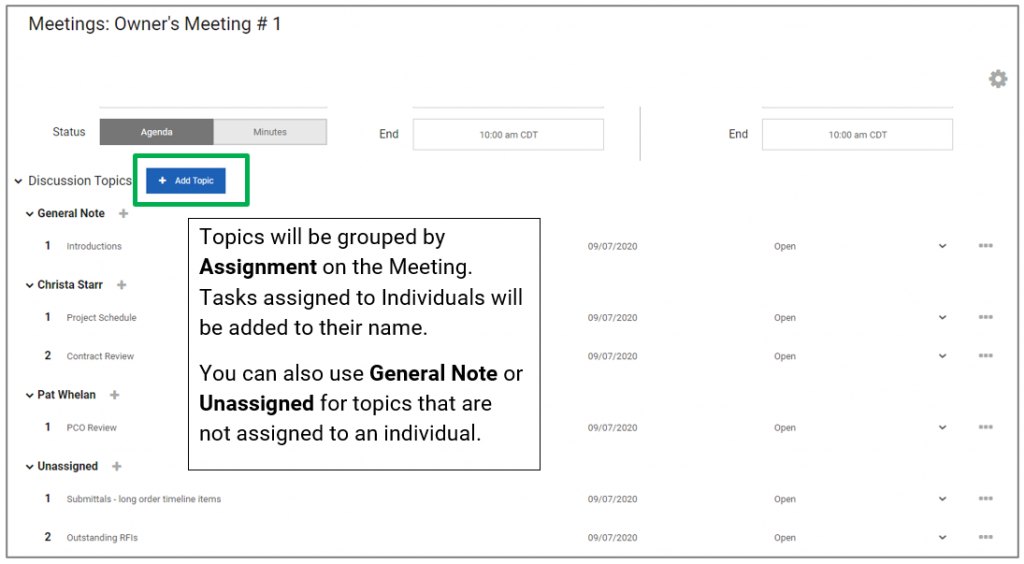
- Topics will be grouped by Assignment.
- Tasks assigned to Individuals will be added to their name.
- CONNECTION! Tasks Assigned to Employees will show on their Dashboard To Do list!
- Use General Note or Unassigned for topics that are not assigned to an individual.
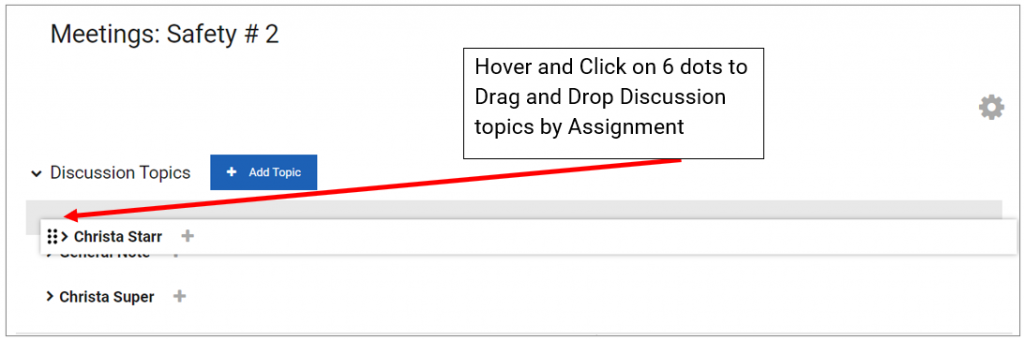
Working with Discussion Topics
- Collapse or Expand Topics: Click on the Discussion Topics section or bold Assignment headings with Caret symbol >.
- Change Topic Order: Hover over bold topic Assignment name and click on 6 dot symbol to change order via Drag and Drop.
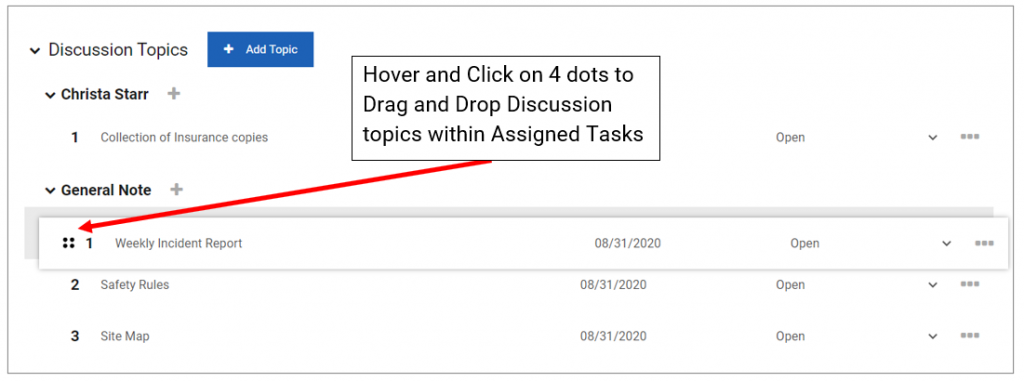
- Sort the Order of Discussion items: Hover over Item within assignment and click on 4 dot Symbol to change order via Drag and Drop.
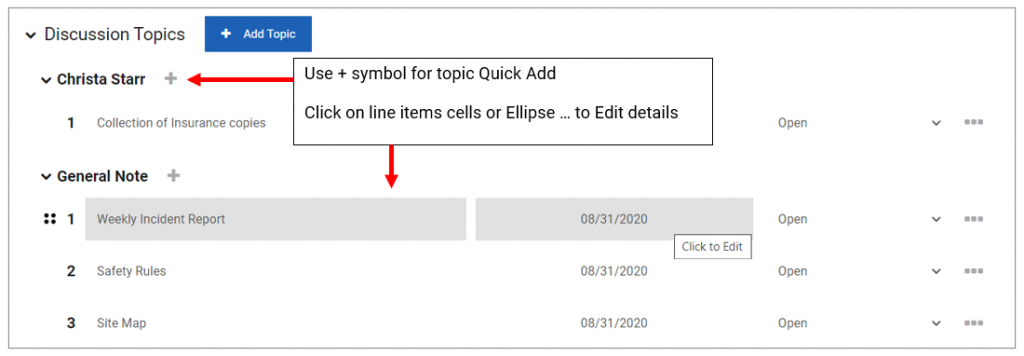
- Quickly Add Additional Topic Assignments to Individual, General Notes and Unassigned using the + symbol
- Edit Topic Name, Due date, Open/closed status by Clicking
- Edit Assignment or Detailed Description on the Ellipses
Attendees
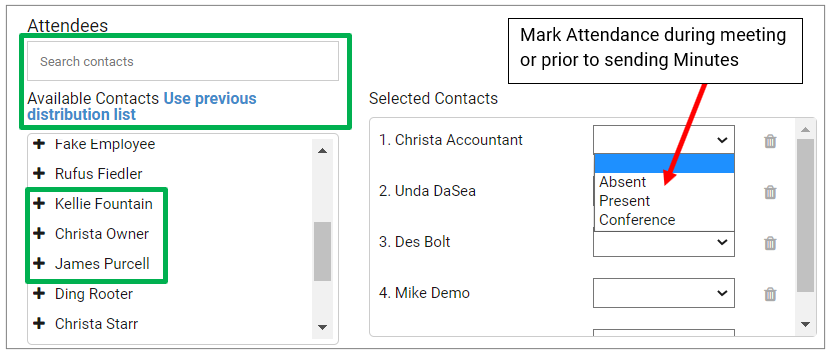
There are 3 methods to add Attendees
- Click the + sign to add users to the Meeting
- Start to type name in Search box, suggestions that match will appear
- Use Previous Distribution list will pull from previous meeting
- Select Attendance from toggle: Absent, Present or Conference
- Delete – Use Trash can icon to remove an attendee
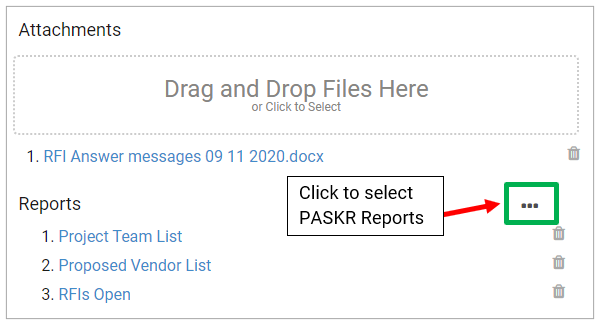
Add Attachment and Reports
Attachments: Drag and Drop files or Click to Browse
PASKR Reports: Click report Ellipses to select from the list of available reports.
Gear Actions
Click Gear Symbol to:
Pull Open Issues. This will pull any issues that remained open from the previous Meeting. Closed issues will not be pulled forward. To avoid duplication of Issues, it will only pull from the previous meeting of this Meeting Type.
Print: The position of the Agenda/Minutes Button controls which version of the Report. You will be able to print either version at any time from here, even if you have already marked the Minutes as Posted from the Meetings List Screen.
Send: The position of the Agenda/Minutes Button controls which version of the Email Notification will be sent. You will be able to Send either version at any time, even if you have already marked the Minutes as Posted from the Meetings List Screen.
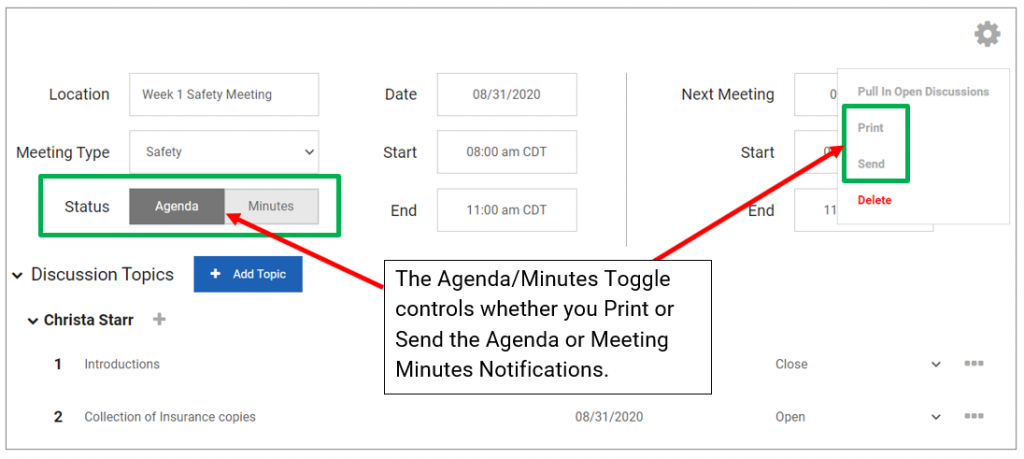
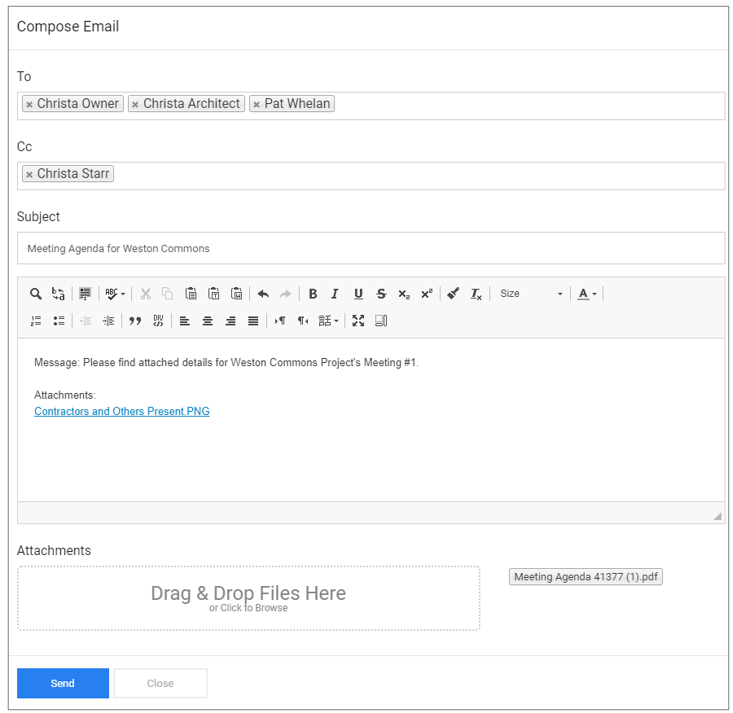
Send will open the Agenda Notification e-mail to Review and Send
NOTE: Agenda Notification can also be sent from the Meeting List screen by clicking the ellipses and select Send to Attendees.
Next How do I distribute Meeting Minutes?
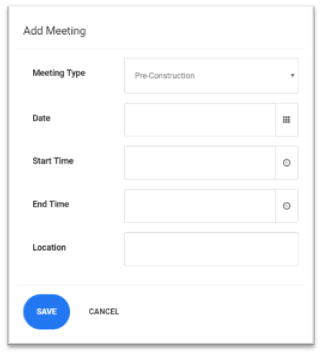
How do I add a meeting?
Go to Meetings > Add Meeting
Click Add Meeting on upper left, in blue
- Select Meeting Type
- Date
- Start time
- End Time
- Location
- Click Save
Tutorial Video for Adding a Meeting:
How do I distribute Meeting Minutes?
KEEP IT SIMPLE!
In RedTeam Go Meetings the Agenda and Minutes are really the same worksheet. That means when you Print or Send an Agenda or Meeting Minutes notification, the only things that change are the headings and name of the Printed Document and the Description and Attachment in the notification e-mails. This makes it easy for edits and gives you the best control over the whole process.
Record Meeting Minutes
Click on the Meeting ellipses and click Edit to open and update all the Meeting items during or after meeting.
- Update Meeting attendance
- Add details to Discussion topics (via the ellipses)
- Change any completed issue statuses to Closed
Send Meeting Minutes
There are 2 ways to Send Meeting Minutes
1.) From inside Meeting
- Switch Toggle to Minutes
- Click Gear Symbol
- Click Send to Open E-mail notification

2.) From the Meetings List Screen
- Click Ellipses
- Select Post Finished Minutes, which will change the Status of the Meeting from Agenda to Minutes on the meeting List screen
- Next select Send to Attendees on the Gear icon to open email notification window
- Review and Send Meeting Minutes notification

Both methods will send open the Meeting Minutes Notification Email

Next Post How can I add/Edit Meeting Types?