- Home
- Upcoming Live Training Sessions!!
- Webinar Recordings
- Implementation Courses
- Getting Started Guide For Admins
- RedTeam Go Navigation
- Gear Icon
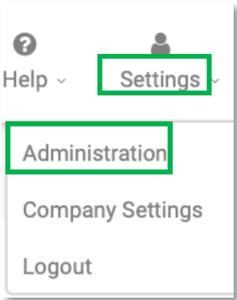
- Administration
- Contacts
- Projects
- Planroom
- Estimate (Base Bid)
- Bid Invitations
- Proposal Package
- Construction Buy Out
- Contracts
- Daily Logs
- Photos
- Billing
- Schedules
- Submittals
- Transmittals
- Request For Information (RFI)
- Potential Change Orders (PCOs)
- Change Orders
- Owner Change Orders
- Subcontractor Change Orders
- Internal Change Orders
- Meetings
- How Do I Add Meetings?
- Close Out
- Job Costs (Purchase Orders & Expenses)
- Required Documents
- Accounting
- Reports
- Superintendent
- Subcontractor
- Architect
- Owner
- Mobile
- Release Notes
- Glossary of Terms
- Accounting
Hello. How can we help you?
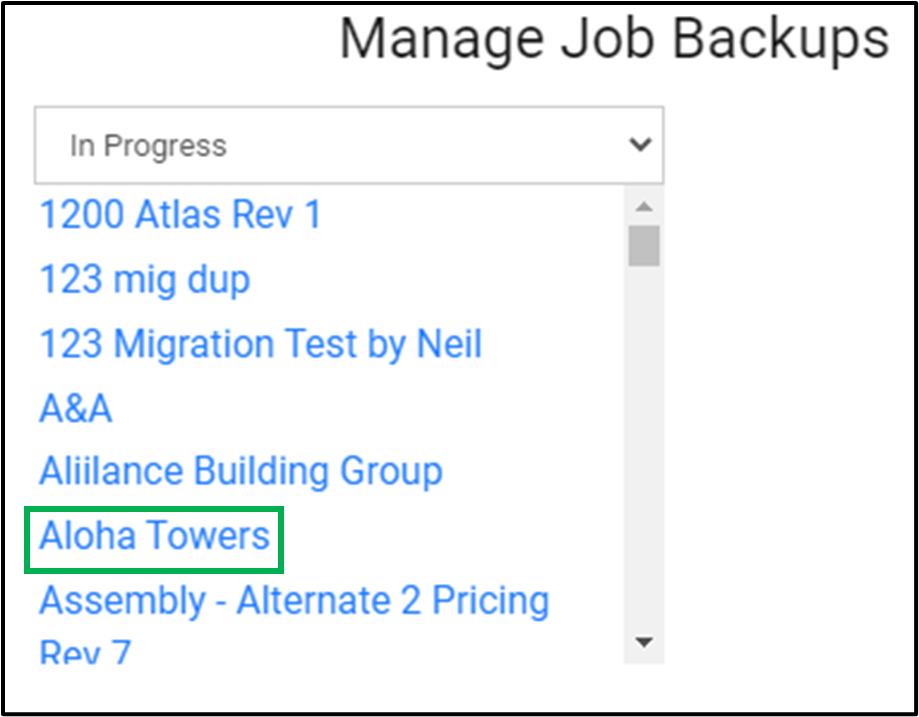
How Do I Create A Job Back-Up File?
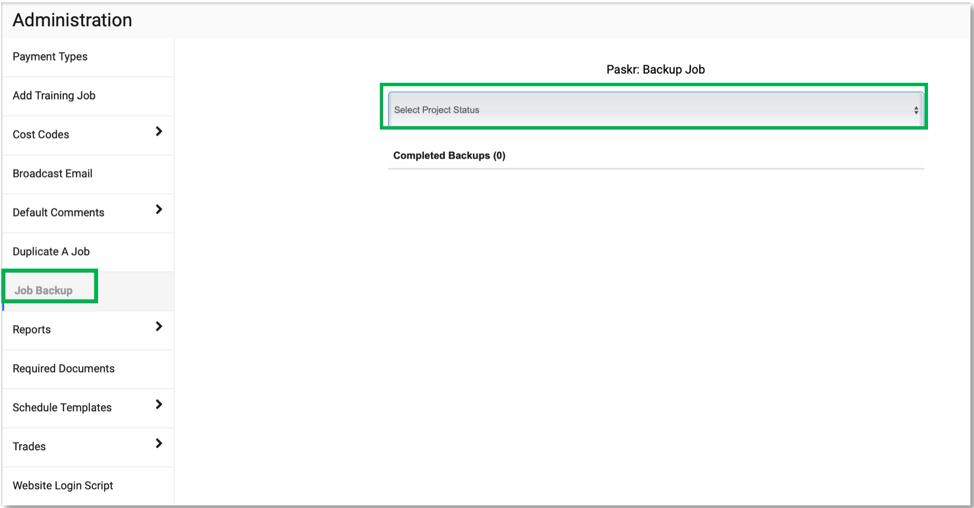
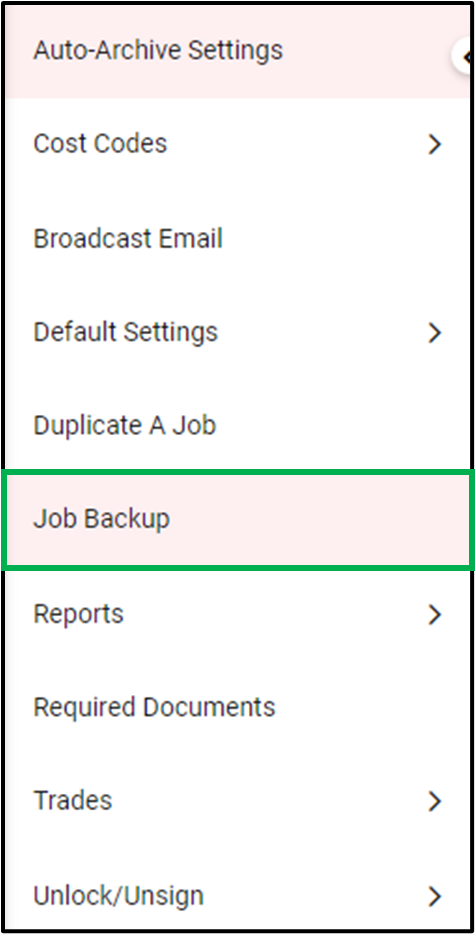
You will create a Job Back-Up file by going to Profile>Administration>Job Back Up

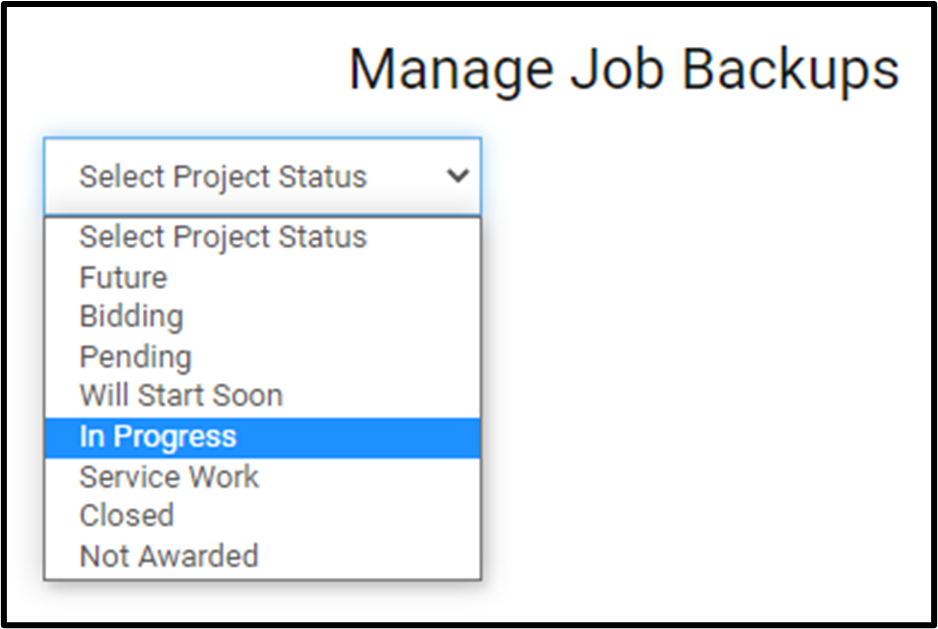
Then you will select the Status your project is currently in.
Select the Project
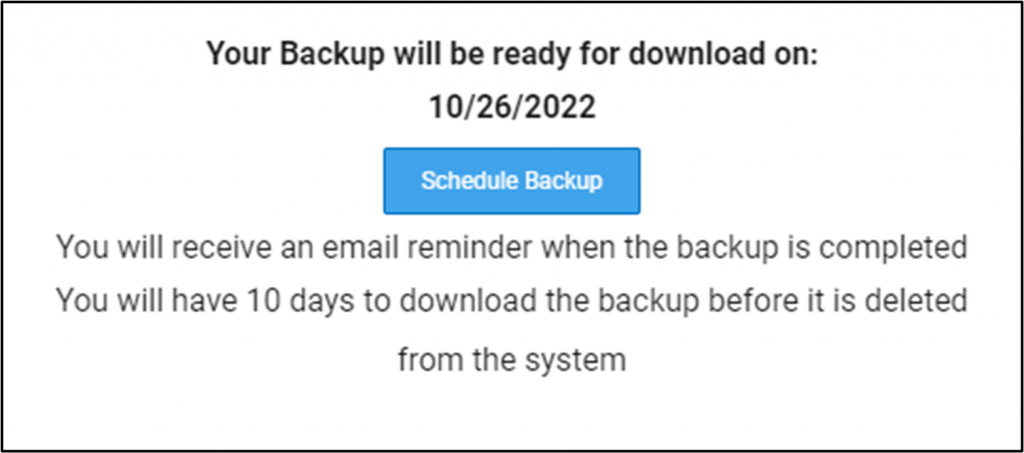
Schedule Back Up
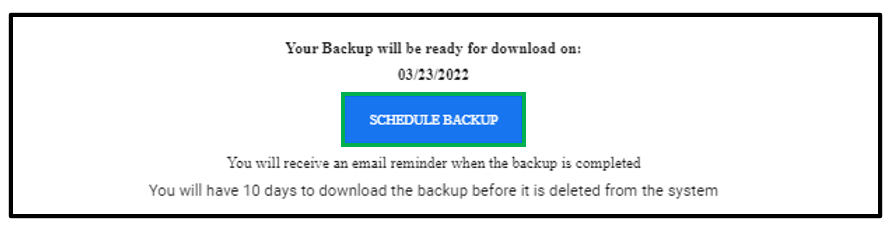
Schedule Backup
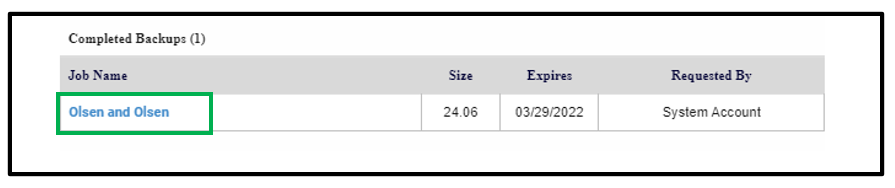
Completed Back Up
This is what the completed back up will look like. You can click on the blue hyperlink to access the file. You can also see the file size, expiration date to access, and who requested it.
What Is Shown On The Project Dashboard?
The project dashboard shows a number of helpful features to help keep a project organized.
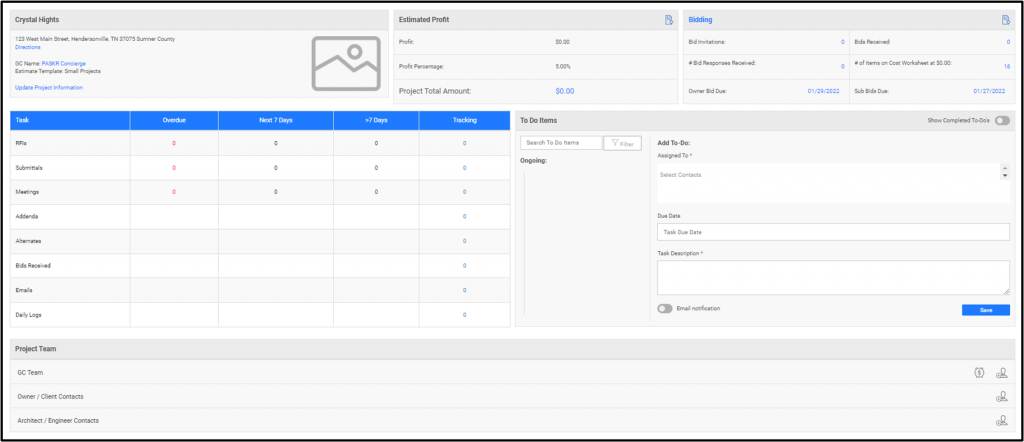
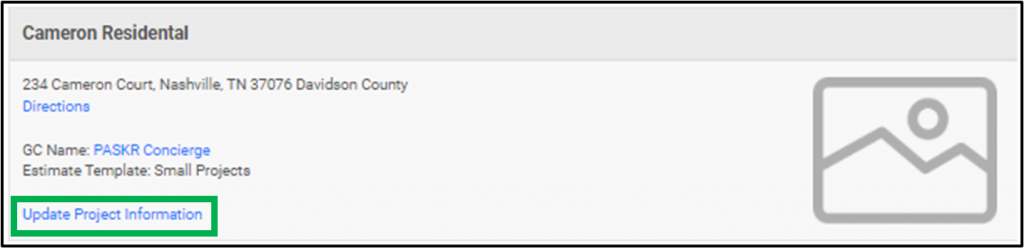
The Project Name card shows the name of the project, the address, the estimate template used as well as a hyperlink to update project information.
The Profit card provides profit information. Clicking on the hyperlink will open the Original Budget Report.
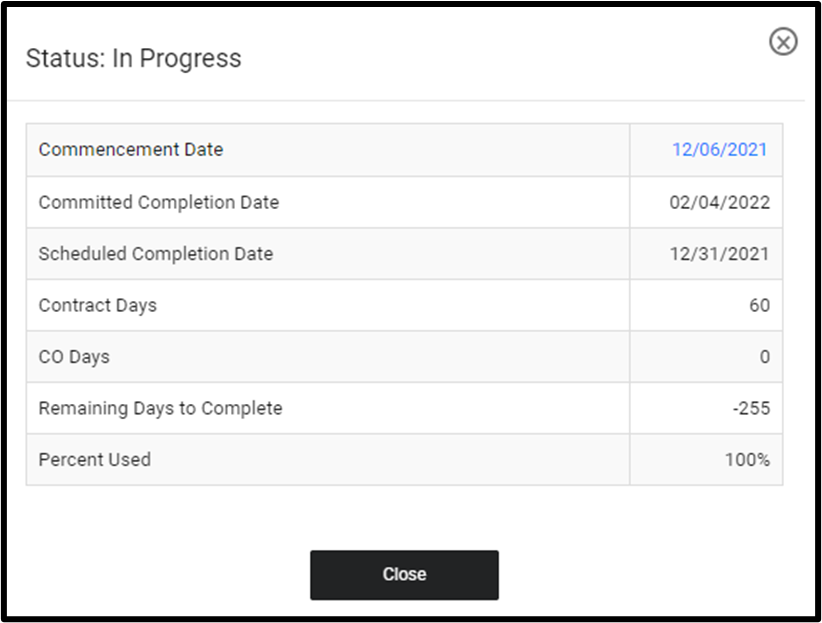
The status card provides information about the status of the project including schedule information. Clicking the paper icon opens another window with more information.
The Task Card provides information about tasks that are overdue, due within the next Seven Days or longer as well as tracking information.

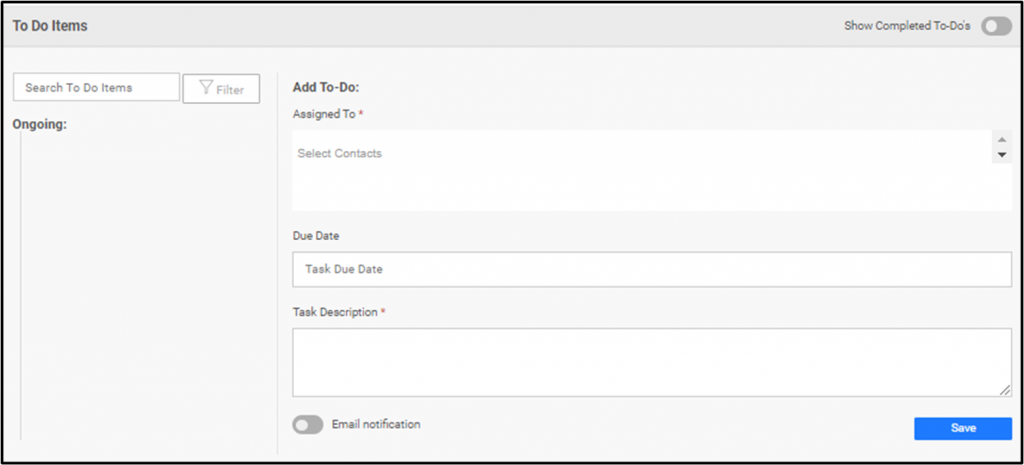
The To Do Item cards allows you to create tasks, assign tasks and due dates.
The Project team card shows the project team as well as allows you to add more people to the project team. Click on the person icon to add to the project team.

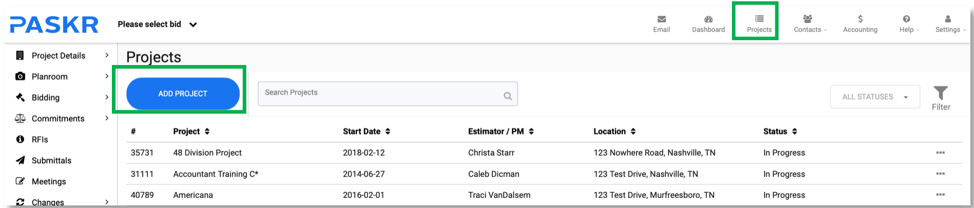
How to Create a new Project
You can create a new project from the left-hand Navigation. We made it easy to move forward with just minimal information and fill in additional information later as it becomes available.
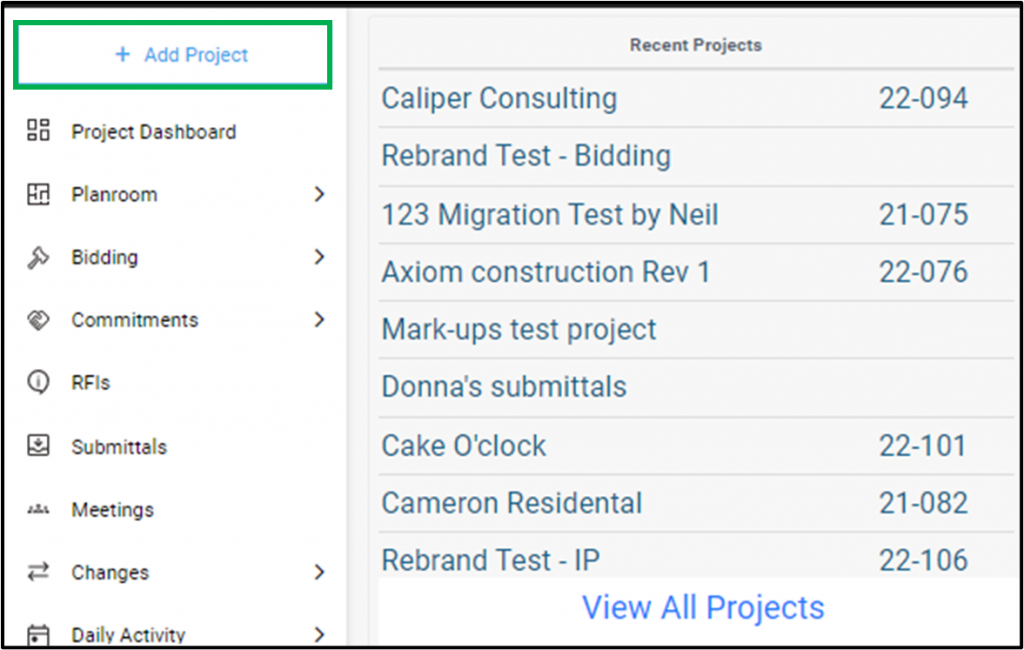
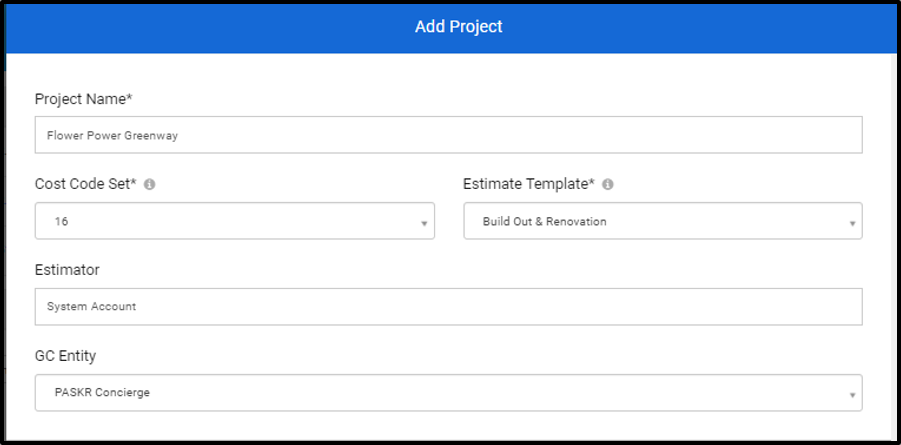
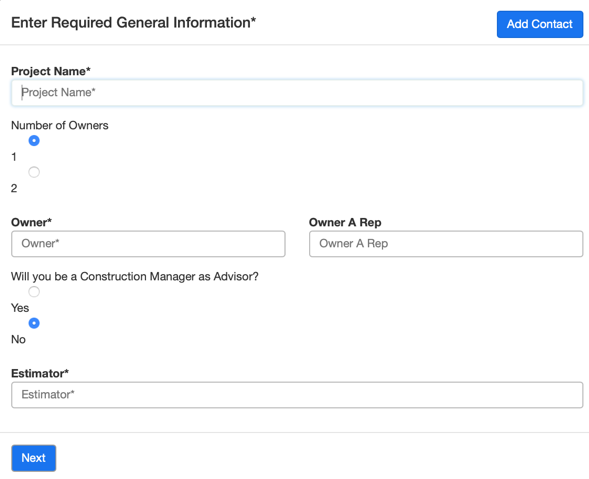
Click on Add Project to open the entry screen. The first section includes all the required information.
PROJECT INFORMATION
- Project Name (Can be changed later)
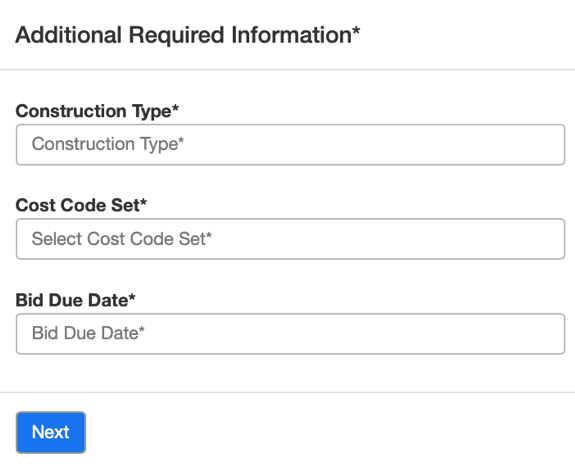
- Cost Code Set (Cannot be changed once project is created) Your RedTeam Go site comes with construction industry standard 16 and 48 Division Cost Code sets already loaded. Select whether you will be using the 16 division, 5 digit format (03-100.S) or the 48 division six digit format (03 10 00.S). If you wish to change later, you will need to create the project again and select the other set.
- Estimate Template (Cannot be changed once project is created) Your RedTeam Go site comes with some standard Cost Code Templates for certain types of construction projects (options include Ground Up, Build Out and Renovation, Residential) You must select a template here, but don’t worry they are easy to customize your projects and templates later!
- Estimator (Can be changed later) You will automatically be listed as the Estimator on the project you create, but you can start to type and select another Estimator or add a new Estimator if they are not yet in your employee database.
- GC Entity Select the entity the project will be under. You can select a second on the drop-down if applicable.
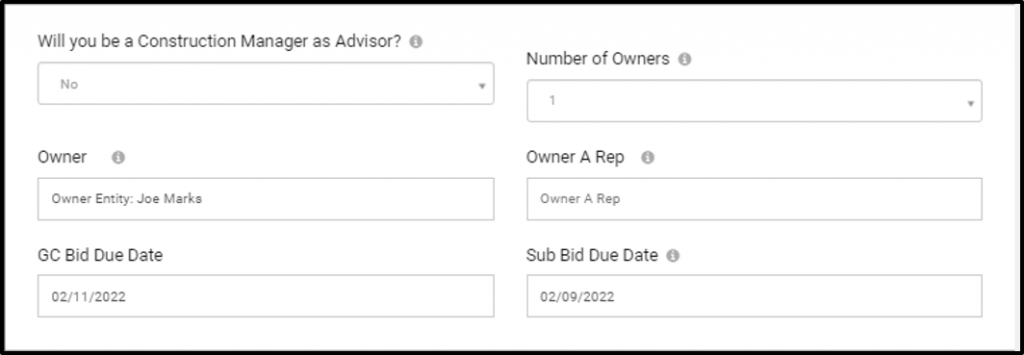
The next section contains information about the Project Owner relationships. This information can be added or edited at a later time.
OWNER INFORMATION
- Will you be Construction Manger as Advisor? (Defaults to NO) You will only Switch this to YES if your company will be serving as a GC not at risk for this project and will be managing subcontractors in the Owner’s name. If you choose YES, the Subcontracts will be made directly between the Owner and the Subcontractors. This can be changed on the Project Information page under Owner/Client Contacts section as long as the project is in the Bidding phase
- Number of Owners (Defaults to 1 Owner) Only select 2 Owners here if each will be paying for a different portions of the contract total. Selecting 2 Owners will allow you to split the bid, write 2 Owner Contracts and Bill each owner separately. Can be changed from the Project Information page Owner Section as long as the project is in the Bidding phase. NOTE: You will be able to add as many additional Owner contacts as desired under the official Owner contact(s) any time.
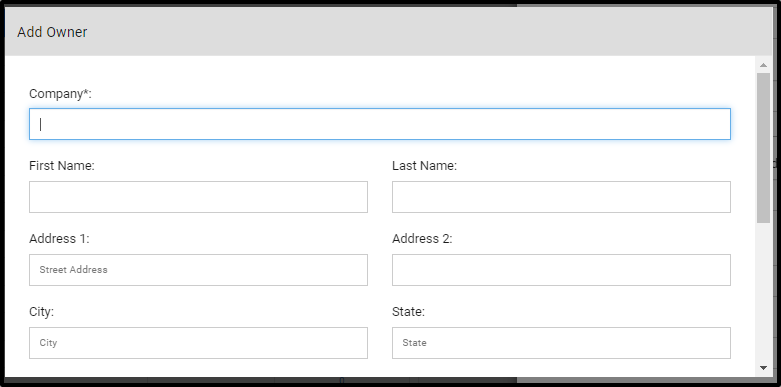
- Owner Start typing and select an existing owner from your database or add a new one. The system will recognize if you do not have the Owner name in the database and will offer for you to enter the Owner Company and Contact at that time.
- Owner’s Rep Add an Owner representative here, if desired. This can be done at anytime.
- Bid Due Date Enter the date Proposal is due to the Owner.
- Sub Bid Due Date Enter the date you will require subcontractors and vendors to return bids by in order to compile your proposal to present to the Owner.
If the system does not recognize the Owner or Owner’s representative names entered, it will give you the option to add at this time. It will Automatically assign the Customer/Owner Trade Type to this contact so they will be recognized in the system as an Owner.
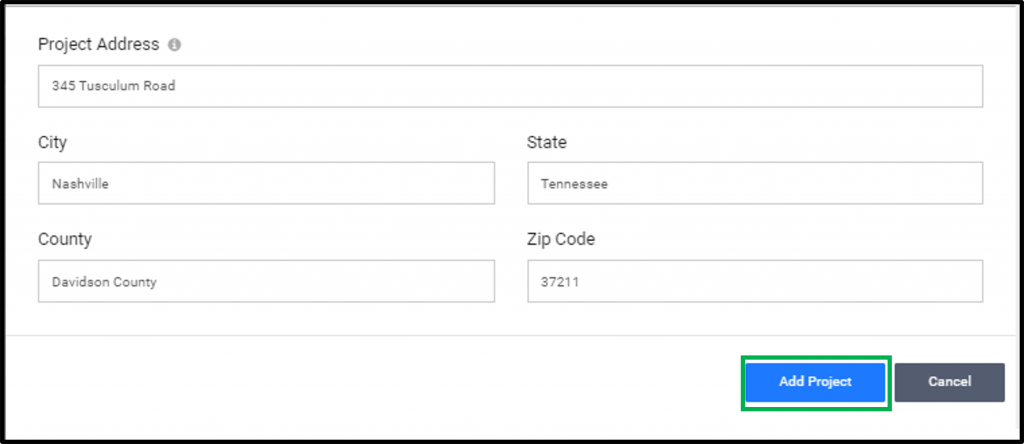
PROJECT ADDRESS
Enter the Project address or use the Google location finder to select an existing address and select Add Project.
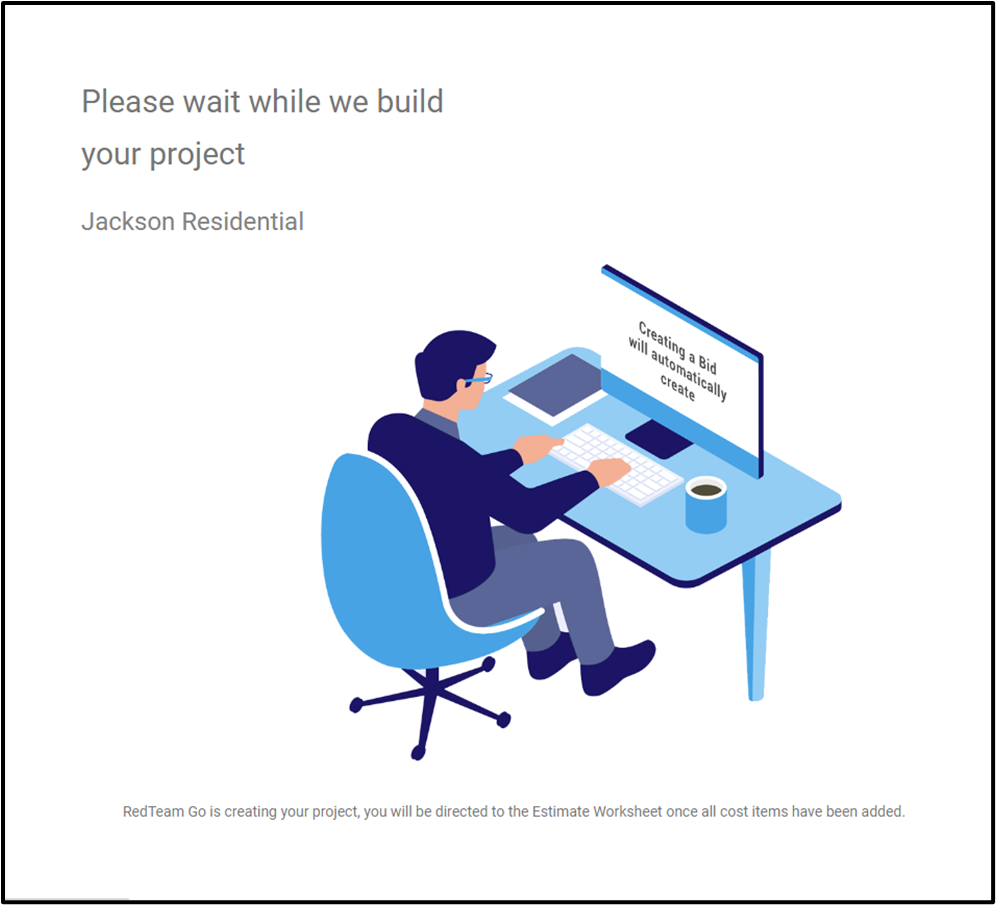
RedTeam Go will display the waiting screen as it builds your project with the information provided. You will be taken to the Cost Worksheet when this task is complete. The wait time will depend on the number of Cost Codes in the Construction Template that you selected.
RedTeam Go will ask for important information that has been left blank if you will need it to proceed with certain tasks. A notification message will remind you to add required information if you proceed to one of the following areas without required information.
- Sending Bid Invitations (Bid Due Date, Project Address)
- Sending the Proposal Package to the Owner (Owner Information, Project Address)
- Moving a Project to Pending (Owner Information or Project Information) if you are waiting to see if you will win the bid, are ready to issue the Owner Contract or need to begin work on an awarded project.
How Do I Create A New Project?
From any page in RedTeam Go on the left side menu click Add Project.

Fill out the project form.
- Project name
- Cost code set
- Estimate template
- Estimator
- GC entity
- Construction manager as advisor: yes or no (General contractor not at risk)
- Number of owners (1 or 2 owners. 2 owners means that you wish there to be two contracts and two owner bills. EX: building the building shell for one owner and then a tenet build out for the second owner)
- Owner
- Owner A representative
- CG bid due date
- Sub Bid due date
- Project address

Once everything is filled out, click Add Project

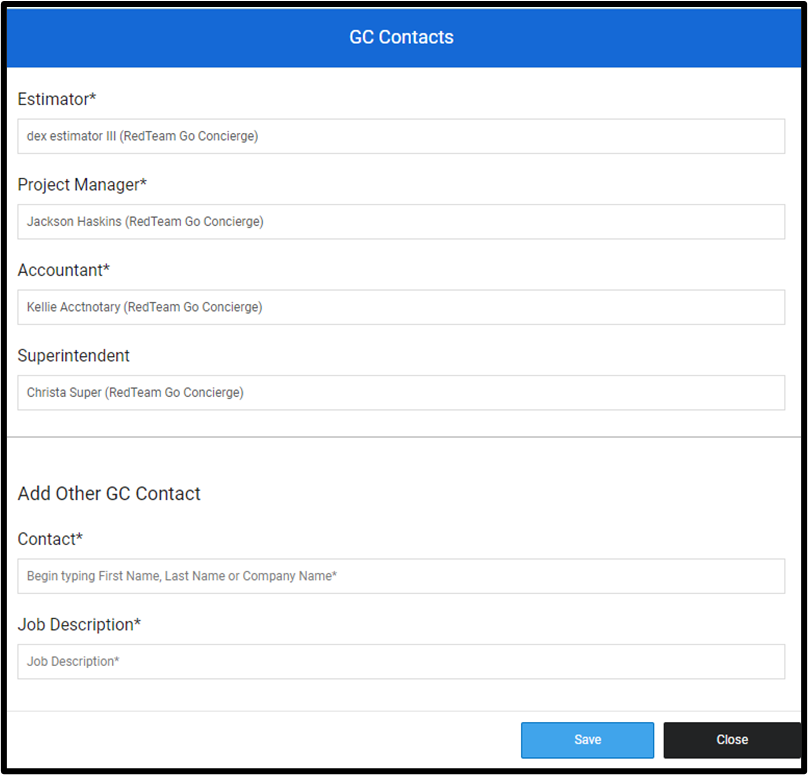
To add the project team navigate to the Project dashboard and add the project team using the person icon on the bottom right of the page.

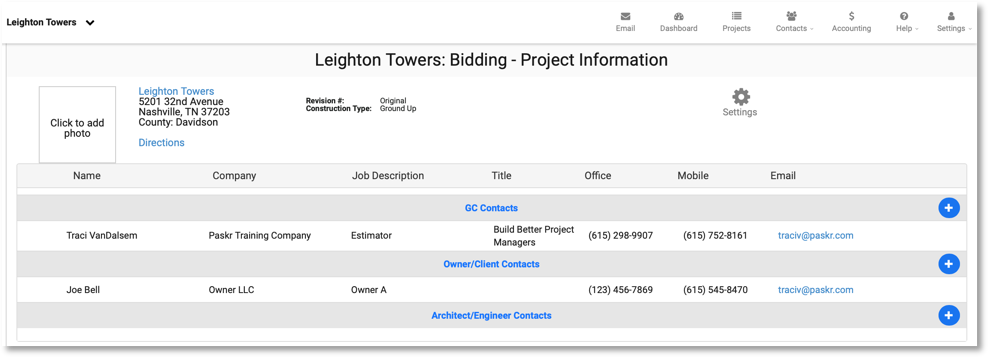
Fill out GC contacts / Owner contacts / Architect / engineer page.
Note: This is an auto save page

What are the different project statuses, and what can I do in each status?
Bidding:
These are jobs you are actively bidding. In this phase, you populate your plan room, invite bidders, and put together your estimate and proposal package. After bid day, you should promote to Pending. This will keep your bidding box from getting cluttered.
Pending:
Your project stays here until a determination is made. From here you can create a revision (this saves the original project in pending and creates a revision in bidding), set to Not Awarded, or set to Bidding (this returns this job to the bidding phase where you can make adjustments to the estimate and proposal package). If the project is awarded to you, accept the alternates as prescribed and create your owner contract in Pending before you promote to Will Start Soon. The RedTeam Go contract value must equal your owner contract value exactly before you promote to Will Start Soon. Once in Will Start Soon, you will not be able to change the contract value or move the status of the project backward.
Will Start Soon:
When you set a job to Will Start Soon, a job setup report will be sent to your accountant with basic project information (contract amount, owner contact information, etc). From this point on, you can only move a project forward. In this phase of the project, you will be creating your accounting budget (see Budgeting in the Will Start Soon section of this manual). You can also perform the initial buy out of the project. Subcontracts and Purchase Orders are available in this phase. Once your accounting budget is accurate, promote to In Progress.
In Progress:
When you set a job to In Progress, the budget is sent to your Accountant for posting in the accounting software. In this phase you have full access to all project management functions. Any change to the budget from this point on will be reflected as a change order.
Service Work:
Service work doesn’t work any different than regular projects, other than it is a different place to put projects that may be “warranty issues”, “maintenance issues”, etc. or other small projects that you would like to house in a different area than all your other large projects. The jobs are set up, moved through the statuses, and billed exactly the same as regular projects.
Not Awarded:
If projects are Bid, and not awarded to your company, you can set them to the Not Awarded Status. These projects will be listed in this Status for two years after they are placed here.
NOTE: Not Awarded Projects can be moved back to the Bidding Status, should the project come back around to you.
Closed:
Projects that have been completed in construction and in accounting.
NOTE: Closed projects will remain in this status for 2 years after being set in the Closed Status.
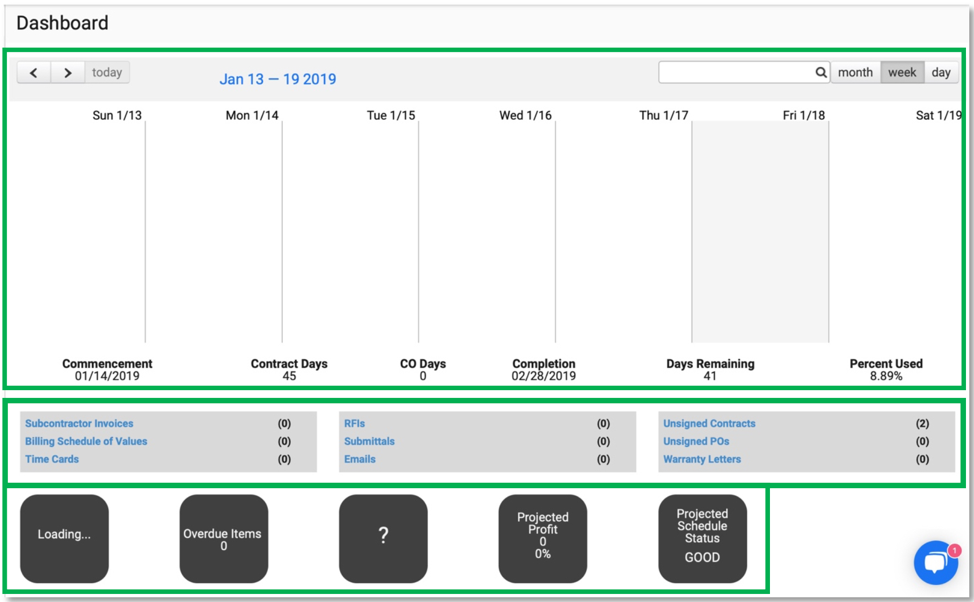
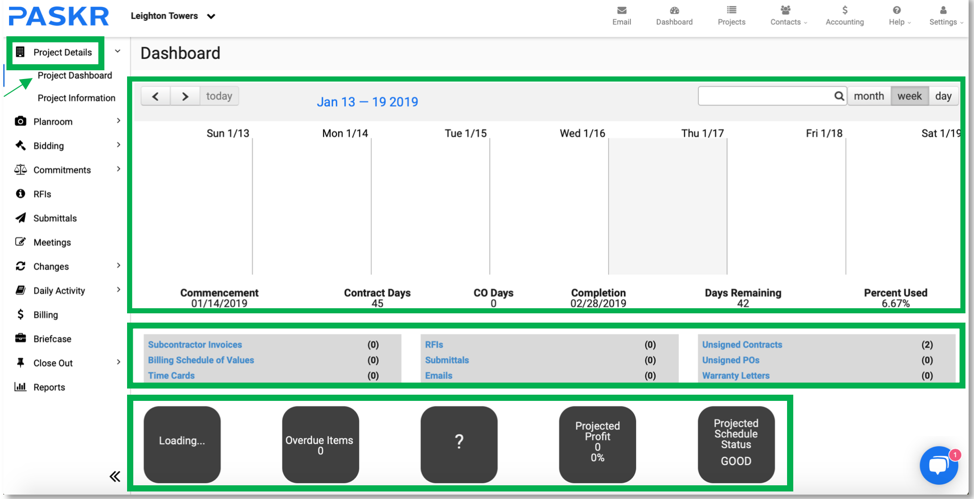
What can be accessed through the Project Dashboard?
The Project Dashboard shows the following information:
Project Menus
You can navigate to different areas of the project by hovering over the following menus: Project Information, Tasks, Filing Cabinet, Correspondence, Reports and Contacts.
Calendar
If you are using the scheduling module of RedTeam Go, a view of your project schedule will be shown and can be displayed by Month, Week or Day.
Project Information Listed:
Commencement lists the start date of the project.
Contract Days lists the number of days in the project.
CO Days lists the number of days added to the project via change orders.
Completion lists the completion date of the project.
Days Remaining lists how many days are left from the current date to the completion date of the project.
Percent Used lists the percentage of RedTeam Go that was used for the project.
Interactive Information:
Based on what status the project is in, the following interactive information is listed in blue boxes underneath the calendar on the project dashboard:
Bids Received lists the number of bids quotes that have been received from subcontractors/vendors that have not been reviewed. Clicking on the blue Subcontractor Invoices hyperlink will take you to the Bids Received screen to view the bid quotes.
Addenda lists the number of Addenda listed for the project. Clicking on the blue Addenda hyperlink will take you to the Addenda screen.
Alternates lists the number of Alternates listed for the project. Clicking on the blue Alternates hyperlink will take you to the Alternates screen.
Subcontractor Invoices lists the number of subcontractor invoices that are waiting to be approved for the project. Clicking on the blue Subcontractor Invoices hyperlink will take you to the Approve Subcontractor Billing screen.
Billing Schedule of Values lists the number of schedule of values waiting to be approved. Clicking on the blue Billing Schedule of Values hyperlink will take you to the Approve Subcontractor Billing screen. Hover over Sub Pay Schedules and click on the name of the subcontractor. Their schedule of values will open for you to approve or decline.
Time Cards lists the number of Time cards waiting to be approved. Clicking on the blue Time Cards hyperlink will take you to the Approve Time Cards screen. Review the time entered for each employee and check the box to the right of their time to approve it.
RFIs lists the number of Requests For Information that need to be answered. Clicking on the blue RFIs hyperlink will take you to the View RFI List screen.
Submittals lists the number of submittals that need to be answered. Clicking on the blue Submittals hyperlink will take you to the View Submmital List screen.
Emails lists the number of new emails for your that have not been read on this project. Clicking on the blue Emails hyperlink will take you to a screen that lists unread Emails.
Unsigned Contracts lists the number of contracts that have not been signed by Subcontractors. Clicking on the blue Unsigned Contracts hyperlink will take you to the View Subcontract List screen.
Unsigned POs lists the number of purchase orders that have not been signed by Vendors. Clicking on the blue Unsigned POs hyperlink will take you to the View PO List screen.
Warranty Letters lists the number of warranty letters that have not been signed by Subcontractors/Vendors. Clicking on the blue Warranty Letters hyperlink will take you to the View Warranty Letters List screen.
Interactive Squares
Weather Circle – Lists an icon displaying the current weather condition for the project location, the high/low temperature for the day and the current temperature. Hovering over the weather circle gives an overview of weather for the week.
Overdue Items Circle – Lists the number of to do items that are overdue. Hovering over the overdue items circle gives an overview of the RFIs, Submittals, Scheduled Tasks and Punchlist Items that are overdue.
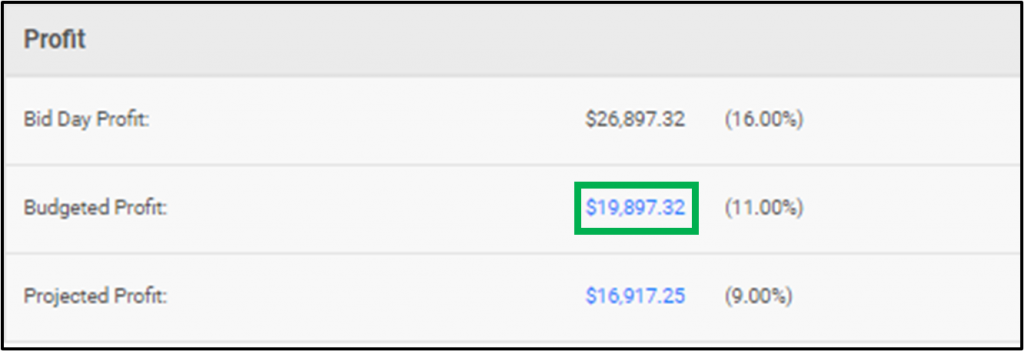
Projected Profit Circle – Lists the projected profit $ amount along with what % of the project it is. Hovering over the projected profit circle gives an overview of the Bid Day Profit, Budgeted Profit and Project Profit $ amounts and percentages.
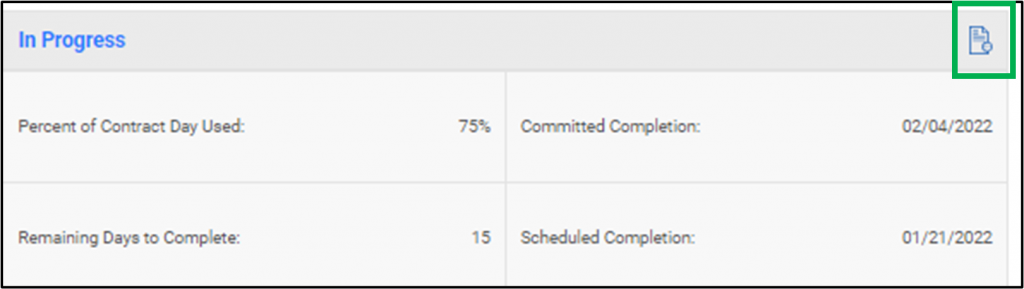
Projected Schedule Status Circle – Lists the current status of the project. Hovering over the projected schedule status circle gives an overview of the Committed Completion Date, Projected Completion Date, Days to Complete and how many Critical Tasks are yet to be completed.
What is shown on the Project Dashboard?
The Project Dashboard shows the current week, and lists scheduled activities in the Calendar. The Calendar can be updated to show specifics for the Day, Work Week, or Month.
Below the Calendar you will see a list of Tasks to be completed by Project Mangers. If there are any tasks that need to be completed you will see how many in parenthesis. Simply click on the blue hyperlink for the Task name, and you will go directly to that task to complete it.
Below the Project Tasks, you will see 5 squares that will be filled with information, depending on the status the project is in. Those will include Overdue Items, Projected Profit, and Project Schedule Status.
How can I bypass Bidding and input an Awarded Project?
You will begin setting up a new project from the Global Dashboard by going to Projects > Add Project

1. Next refer to the article in our Knowledge Base titled “How do I create a new project“, then follow the rest of the steps below.
- Addenda
- Drawings
- Photos
- Specifications
2. Zero out Sales Tax, Labor Burden, General Liability and Overhead by going to Bidding > Worksheet, click on Actions > Set Mark Ups.


3. When setting up your estimate, you can add/remove any cost codes from your Estimate Base Bid by clicking on Actions > Add/Remove Cost Items.

4. Click on a Division to see Cost Codes. Enter line item dollar amounts as lump sums that include alternates and all markups except Profit.

5. When creating your bid notes on the Worksheet, include the scope of work for the base bid as well as any alternates for that cost code. Bid notes will populate in the Scope of Work on subcontracts.

6. Check to be sure the division totals are the same as that of your budget you created outside of RedTeam Go.
7. If there is a difference in the between your subtotal in RedTeam Go and the contract value with the owner, click on Actions > Set Mark Ups add the difference as a dollar amount to profit.

8. Set the project to Pending by going to Projects > click the Ellipse Icon next to the Project Name.

9. As soon as your project total is accurate (see NOTE below), move your job to Will Start Soon and then to In Progress, following the same steps as the above, where you can proceed with all project management tasks.
NOTE: Your RedTeam Go project total MUST be exact to the penny before you move your project to Will Start Soon. Once you promote your project to Will Start Soon your project total can only be changed via an owner change order. Moving a project backward from Will Start Soon to Bidding is not possible once the owner contract value is set.
How do I create a new project?
Projects > Add New Project
Follow the Wizard to set up the project.
The first window will have you select the Project Name, number of Owners (you will be able to add multiple Owner contacts for one owner).
TIP: There will only be TWO owners if you wish to have two contracts and two Owner Bills. Ex: if you are building a shell building for a developer, then you are also building out a tenant space for someone leasing space from the developer. You would have costs for the Owner A (Developer), then costs for the Build-Out for Owner B (Tenant).
The Owner A Representative is someone that can act on behalf of the Owner to sign Contract Documents, Change Orders and Owner Bills.
Will you be a Construction Manager as Advisor? Yes or No. A Construction Manager as Advisor is when the General Contractor acts as a General Contractor not at risk. Which means they are managing Subcontractors in the Owner’s name. All subcontracts, change orders and sub billings have the project Owner’s signature, but are managed by the General Contractor. Construction Manager’s benefit from RedTeam Go in every way that a regular GC would except the designee (Owner) cannot electronically sign the subcontracts or sub change orders. Subcontracts can be signed electronically by the sub and then sent to the designee (Owner) for hand signing. Sub change orders must be executed by the sub and the designee in ink. The documents can then be uploaded into the filing cabinet.
Select the Estimator for the project.
Next add the Construction Type (Estimate Template), Cost Code Set (16 or 48 Division), and Due Date to have a Proposal to your Owner.
Last, enter the project address.

Once you complete the wizard you will land on the Project Information Page. Here you will click on the blue hyperlinks for GC Contacts, Owner/Client Contacts, and Architect/Engineer Contacts to add more contacts for each category if necessary.
Next click Bidding > Worksheet to view your Divisions and Cost Codes for the project. Click Actions to Add/Remove Cost Codes as well as set your project Mark-Up Percentages.

Click on the Notebook Icon next to the cost code to add Bid Notes. Bid Notes will be sent with Bid Invitations to your Subs/Vendors you invite to price each cost code. They will also be used to populate the Scope of Work section of the Subcontract when the project moves forward in status to Will Start Soon, as well as the Scope of Work report for the Owner Proposal Package.

How do I create a Project Back-Up file for a project?
Settings > Administration > Job Back-Up > Select Project from Drop Down Menu
Creating a Job Back-Up will copy all documents from the Briefcase and all Emails from Correspondence from their respective folders and create a zip file for you to download to your media of choice. (Save to hard drive on your computer, disk, external hard drive, etc.)