

- Home
- Upcoming Live Training Sessions!!
- Webinar Recordings
- Implementation Courses
- Getting Started Guide For Admins
- RedTeam Go Navigation
- Gear Icon
- Administration
- Contacts
- Projects
- Planroom
- Estimate (Base Bid)
- Bid Invitations
- Proposal Package
- Construction Buy Out
- Contracts
- Daily Logs
- Photos
- Billing
- Schedules
- Submittals
- Transmittals
- Request For Information (RFI)
- Potential Change Orders (PCOs)
- Change Orders
- Owner Change Orders
- Subcontractor Change Orders
- Internal Change Orders
- Meetings
- How Do I Add Meetings?
- Close Out
- Job Costs (Purchase Orders & Expenses)
- Required Documents
- Accounting
- Reports
- Superintendent
- Subcontractor
- Architect
- Owner
- Mobile
- Release Notes
- Glossary of Terms
- Accounting
Hello. How can we help you?
How do I Annotate and Compare Drawings?
Click on the Ellipses of a Drawing sheet and select Annotate/Compare from the dropdown menu.

This will open the feature where you can annotate drawings, compare versions for changes and attach marked up plans to existing or new RFIs (Request for Information).

Overlay Comparison
The Compare feature allows users to select 2 sheets and overlay them so differences are highlighted in contrasting colors.

After selecting the first sheet:
- Click on Compare button above to select the second sheet to overlay.
- If there are earlier versions/revisions of the sheet, those will appear automatically. Select from those or clear out the search cell above to see all sheets to select from drawings. You can also use type-ahead in this cell to search for a particular sheet.

Differences in the compared drawings will appear marked in the corresponding blue or red colors.
You can toggle between Document A and Document B tabs to confirm changes, which may be required on sheets that already use color.

Align
If the sheets selected do not line up exactly, the Align option can be used. It will require you to select 3 reference points to align on the drawings. The Align feature will appear differently depending upon the device used. The desktop Align tool appears with the zoom tool that can be used to click on the exact points. Click Reset as needed if you need additional repositioning.


Redline Markups
Redline Markups are the new Annotation area. The dynamic save will be retained as Private save in drawings until they are Published. When on Private save, the markups will are only be visible to GC users.

Annotation Log
Click on Thumbnails dropdown icon to left and select Annotations to see list of markups that have been changes on left hand side view.


Published Annotations will now appear on the OCR interactive view. Some Items are unavailable in this view (like text notes).

Markup and Attach – RFIs
Markup and attach will allow users to markup a drawing sheet and add it to an existing RFI or to create a new RFI. It will open the RFI worksheet with the annotated drawing sheet attached, which can be updated and submitted for answers.

How do I upload new Versions or Revisions to the Planroom?
All Revised files are added via the + Upload Button. The method is different if you are Splitting and Scanning with the OCR or just uploading files without scanning. Both methods appear below.
With Splitting and Scanning
- Go to Planroom>Drawing
- Click +Upload and Select the option Upload File(s) for Splitting, Scanning and Linking

On the Upload and Scan screen select the Folder that contains the Plan Set from the Drop Down.
NOTE * You must select an existing the folder or the revision process will not be activated!

There are three options for identifying Versions/Revisions.
- You can enter a Version name or number to apply to all sheets here on Upload
- You can leave cell blank and use the OCR scanning process to identify the Version/Revisions.
- You will be able to manually type version information during the Review and Matching process.
Complete the other cells on form and click Upload Files button to begin scanning process.

The system will Upload the revised files through the same process as the originals and place the file in the Progress Log for OCR selection and then into Review after Scanning is complete.
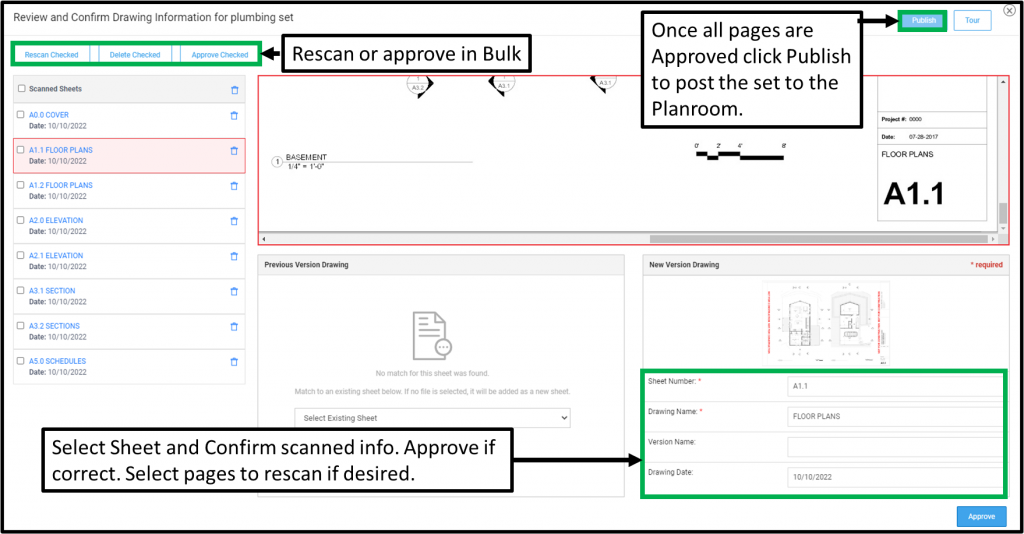
Reviewing Scanned Versions/Revisions.
When you go to Progress Log and click to Review the new version system will attempt to match the Old and New version files by the Sheet number.
- Click on the Sheet to display and compare the old and new data for accuracy.

- Make any needed corrections to the new Version and click Approve by sheet or by using check boxes on left to bulk approve the sheets.
- If sheets are matched incorrectly click after Pick the wrong drawing? Click Here
- This will unmatch the sheet so you can reselect or leave it in the Unmatched section if it should be added to the existing folder as a new sheet, rather than a revision.

- Any sheets that could not be matched or are new will show in the Unmatched Sheet section
- Click to open these and Match to a previous version if needed.

If you have Approved a sheet in error, select the sheet and click on Cancel in lower right so sheet becomes editable again.

After all Matched and Unmatched sheets are Approved, click Publish in upper right hand corner to post the new Version to the Drawing set in Planroom.
Upload Only (No Splitting and Scanning)
- Go to Planroom>Drawing
- Click +Upload and Select the option Upload File(s) without Splitting and Scanning
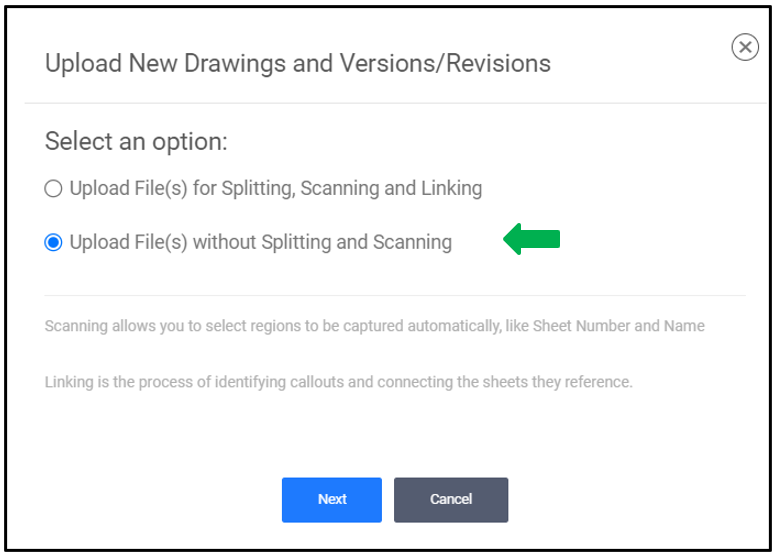
On the Upload screen Select the Folder that contains the Plan Set from the Drop Down.
NOTE * You must select an existing the folder or the revision process will not be activated!
Complete the other cells on form and click Upload Only button to begin file matching.
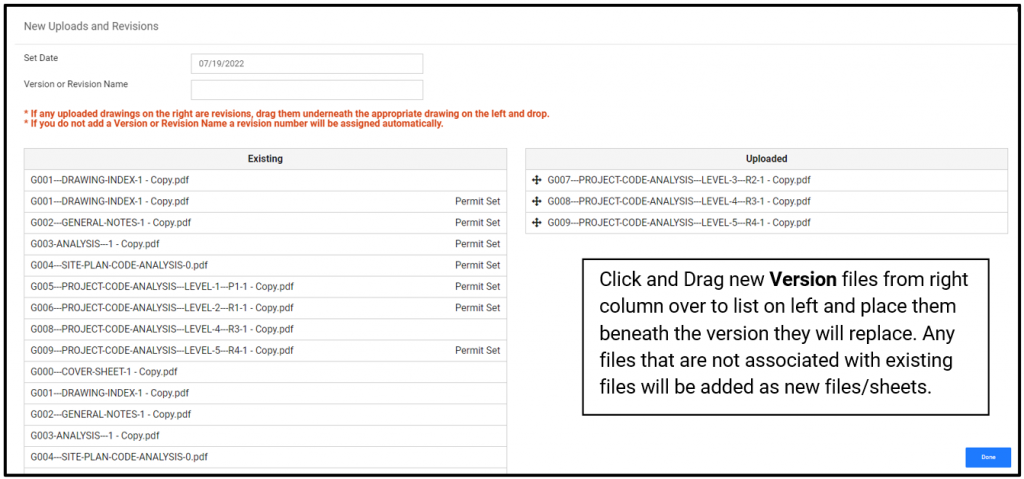
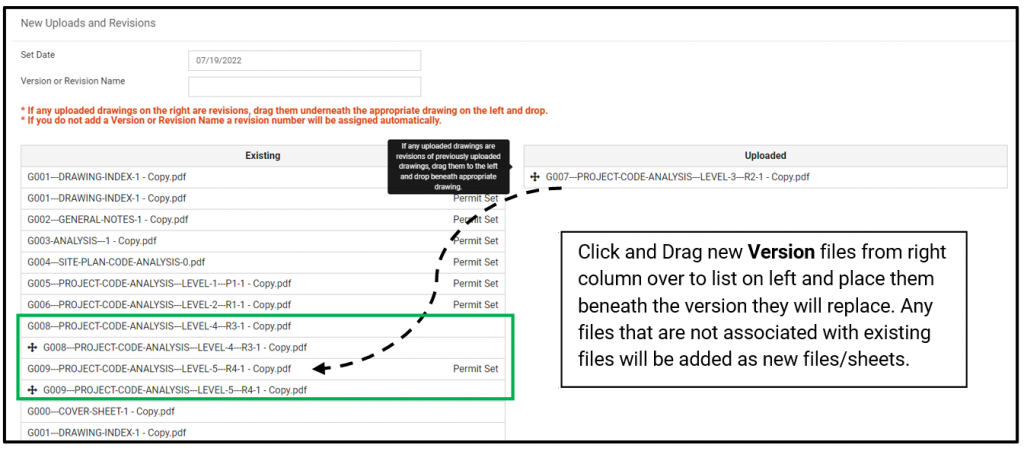
The new Version/Revision matching form will open.
- Click and Drag new Version files from right column over to list on left.
- Position the file directly beneath the file to replace.
- These can be repositioned as needed
- Any files that are not associated with existing files (left on right hand side) will be added as new files/sheets in the existing Drawing Set folder.
- Click Done to commit to the Drawing Set
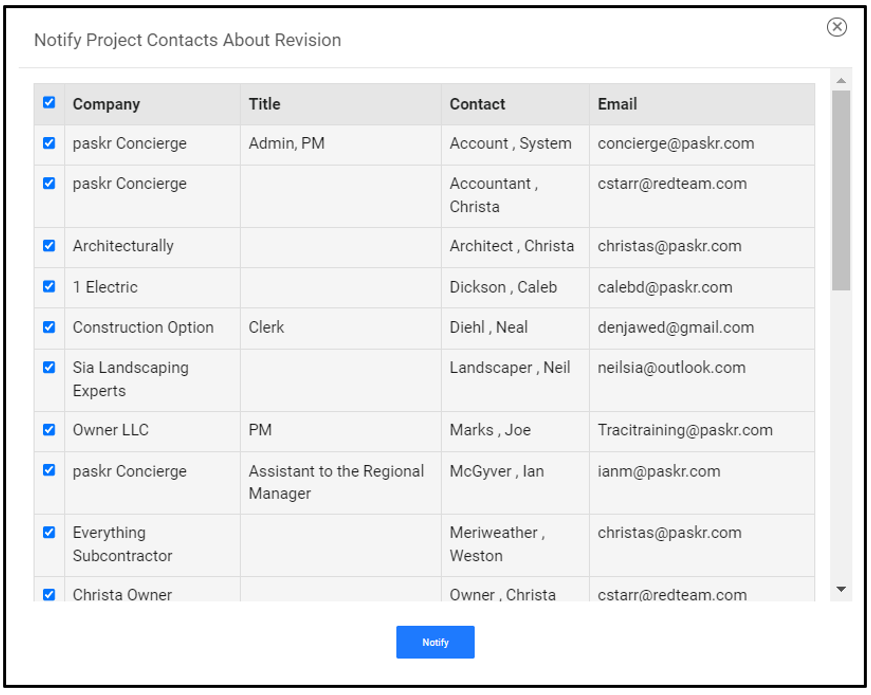
The option to Notify project contacts about the new Versions/Revisions will appear.
Click Notify so send selected Project contacts the email about revised documents.
How do I upload files to Drawings without Splitting, Scanning or Linking?
You can upload original and new versions/revised PDF files without splitting and scanning the files.
- Go to Planroom>Drawing
- Click +Upload and Select the option Upload File(s) without Splitting and Scanning
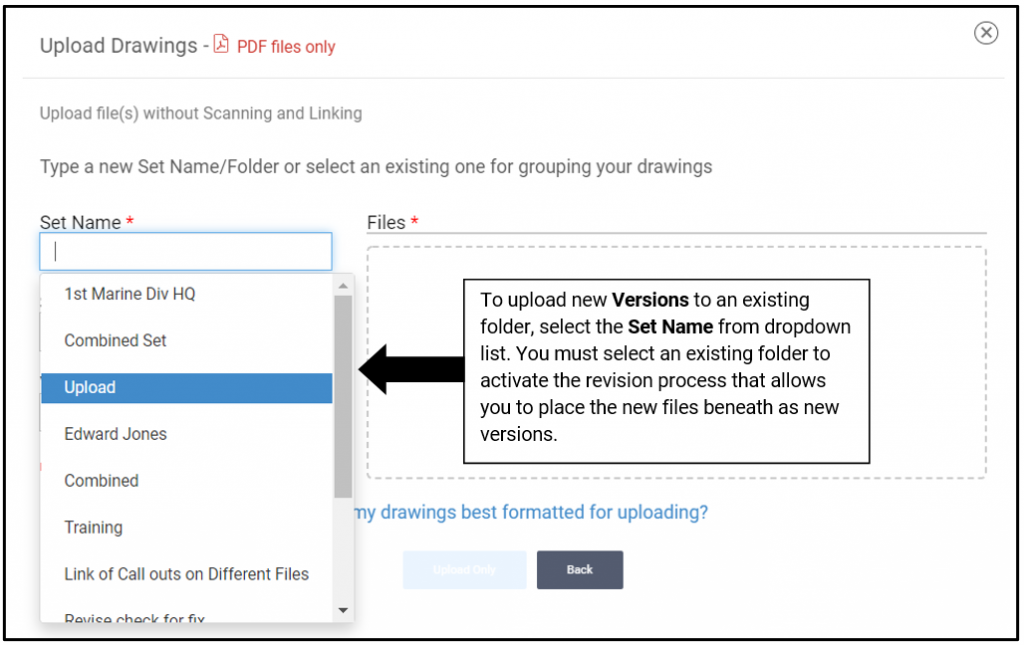
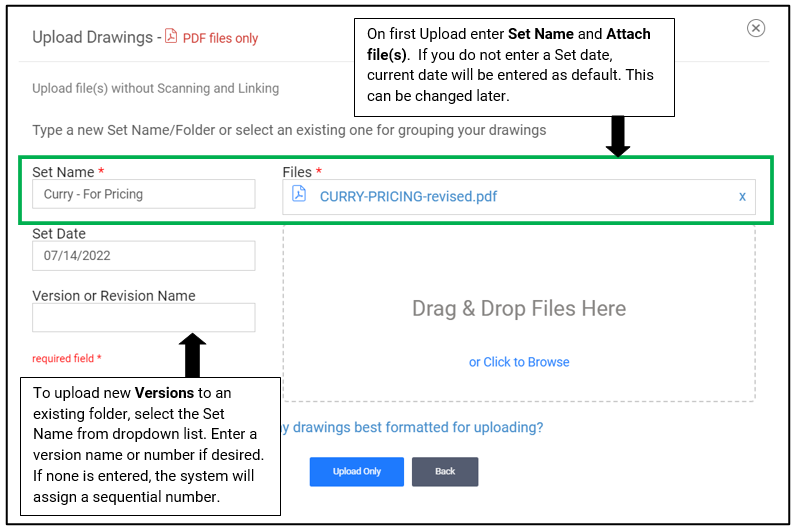
For Original On Upload screen enter:
- Set Name (*required)
- Attach files (*required)
- Set Date (if no Date is entered it will default to the Upload date, but can be edited later on list screen view if not all sheets have the same Set Date.
- Enter Version or Revision Name or Number (optional) – see below for details on uploading new versions.
Uploading New Versions/Revisions
To upload a new Versions or Revisions you will still click +Upload and Select Upload Files withou Splitting, Scanning or Linking
On the Upload screen select the Folder that contains the Plan Set from the Drop Down.
NOTE * You must select an existing the folder or the revision process will not be activated!
Complete the other cells on form and click Upload Only button to begin file matching.
The new Version/Revision matching form will open.
- Click and Drag new Version files from right column over to list on left.
- Position the file directly beneath the file to replace.
- These can be repositioned as needed
- Any files that are not associated with existing files (left on right hand side) will be added as new files/sheets in the existing Drawing Set folder.
- Click Done to commit to the Drawing Set
The option to Notify project contacts about the new Versions/Revisions will appear.
Click Notify so send selected Project contacts the email about revised documents.
How is the Drawing List Screen Organized?

- The GC view of the Drawing List Screen can be displayed in Thumbnail or List view. Use Toggle to switch between viewing Methods.
- Click Upload and select files to be Split, Scanned and Linked via sheet number Callouts or Upload files without Splitting and Scanning. Revisions can be uploaded for either option by choosing to upload to an exisiting Drawing Set folder.
- The Progress Log will display a badge with the number of Sets that are ready for OCR selection or Review before being Published to the plaroom.
- Click Title to open files in Linked view (or as PDF if not linked).
- Use vertical ellipses to access the Annotation feature and Replace options.
- Use the Buttons and Actions menu to Download Zip files, send emails, Delete Re-sort file order, Rename or change dates sheet dates in bulk.
How does Plan Linking Work?
When you Upload and Split a PDF file, in addition to using the Optical Character Recognition (OCR) to scan and name your files, RedTeam Go will also scan for any callouts in your file. If it recognizes existing sheet numbers in the callouts, it will create a link to direct the user to that page upon clicking the link.
After the Upload and Split process is complete, the drawing files will appear in the Planroom folder you named.
- Expand the folder and click on the Ellipses (…) next to any file name and select View
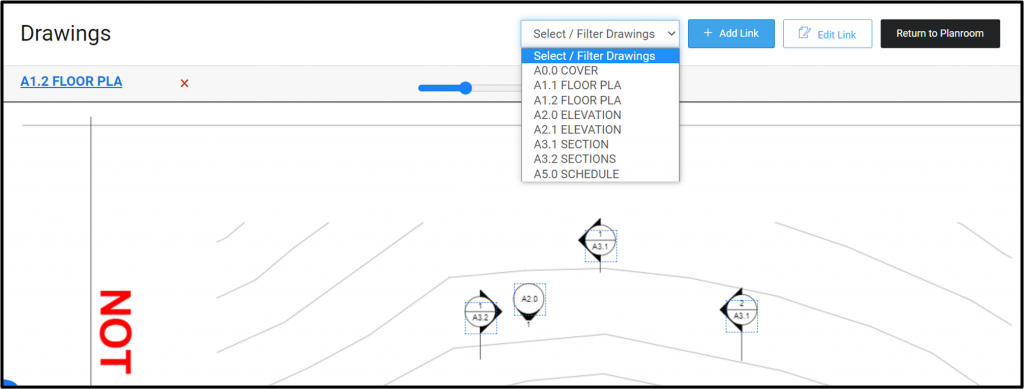
- This will open the drawing files in the Plan Linking View seen below
- All page names will appear in the select/filter drawings drop-down.
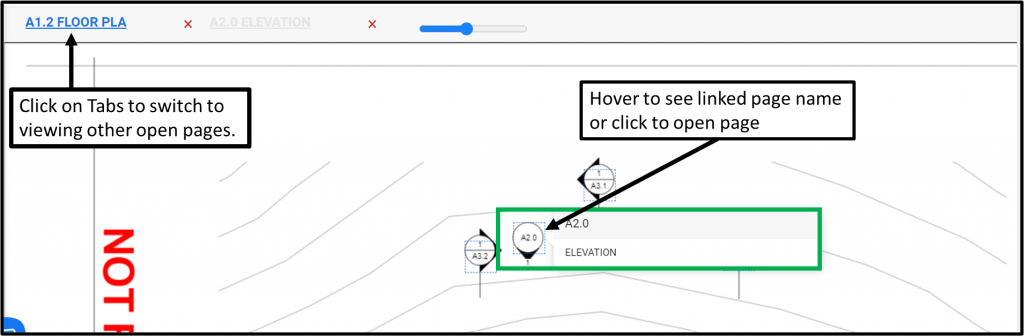
- Click on any callout to open and view the linked page.
- Click on the tabs to above the plan view to switch to other open pages.
- Use the X to close any pages you no longer need to view.
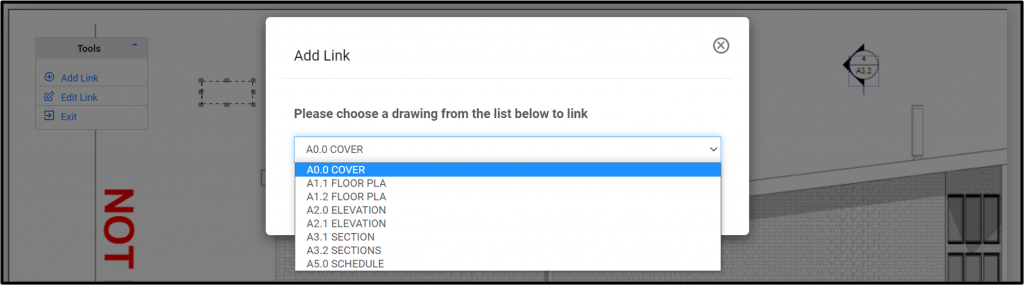
Add Callouts
- If the OCR was unable to read your callout or you wish to link something that is not an official callout click on Add Link
- Use your mouse to click and drag to select the area you want to link.
- When the list of drawing sheets opens, select the page you wish to link and click Submit.
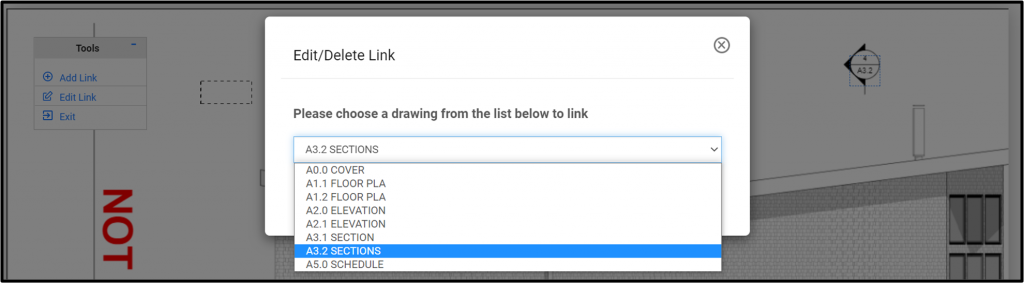
Edit Callouts
- If you have a callout that is linking to the wrong page, or you prefer to link elsewhere, click Edit Links
- When in Edit mode, you can click the existing link and it will open the list of drawing sheets
- Select the Drawing page your wish to link and click Submit.
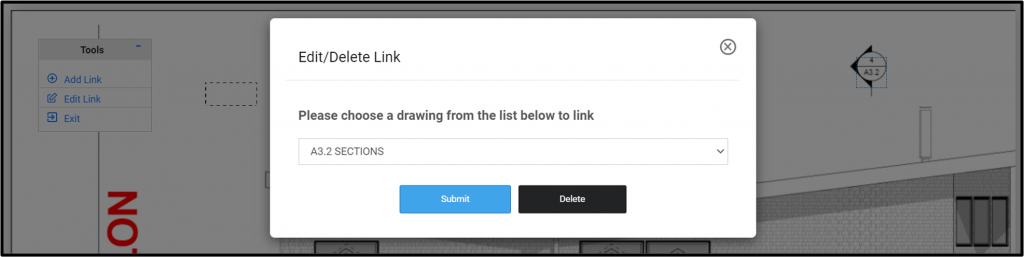
Delete Callouts
- If you wish to remove a callout, click on in Edit Link.
- When in Edit mode, you can click the existing link and it will open the linked drawing sheet.
- Click on Delete to completely remove the link.
What type of files do I need PDF Splitting?
Vector Files are Best
Raster files will not be clear enough for the OCR to read successfully
How do I use the Plan Splitting Feature?
You can quickly split plans and name and number sheets using the Optical Character Recognition (OCR) feature.
To use Plan Splitting go to Planroom>Drawing. Click + Upload>Upload Files(s) Splitting, Scanning and Linking
The Plan Splitting will take you through 3 steps:
- Upload the file(s)
- Select the areas you would like OCR to read
- Review the results and Publish
Upload

Complete the information on the Upload and Scan screen that appears below:

- Set Name – (* Required) Add a new Set/Folder Name or select an existing folder name to add new Versions or Revised documents to that folder.
- Files – (* Required) Upload one or more documents in the files area
- Set Date – (Optional) Enter a default set date, or you will be able to select the date region after upload if you are scanning. If none is selected, it will default to the date of upload.
- Version or Revision Name/Number – (Optional) Enter the version or revision name or you will be able to select the region after upload if you are scanning.
Click Upload Files
NOTE* The screen that is uploading the file to the server must remain open on your screen or the upload will be cancelled!
Once the Upload step is complete, the system will automatically begin to split the file into pages. You will be able to Wait Here for the pages to be split or click Close and Continue if you want to proceed with other work.
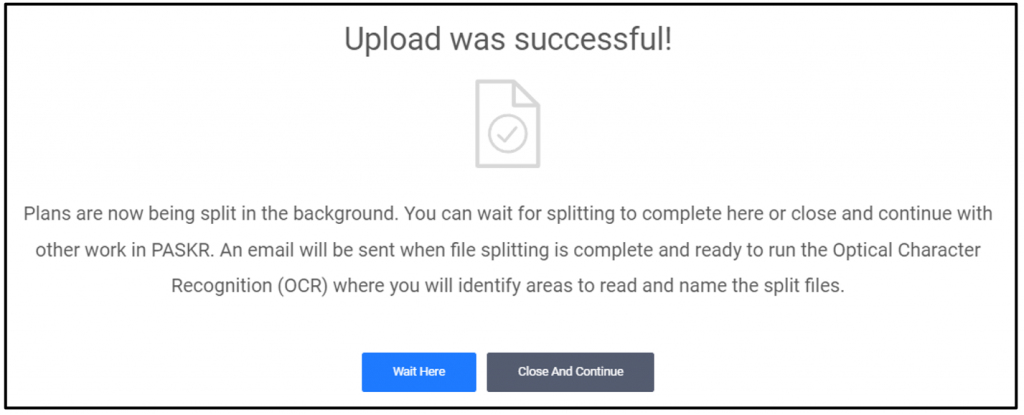
You will receive an e-mail and a task will be posted on your Global Dashboard To Do list when the files have been split and are ready for you to select regions to be read by OCR.
Select Regions for OCR to Read
From the Planroom, click on the green Progress Log button to open the Drawing Progress screen.
Next, click on the word Process in the image below to open the OCR selection window.

This will open the OCR Selection Screen view below:

- The system will select a page at random. If you wish to use a different page, use the Previous Page/Next Page option in the lower left to change.
- To select the region of the plans to read with OCR, click the pencil next to the cell and use your mouse to select the desired region.
- Drag or resize the selection box to adjust the text information captured.
- The arrows will turn to a green check mark when information has been read successfully.
- Click on any double arrows to bypass a cell you do not want to read.
- When all cells have either been scanned or skipped, you will be able to click on the Confirm and Go to Review button.
Troubleshooting:
If the date is not recognized by the OCR, the system will switch to the default date selected during upload or the date of upload if no date was indicated.
The OCR Process searches for and reads text areas. If the document has been scanned, if the lines are not clear, or if the text is part of an image OCR will not be able to identify and read text characters. If this happens, you can bypass the cell and edit during Review.
It is important that the files be Vector based and not Raster based content files for the OCR to read. (See More detailed information about this on the upload screen or at the bottom of this section.)
Click Confirm and Review and you will be given the option to Wait or Close and Continue with other work
You will receive an e-mail and the task will be added to To Do list on Global Dashboard when the files are ready for Review.
Review and Publish
To review the results of the OCR read and file naming, click on the Red Progress button and click the Review Link next to the plan set.

- Review Screen will open with a list of files on left-hand side.
- Click on a file to view details. The information will display and can be edited in New Version section on right.
- Sheet Title and Sheet Number will be combined to create the full sheet title.
- You can manually correct errors by typing into the cells or you can check the boxes next to a sheet and click the rescan selected option.
- This can be done as many times as needed to read all sections.
- Sheets can be approved one at a time or in Bulk with check boxes.
- Once all files are approved, the Publish button will become active.
- You will still be able to edit the files names, and dates from the Planroom folder.
- New Versions and revisions can be uploaded via the Upload button and by selecting the same folder name so the system will match revised sheets by Sheet Numbers.
DETAILS ABOUT DRAWING FORMATS FOR OCR
Are my drawings best formatted for uploading?
PDF files need to have Vector based content for text to read successfully. Raster content is not properly formatted for text reading. Please request Vector-Based PDF files from the design team to use with the RedTeam Go text reading feature.
How can I tell if I have Vector or Raster files?
The easiest way to tell which file type you have is to zoom in on file content. If it is a Vector file, the image will remain sharp, while a Raster file will become blurry or pixilated. Another check is to attempt to highlight text on the drawing with your mouse; if you can’t highlight the text, it is Raster file.
What is the difference between Vector and Raster based content?
Vector Files
Vector files are created from a mathematical model which creates links between two points or a series of points and then displays the line segments between them on your computer. The text needs to have these sharp lines to be read successfully.
Raster Content
Raster files have a series of pixels in the form of a grid of color squares rather than lines of letters, so they cannot be read successfully due to the lack of sharp lines. Any file that is scanned will also have raster content.
AutoCAD Files
In order to use the text reading on files created by AutoCAD, the files must be provided in TrueType font with no alteration from the original font and with a Z coordinate value of zero.
The ‘Text as Comments’ feature should also be turned off before the file is published as a PDF to be used with text reading. To turn off the feature, navigate to the command line in AutoCAD. Enter EPDFSHX and change the value to zero (0).
How do I upload ASI’s?
Go to the Project Planroom>ASIs
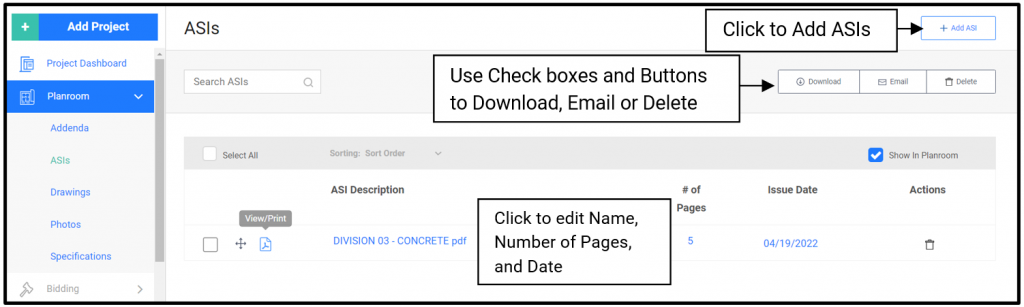
Click + button to Upload ASIs in upper right.
- ASI files will upload with the name of the attachment but can be edited by clicking Name
- Click to change the number of pages included in the attachment (will default to 0 when uploaded)
- Change Date if incorrectly selected during upload.
- Use Sort Icon to change order.
- Click on Paper Icon to view ASIs.
Once uploaded, you can check boxes to left of the ASIs and use Buttons for bulk actions to:
- Download
- Delete
How do I delete a photo?
Click on Plan Room > Photos > Check the check boxes for the ones you wish you email > Actions > Email
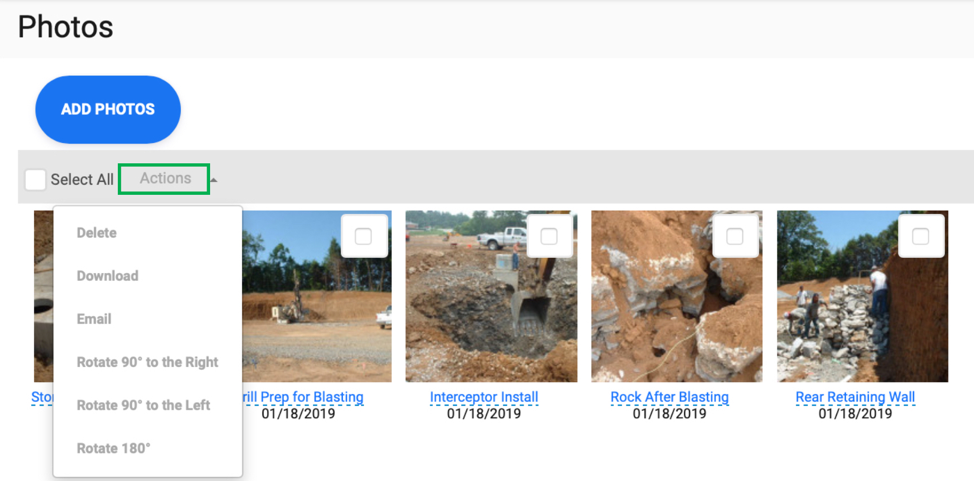
How do I email a photo?
Click on Plan Room > Photos > Check the check boxes for the ones you wish you email > Actions > Email