

- Home
- Upcoming Live Training Sessions!!
- Webinar Recordings
- Implementation Courses
- Getting Started Guide For Admins
- RedTeam Go Navigation
- Gear Icon
- Administration
- Contacts
- Projects
- Planroom
- Estimate (Base Bid)
- Bid Invitations
- Proposal Package
- Construction Buy Out
- Contracts
- Daily Logs
- Photos
- Billing
- Schedules
- Submittals
- Transmittals
- Request For Information (RFI)
- Potential Change Orders (PCOs)
- Change Orders
- Owner Change Orders
- Subcontractor Change Orders
- Internal Change Orders
- Meetings
- How Do I Add Meetings?
- Close Out
- Job Costs (Purchase Orders & Expenses)
- Required Documents
- Accounting
- Reports
- Superintendent
- Subcontractor
- Architect
- Owner
- Mobile
- Release Notes
- Glossary of Terms
- Accounting
Hello. How can we help you?
How Can I View, Edit, Or Manage Answers In RFI?
To view existing RFI’s from the Left-Side menu click RFI’s. Then, from the RFI list, click the Ellipse icon.

Existing RFIs-Click the ellipses next to the RFI to open the menu of tasks.

From the Ellipse Menu, you can Submit, Edit, View/Manage Answers, Delete, add Attachments, or Print the RFI.

Select View/Manage Answers to see Answers and Responses for the RFI.
Answers will appear automatically in the View/Manage Answers section when they are returned. When the answer comes back from the official recipient, it will be marked Answers. Additional comments from other copied parties will be listed as Responses.

GC can:
- View the Answers and Responses
- Add additional Answers (click Gear and select Add Answer)
- Edit Answer or Responses
- Select the name of the respondent if the system could not identify (this may occur if the e-mail address is not in the contact database or if the account is an alias of another e-mail account)
- Select the Final Answer (check box)
- Distribute Answer – When you check an Answer as Final, the system will prompt you to Distribute the Answer to all copied parties.
How Do I Duplicate and Delete Tasks On The Schedule?
In addition to being able to select and move multiple items using the keyboard Shift and Ctrl keys, you can now select and Duplicate or Delete multiple items at once.
- To select multiple items in sequence – Click on the first item, hold down the Shift key, select the last item to highlight all, right-click to see Duplicate/Delete options for selected items.
- To select multiple items that are not in sequence – Click on the first item, hold down Ctrl key, select additional items, right-click to see the Duplicate Delete options.

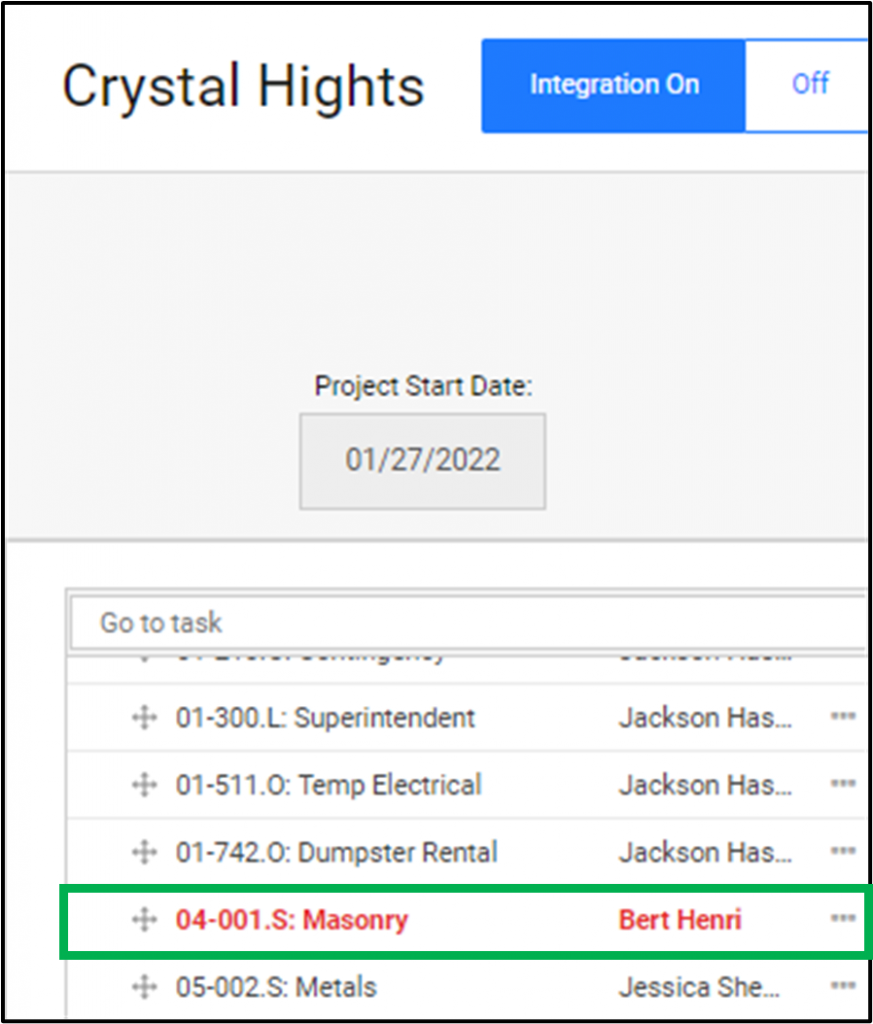
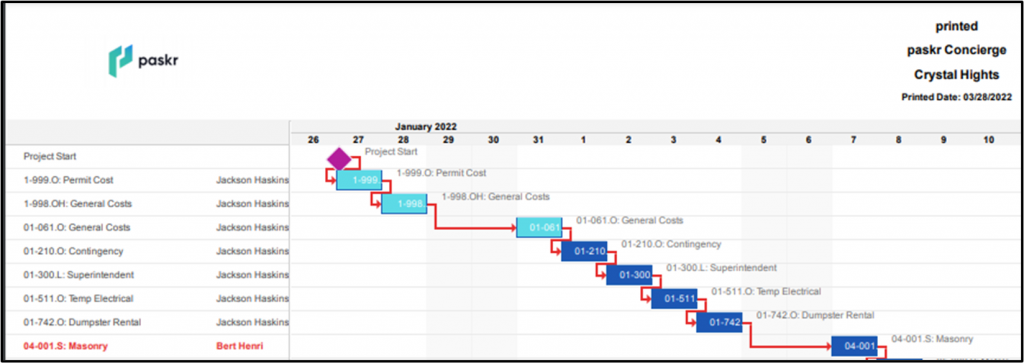
How Do Overdue Tasks Show On The Schedule?
A Due Date can now be set for Items in the Task Window. When the due date passes, the item will be marked Overdue so they can be seen on the Schedule and Print documents. To remove the Overdue notice and turn that task black on the Schedule, clear out the Due Date cell.
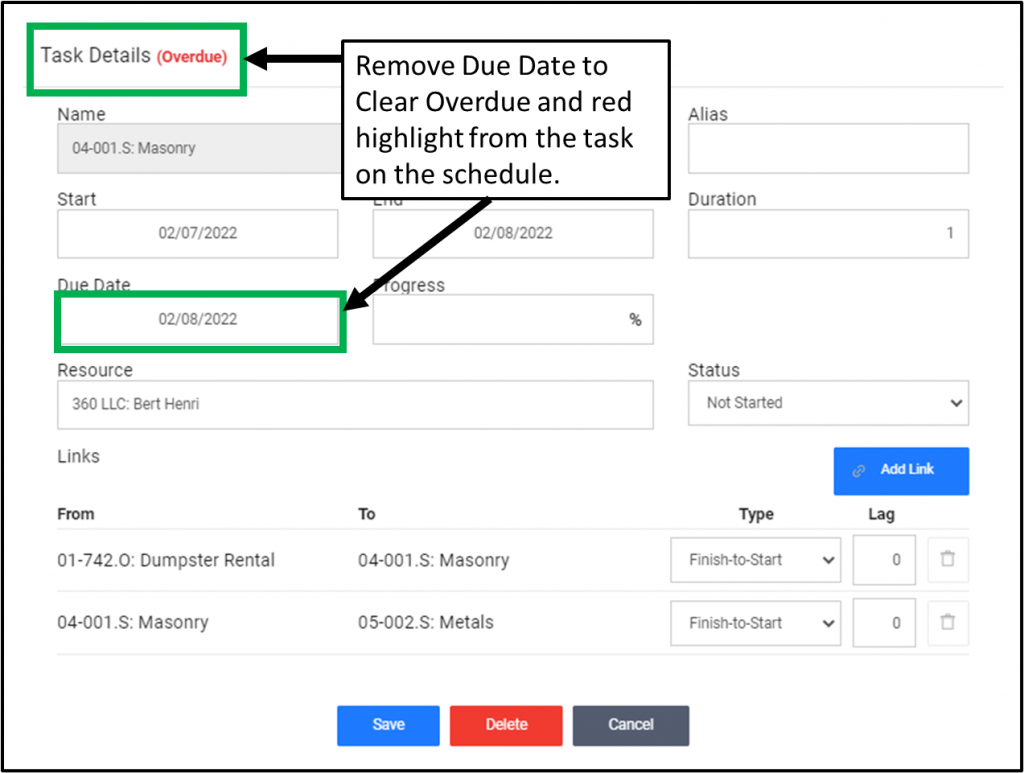
Overdue Tasks will also show red on both the Schedule view and Printed versions of the Schedule.
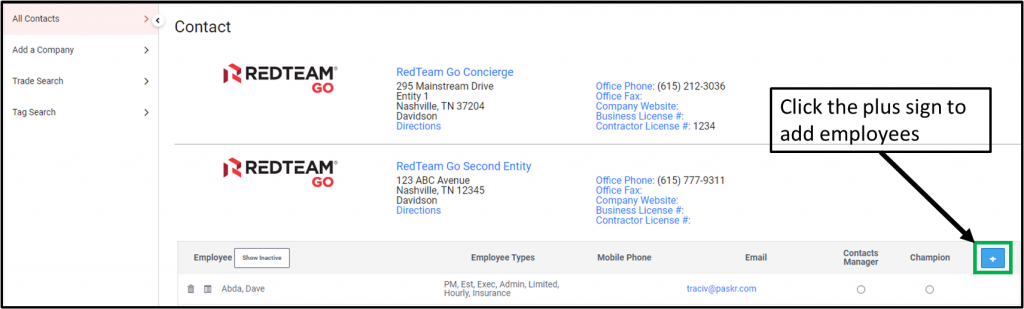
Adding your Company Employees to your new RedTeam Go site.
You’ve just purchased your RedTeam Go software, and now you are ready to use it.
Let’s take a look at the first few steps you will take to begin using your new tool. You would have received your Username and Password after your site was built. We recommend after receiving the email with your Username, Password, and the URL for your RedTeam Go site, that you save your URL as a favorite on your Web Browser.
When you login for the very first time you will land on your Global Dashboard.
Step 1: Adding your Company Employees to your new RedTeam Go site
Follow these instructions to add your company employees:
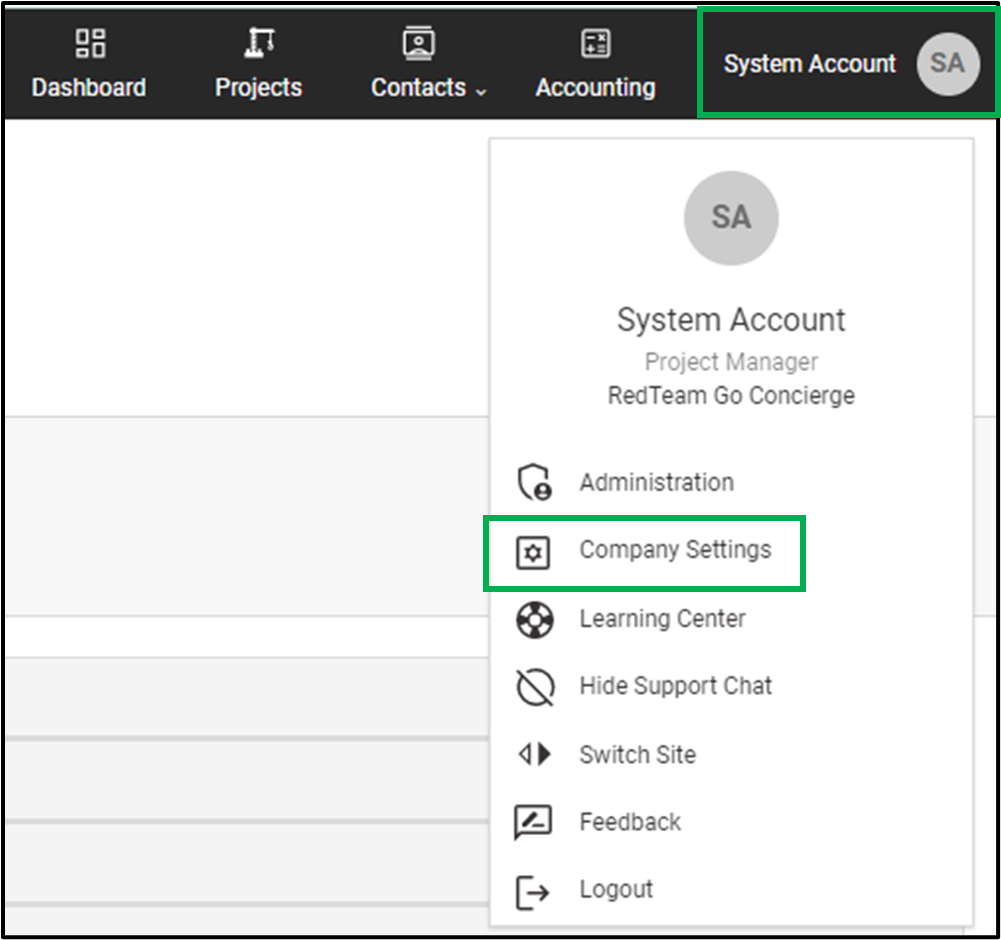
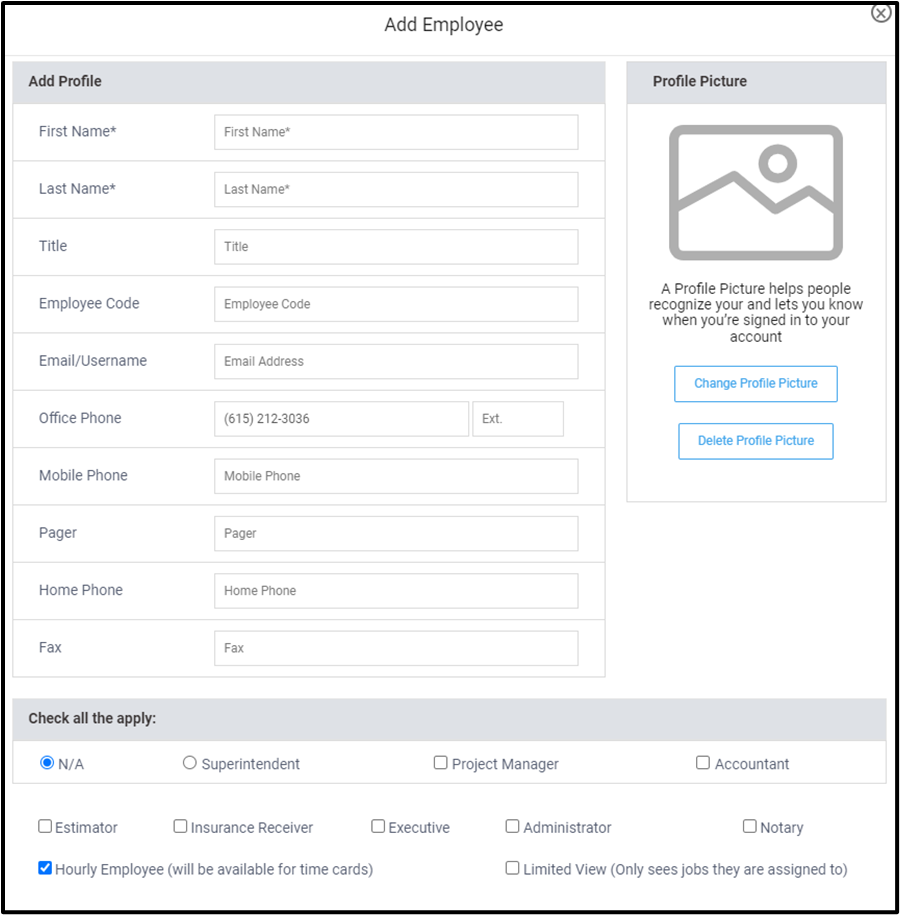
- Go to Profile>Company Settings>Click the + sign to Add a New Company Employee>Complete the form including their RedTeam Go rights at the bottom of their screen.
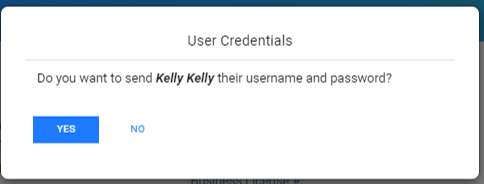
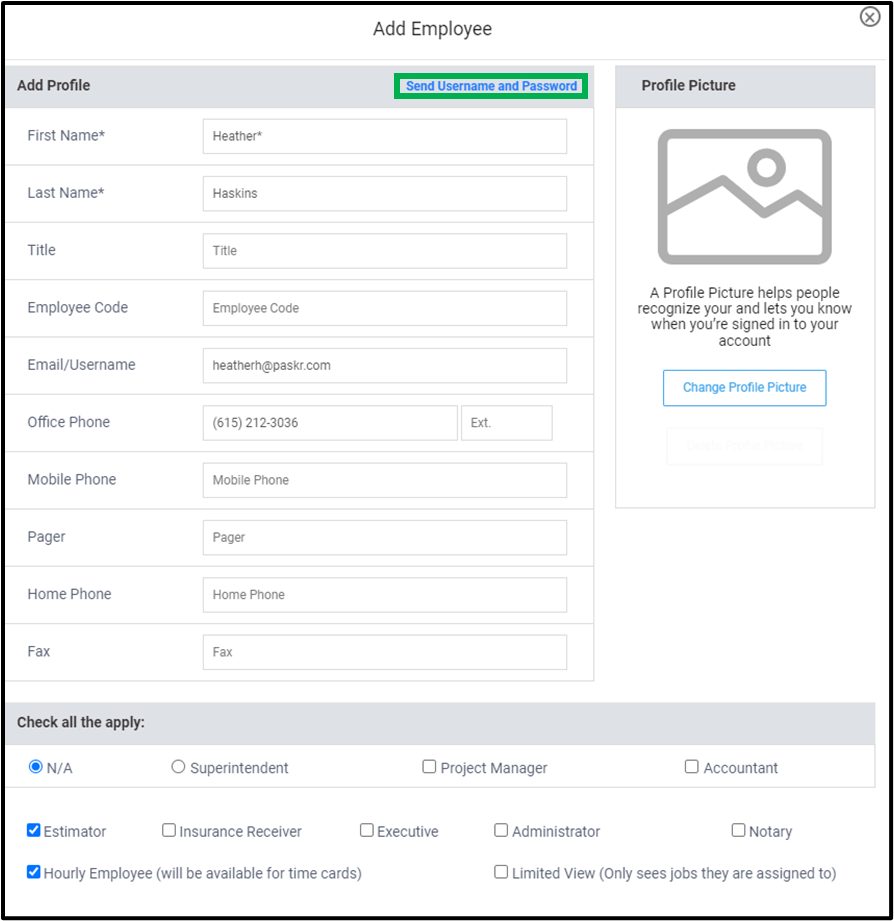
- Send the employee their Username and Password. You will be prompted to do so after filling out their employee information window. However, if you need to send it to them again click on the blue hyperlink “Send Username and Password”.
Employee Rights
Superintendent – Reports to the Project manager. Responsible for Daily Logs, Time Cards, Progress Photos, can initiate RFI’s, can issue Field PO’s and enter their Expenses.
Estimator – Creates New Projects in RedTeam Go. Responsible for the Bidding process, preparations of the Estimate, developing the Scope of Work and Proposal Package. Controls the flow of communication while the project is in the Bidding and Pending Statuses. Will be designated as the Estimator on a Project Information page. Can do all tasks in RedTeam Go that a Project Manager can do except update the project schedule.
Project Manager – Can also create a new project in RedTeam Go. Controls the flow of communication when the project is in Will Start Soon and In Progress statuses. Will be designated as the Project Manager on a Project Information page. Can do all tasks in RedTeam Go that an Estimator can do as well as all Project Management tasks.
Accountant – Responsible for Approving Owner Bills, and/or Notarizing them. Receives all information about project budget changes. Can do all tasks in RedTeam Go that a Project Manager can do except update the project schedule.
N/A type – has no rights in RedTeam Go.
*Note – you cannot be a Superintendent and a Project Manager. If an employee is both defer to the Project Manager role. A PM can do anything a Super needs to do. Project Managers approve documents submitted by the Super.
*Note – you can be a Project Manager and an Accountant – it is a dual role in RedTeam Go. Accountants will approve/accept documents submitted by the Project Manager.
*Check any boxes that apply in addition to selecting Project Manager and Accountant. You may have as many boxes checked as needed for each employee.
Insurance Receiver – updates General Liability and Workers Compensation insurance certificates for Subcontractors.
Executive – can go any role that an Estimator or PM would do. Likely that they would have all of those boxes checked. The Executive view of the Global Dashboard will be of the company as a whole, as opposed to an Estimator/Project Manager role that would see information specific to their projects.
Administrator – has all rights an Estimator or PM would do. As well as, has the ability to update Global Settings and set program defaults in RedTeam Go, such as update mark-ups, add/remove/manage cost codes, estimate templates, trade types, expense payment types, employee wage rates, etc. Any item updated under Settings>Administration. Typically a specific small group of Sr. company employees would have this designation.
Hourly Employee – employees that will keep time cards or be marked on Daily Logs as present on site. *Note: Even if salaried…if you want them to code time against a cost code so you can prepare better estimates, they would need this designation.
Notary – notaries can enter their notary information and will be able to notarize Owner Bills & Sub Lien Waivers electronically.
Limited View – projects will only show on the project list if that employee is listed on the project’s Project Information page.
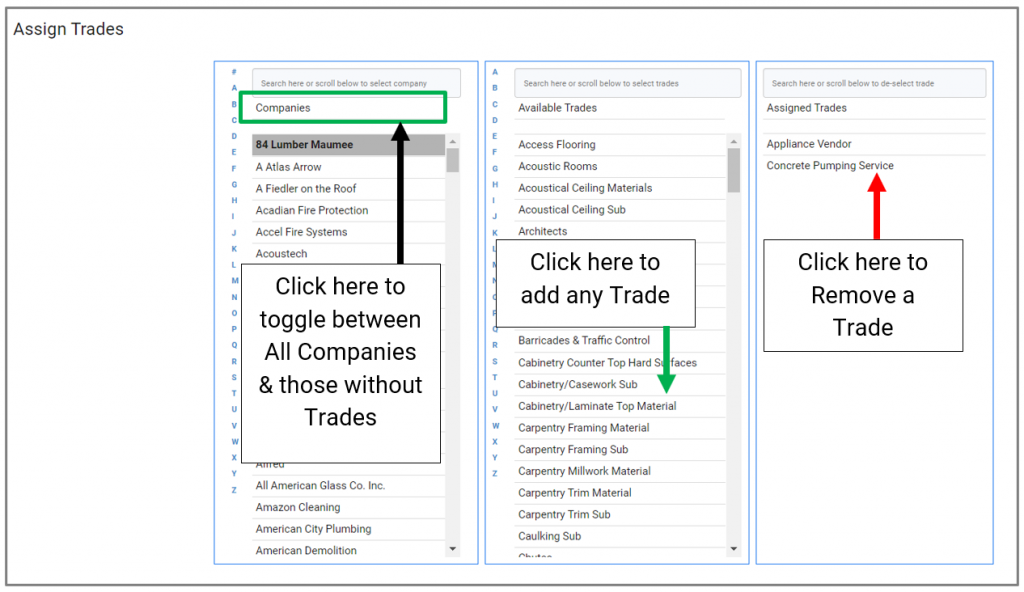
Assigning Trade Types to contacts.
How to assign a Trade Type to your contacts.
Once you have your contacts uploaded into RedTeam Go, you will need to assign a Trade Type to that company. A Trade Type in RedTeam Go is a Trade category that includes all the 16 Division and 48 Division cost codes that a company can perform. Assigning the Trade Type allows the company to be able to be invited to bid on any cost code within that Trade which is being used in a project.
Here’s how you Assign Trades:
Click on Contacts>Assign Trades
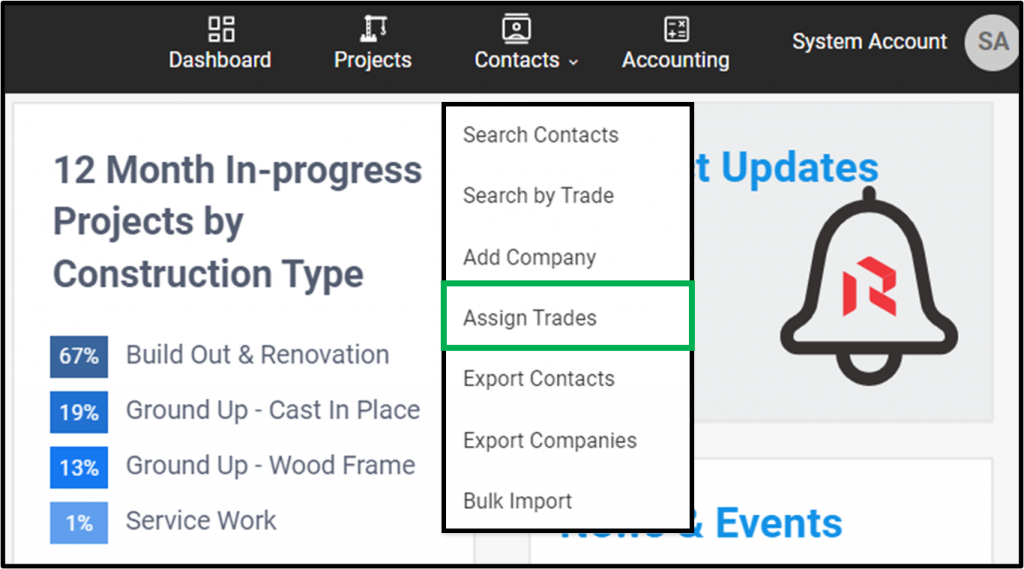
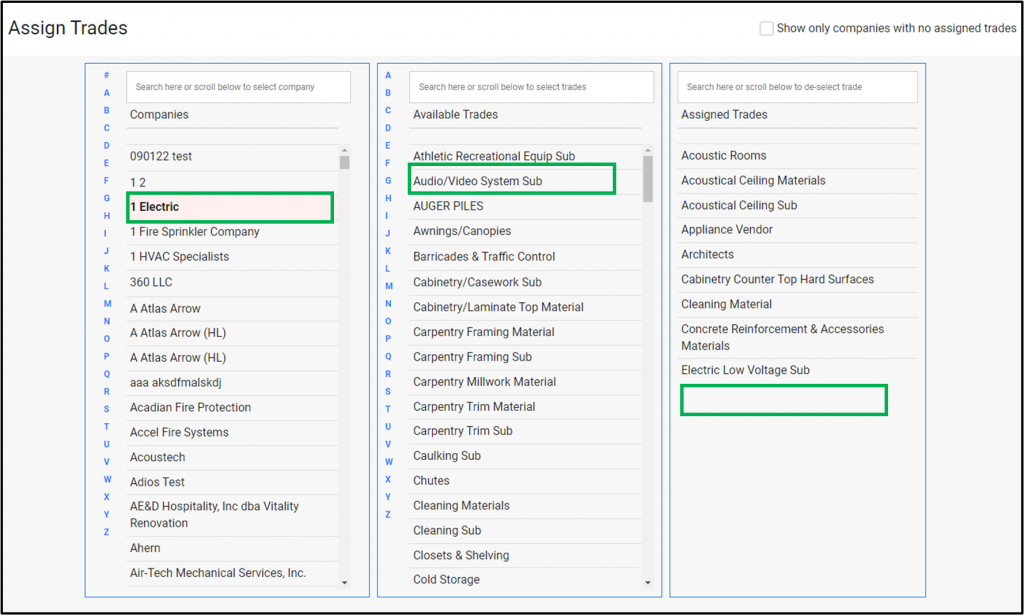
Click on Company Name in the Left Column>Select Trade in the Middle Column>It will be added to the Company in the Right Column
Do Projects have a Dashboard to provide important details to the Project Manager?
The Project Dashboard is designed to display important information in each of the project statuses. As the project moves through its lifecycle in RedTeam Go, Tasks, To-Do’s, Updated Profit, and Project Progress will display in the information cards on screen.
From the left-side menu click Project Dashboard>Select Project

The Dashboard for the selected project will display. The screen below is a sample Project Dashboard for bidding phase and contains the project information and cards.

NOTIFICATION BAR
At the top of the Project Dashboard the Overdue Items count for the project will appear in red in the notification bar. From the task menu, click on the Overdue Items to be taken directly to the tasks.

PROJECT INFORMATION CARD
This card displays the information about the project including project name, project address, project picture/logo, GC name, and estimate template used to create (type). There are links that allow a user to edit the GC name and update the project information.

PROFIT AND SUMMARY CARDS
These cards vary for each status—Bidding, Pending, Will Start Soon, and In Progress.
In Bidding, Estimated Profit card includes profit, profit percentage and project total amount. (NOTE: This does not include the overhead percentage (OH). The OH percentage value is on the Estimate Summary Details (click the icon to display).


In Pending, the Estimated Profit Summary is the same as bidding. The Pending card has links that will direct the user to the Owner Contract area when clicked. Additional details are revealed when clicking the icon.

In Will Start Soon, the profit card can also be expanded by clicking the icon to open drill down.
The Profit card includes bid day profit and budgeted profit from the original budget report and the Will Start Soon card will permit the commencement date to be edited.

In Progress, the Profit summary contains bid day profit, budgeted profit, and projected profit from the budget report. The In Progress detail card can also be expanded by clicking the icon to open drill down.

TASK CARDS
Tasks will reveal any current status task requiring action. These cards will update with tasks depending on the current project status. Task name, along with the total number of tasks to be completed, will appear in Tracking if they do not have a due date. Items with due dates will be tracked and appear in the Overdue column if not completed. When you click on the task hyperlinks, the modals will open to direct you to the outstanding tasks. When you click on the hyperlink in the Tracking column, you will be directed to the task’s page.

TO DO ITEMS CARD
This card allows a Project Manager to create and display to do items for GC employees only. Users without Administration/PM access will only see their own assigned tasks. GC employees with Administration/PM functionality will see all to do tasks for the entire project.

Adding New Item
- Click Assigned To field. A list of suggested names from project contacts (see below) will appear. Select name or add to GC team section if they do not appear.

Select Due Date field for or type the date in RedTeam Go date format (MM/DD/YYYY).

- Enter the task description then click Save.
- Saved to do item will appear on the Ongoing list.
Update To Do’s
- Click item to edit or delete to do.
- Click check box to mark your item as complete. PM can mark other user’s tasks as complete as well.
Show Completed To Do’s Toggle
- Click the toggle button to switch view between Ongoing and Completed To Do lists.

Search To-Do Items and Filter button:
- If you want to look for a specific to do item, select the toggle for ongoing or completed items. Type the name of the contact to filtered automatically.

Click Filter button to sort by date, contact or ongoing/completed items. Select or enter at least one option, and click outside the box to filter automatically.

PROJECT TEAM CONTACTS CARD
Project contacts will display at the bottom of the Project Dashboard.
- Project contacts will appear on the list as they are assigned. Example: As a project is created the GC Estimator and Owner roles are assigned. Once assigned they will show on the Project Team. Subcontractors will show on the list as contracts are awarded/locked. Vendors appear as PO’s are approved. To add additional contacts, click the contact icon to add or edit contacts (GC Team, Owner/Client, Architect, Subcontractor, or Vendor contacts).

Click on the dollar clock symbol to edit hourly rates for GC employees on this project alone.

CHANGE PROJECT STATUS
- Change the project status from the Project Dashboard! Click the current status hyperlink. Then click to move to the next status.

Accounting Integrations
Click below for more information on our accounting integrations.
Quick Books Online Integration
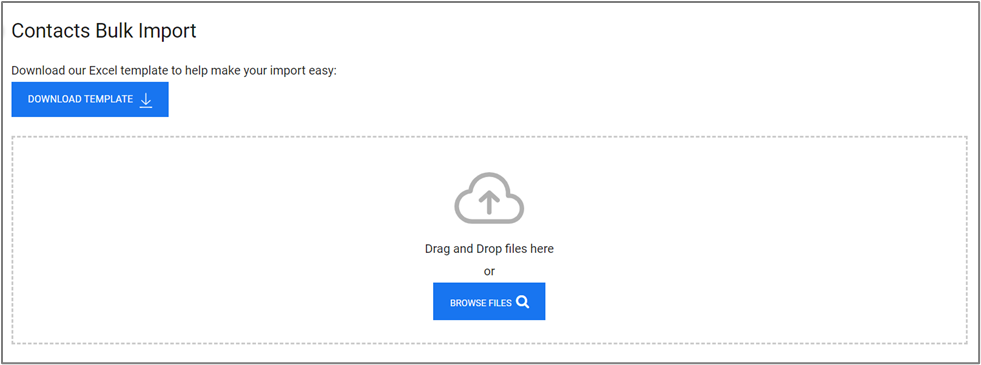
How Can I Bulk Import my Contact list?
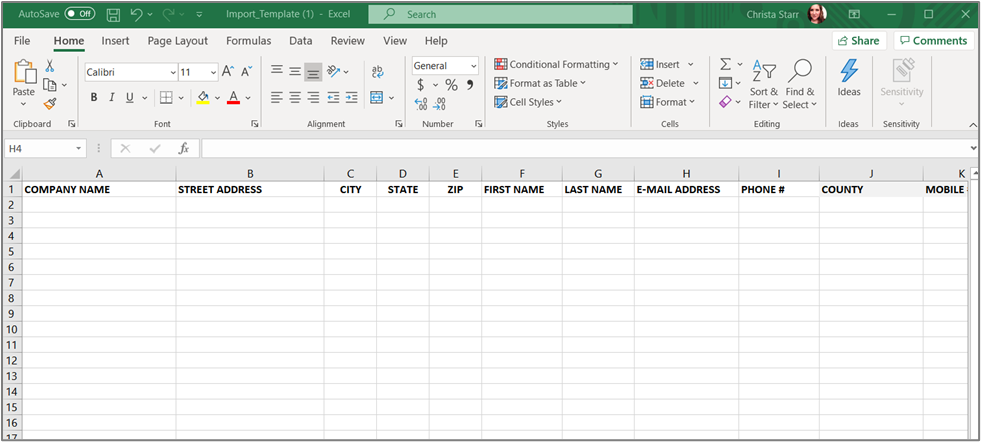
To import your contacts database into RedTeam Go quickly and efficiently, use the Bulk Import Template shown below or arrange your current Excel or .csv file with the same headings as the attached list.
Helpful Hints:
E-mail address – This is the most important piece of information you can include! Without it there is no way to invite your contacts to use RedTeam Go or communicate during the course of your projects! It is much faster to add e-mails to your database before import so it is worth the time to collect prior to import!
Complete information pays off – RedTeam Go will auto populate your contracts and documents with Company names, Contact names and Address information so including this information will issuing contracts quick and easy!
1.) Contacts>Bulk Import Use the provided template to prepare your contact list
- If you have multiple employees from the same Company, be sure to include the same Company Name on each Employee line so the system will know to nest those employees under the same Company listing.
- Be sure to include a heading line in Row 1 for easy matching
- You will be able to add missing information after import
2. Drag and Drop or Browse to locate the contact import
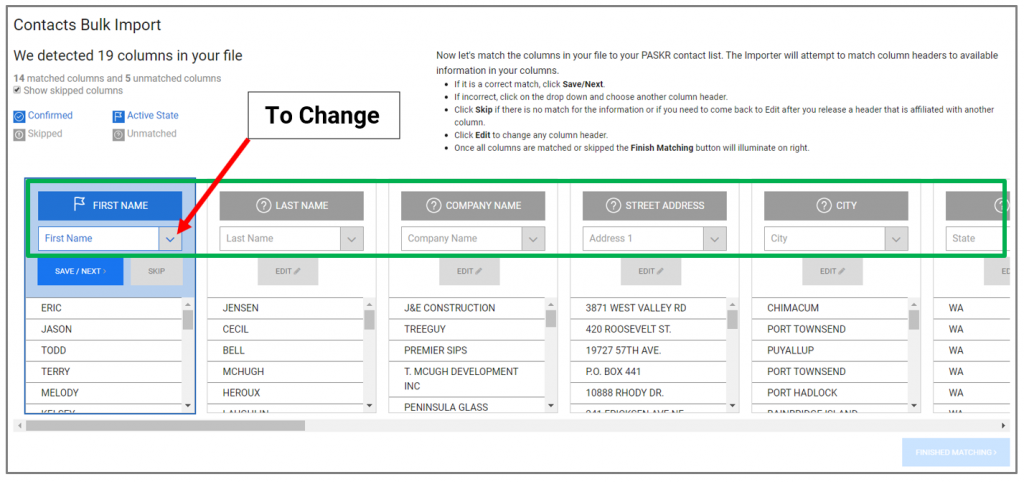
3. RedTeam Go will attempt to match the headings in your Import to the corresponding column in your worksheet.
4. Start on the left to confirm or correct these columns
5. If the top cell description matches the second line click Save and Next and repeat to work across each column
6. If the data match is not correct click on the 2nd line toggle to change.
7. Click Skip if there is no matching column or you need to come back and Edit after releasing a header affiliated with another column.
8. Click Edit to make changes on any column header.
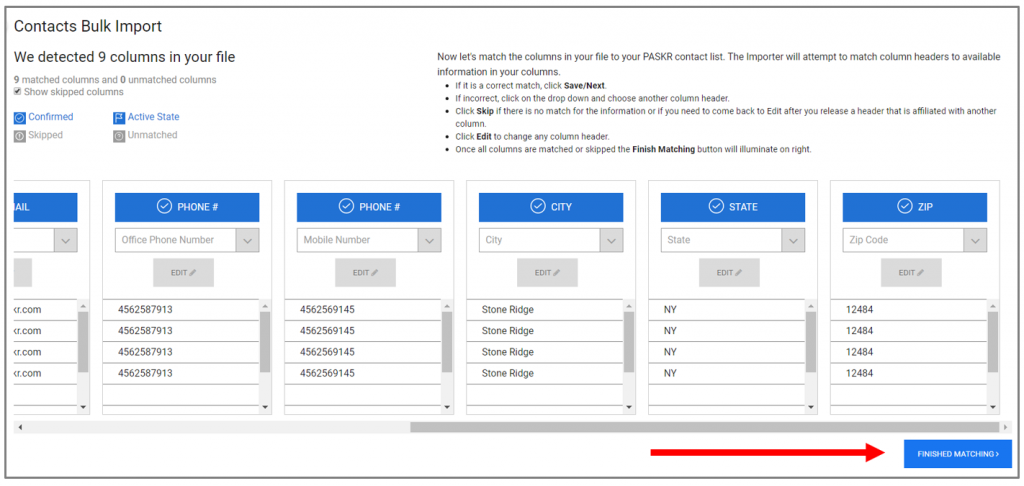
9. Once all Columns are matched or skipped, Finished Matching button will illuminate.
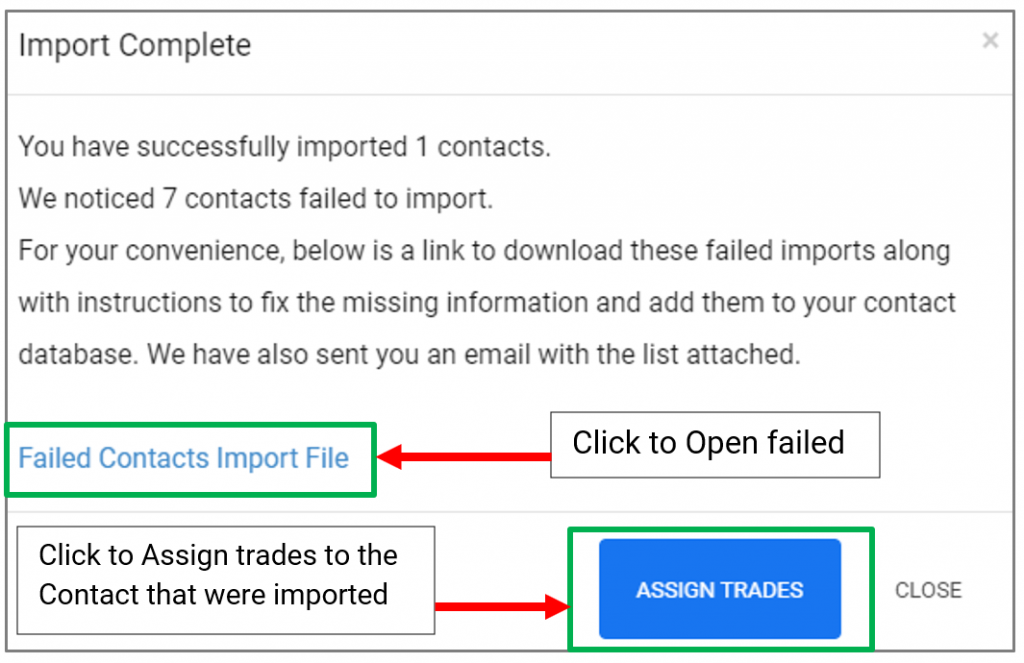
You will see a confirmation for how many contacts imported or failed due to missing information.
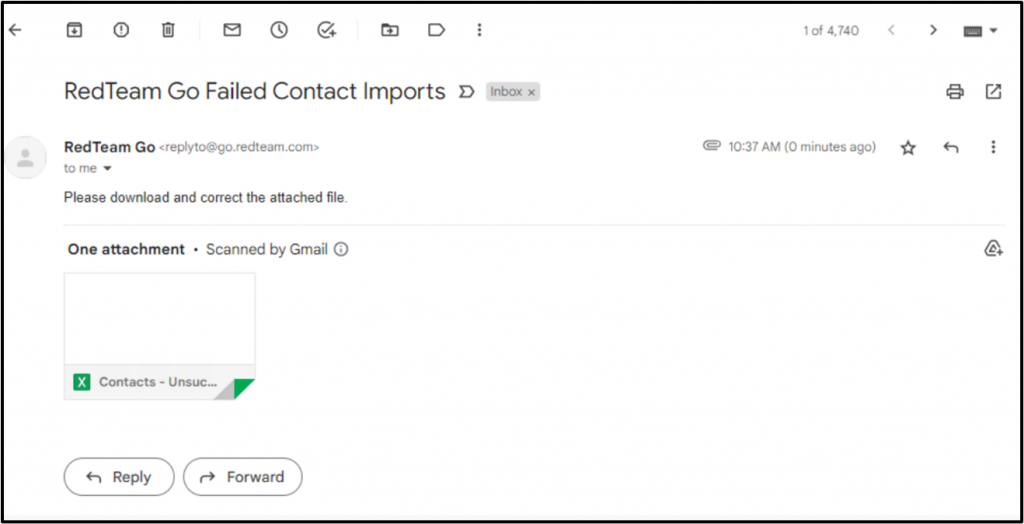
10. Click the hyperlink to download the form of Contacts that were not imported. You will also be sent an e-mail of the Failed Contacts Spreadsheet.
Check your Junk and Spam folder if you do not receive the email. It will come from RedTeam Go App with the Subject: RedTeam Go Failed Contact Imports
Click on the Assign Trades button to begin to affiliate Subcontractor and Vendors with their Trades
- When you come from Import link the page will show Companies (Without Trades) in the first section. You can toggle between all Companies in your contact database and those without any trades by clicking on the word Companies
- Click on a Company Name to expand the Available Trades and Assigned Trades sections
- Scroll down the list of Trades or use the search bar to select the Trades from center section and click to assign.
- Each Trade already has appropriate 16 and 48 Division cost codes assigned to them.
- Adding these Trades makes it possible to invite subcontractor and Vendors to submit bids on these items and permits you to award Subcontracts on the appropriate cost codes.
- To Remove a trade, click on the name in the far-right column to remove any trades you do not want assigned.
- To return to this screen when not using Contact Importer go to Contacts>Assign Trades on the top navigation bar.
Potential Change Orders (PCOs)
How do I create a Subcontractor / Vendor only PCO (Potential Change Order)
Why create a Potential Change Order (PCO) before a change order
How do I create an Owner initiated Potential Change Order (PCO)?
What is shown in the Quote Letter to Owner B report?
Reports > Owner Proposal > Quote Letter to Owner B
This is a standard Quote Letter addressed to Owner B with their Proposed Contract Amount. (Reports > Owner Proposal > Quote Letter to Owner B)
